Have a large customer list from a previous system? Helcim's import and export tools can be a huge time-saver. This guide shows you how to import and export customer profiles (names, addresses, etc.) in bulk.
It also explains the specific use case for exporting customer credit card tokens for your records and clarifies how to properly migrate payment data if you need to move it to or from another service.
In this article
Importing customer profiles
Use this tool to migrate your list of existing customer profiles—their names, contact details, addresses, and customer codes—to your Helcim account.
Set up the import file
Open the All Tools menu, and then select Customers.
Click Import / Export.
Choose Customer Import.
Select the import type (CSV or QuickBooks Desktop) and click Next.
Fill in the import file
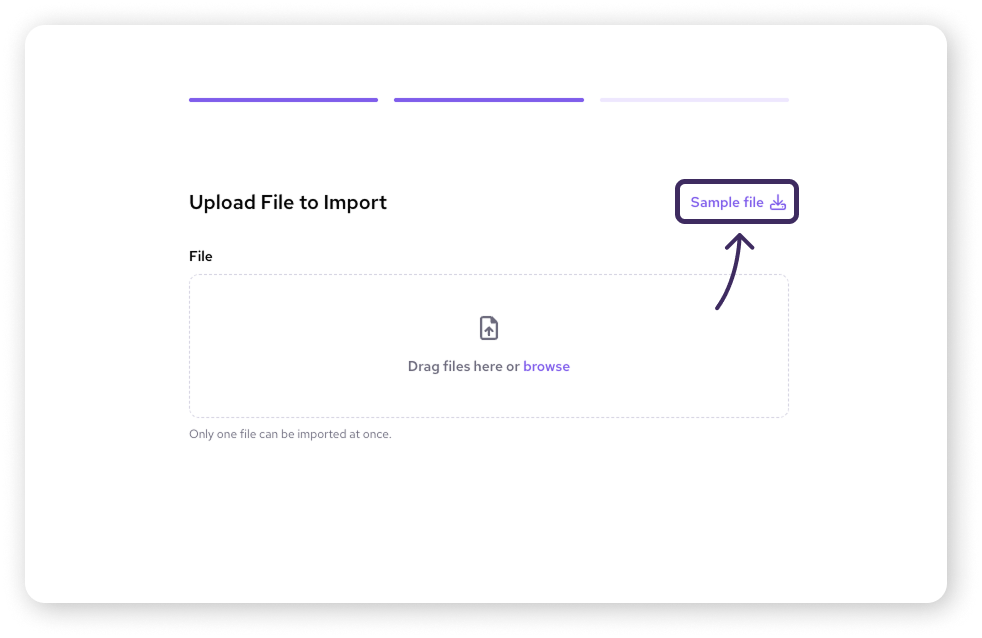
If this is your first time importing, download the Sample File provided on the import page.
Click the Sample file to download the file.
Open it and add your data in the provided columns.
We recommend importing 500 - 1000 entries at a time to prevent the import from failing.
| Make sure your data is formatted exactly like the sample, including column headers. Incorrect formatting is the most common reason imports fail. |
Upload the import file
Once your file matches the sample format, click Browse, select your prepared file, and click Open, then Next.
Review the data preview screen carefully to ensure everything looks correct.
If it looks good, click Confirm. If you need to make changes to your file, click Back.
You'll see a confirmation message once the import is successfully processed.
Exporting customer profiles
Need to download your customer information for use in another tool?
Open the All Tools menu, and then select Customers.
Click Import / Export.
Choose the data set you want to export:
Customers: Exports profiles including code, names, billing, and shipping details.
Credit Cards: Exports a list including customer code, names, card tokens, last four digits, expiry, and key dates (created, updated, last used).
Customer Card Count: Exports a simple list of customer codes and the number of cards saved for each.
Select the export file type you prefer (CSV or QuickBooks Desktop).
Confirm the email address where the export file should be sent. This defaults to your account email but can be edited.
Click Export.
The system will prepare the file and email it to the specified address once ready.
Migrating credit card data
The tools described in this article are primarily for importing/exporting customer profiles. If you want to export a customer’s credit card data in full, you’ll need our support team’s help.
Securely migrating customer credit card data from another payment processor is a separate, assisted process handled by our team to ensure the highest level of security and PCI compliance.
| To learn about this secure process, please see our dedicated guide: Migrate customer credit card data. |
Special considerations for QuickBooks
If you're using Helcim’s integration with QuickBooks Online, the direction you sync data matters for compatibility:
Workflow: To ensure QuickBooks recognizes customers and updates correctly, you generally need to import customer data from QuickBooks into Helcim first. You can then make changes or add payment details in Helcim and export the updated information back to QuickBooks.
Why: QuickBooks may not properly recognize or integrate customer profiles that were created only within Helcim and then exported to QuickBooks for the first time. Starting the data flow from QuickBooks is recommended.
Next steps
Need to import or export credit card data? See Migrate customer credit card data.
Need to manage just one or two profiles? See Add, edit, and merge customer profiles.
Using QuickBooks? Check out our detailed QuickBooks Integration Guide
FAQs
What format does my import file need to be in?
The easiest way to ensure correct formatting is to download the Sample File provided during the import process (Step 4). Your file's columns and headers must match the sample exactly.
Can I import credit card data into my account?
No, you cannot import credit card data using the self-serve Import / Export tool. Securely migrating credit card data is an assisted process. Please contact our support team to get started, and read our guide on migrating customer credit card data.
Can I use the 'Credit Card Export' file to move my customers' cards to another payment processor?
No. The tokens generated by Helcim are specific to our system and will not work with other platforms. The 'Credit Card Export' is for record-keeping only. You must contact our support team for assistance with migrating usable payment data.
My QuickBooks import didn't work correctly. What should I check?
Data must generally originate in QuickBooks, be imported to Helcim, then updated information exported back to QuickBooks. Creating customers only in Helcim and exporting them might cause issues.
How long does it take to receive my exported file?
Exports are usually processed quickly, but larger files might take a few minutes. The file will be sent to the email address you confirmed during the export process, so check your inbox (and maybe your spam folder).