It’s time to try a payment with the 2nd generation card reader. Whether you're at the counter or tableside, the process is designed to be quick for you and secure for your customers.
This guide covers how to start a sale in the app, how your customers will interact with the physical reader, and how to finish the transaction with a digital receipt.
Processing a transaction
To start a sale, ensure your reader is powered on and the status in your Helcim POS app shows as Connected.
In the Helcim POS app, enter the transaction amount or select items from your catalog.
Select Charge.
The app will communicate with the reader. Once they are synced, the reader's screen will display the total and prompt the customer to pay.
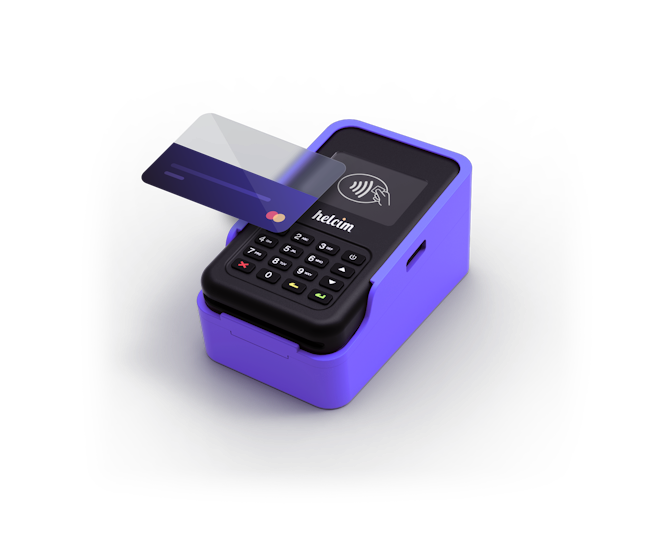
The customer can either Tap their card at the top, or Insert their card into the bottom.
Your app will show a screen that says Waiting for Reader.
Using the physical keypad
While many customers prefer to tap their cards or phones, the physical keypad is essential for larger transactions or debit card payments.
Chip & PIN: If the customer inserts their card, the reader will ask for their PIN. They can use the tactile number buttons (0-9) to enter it securely.
Confirming: After entering their PIN, the customer must press the green return button to confirm.
Correcting errors: If they make a mistake while typing, the yellow clear button will delete the last digit, and the red cancel button will stop the transaction entirely.
Handling tips
If you have tipping enabled in your Helcim Account, you can choose whether the customer selects their tip on your device (phone/tablet/computer).
You can turn your device toward the customer to let them select a tip on the screen before they move to the card reader.
Sending receipts
Once the transaction is approved, the Helcim POS app will give you the option to provide a receipt to your customer immediately.
Email: Type in the customer's email address for a professional, digital receipt.
SMS: Enter their mobile number to text them a link to their receipt.
Print: If you have a receipt printer connected to your workstation, you can print a paper receipt from the approval screen.
Processing Payments in Terminal Mode
The Helcim Card Reader gives you the option to initiate payments in two ways: either directly from the reader, or from the Helcim POS app.
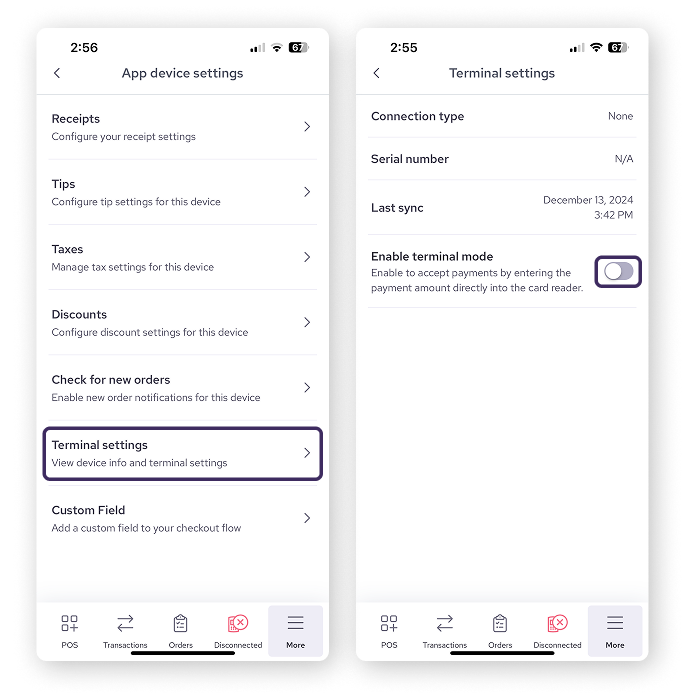
If you'd like to use the card reader on its own, you can switch to terminal mode in your App Settings.
Mobile or tablet
Select More
Select Settings
Select App device settings
Select Terminal settings
Tap the toggle to Enable terminal mode
Desktop or laptop
Select More
Select Terminal Settings
Click the toggle next to Terminal Mode
| When terminal mode is turned on, you can enter the sale amount directly into the card reader, and your customer can complete the transaction by entering their payment details. This is especially useful for mobile transactions, or at events or pop-up shops. |
Next steps
If a transaction doesn't go through—perhaps a card is declined or the "Alert Irruption" message appears—head over to our guide on Troubleshooting the Card Reader (Gen 2) for a list of common error codes and their fixes.
FAQs
What is the maximum amount for a "Tap" payment?
This limit is set by the customer's bank, not by Helcim. If a transaction is over the "Tap" limit, the reader will prompt the customer to Insert Card and use their PIN instead.
Can I use the reader to process a refund?
Yes. You will start the refund process in the Helcim POS app. When prompted, the customer can tap or insert their card into the reader to receive the funds back.
Can I use Helcim Fee Saver to surcharge with the 2nd generation card reader?
No, but you can surcharge with the newer 3rd generation card reader.
To learn more about the new reader, visit this article.