Ready to set up a temporary hold on a customer's credit card? Creating a pre-authorization with Helcim is a straightforward process, whether you're using the Helcim POS App or the Virtual Terminal. This ensures funds are available for a future charge without actually processing the payment yet.
In this article, we'll walk you through the steps to create a pre-authorization using both methods.
Create a pre-authorization in the Helcim POS app
You can easily process a pre-authorization directly through the Helcim POS app, including on the Helcim Smart Terminal.
Mobile version
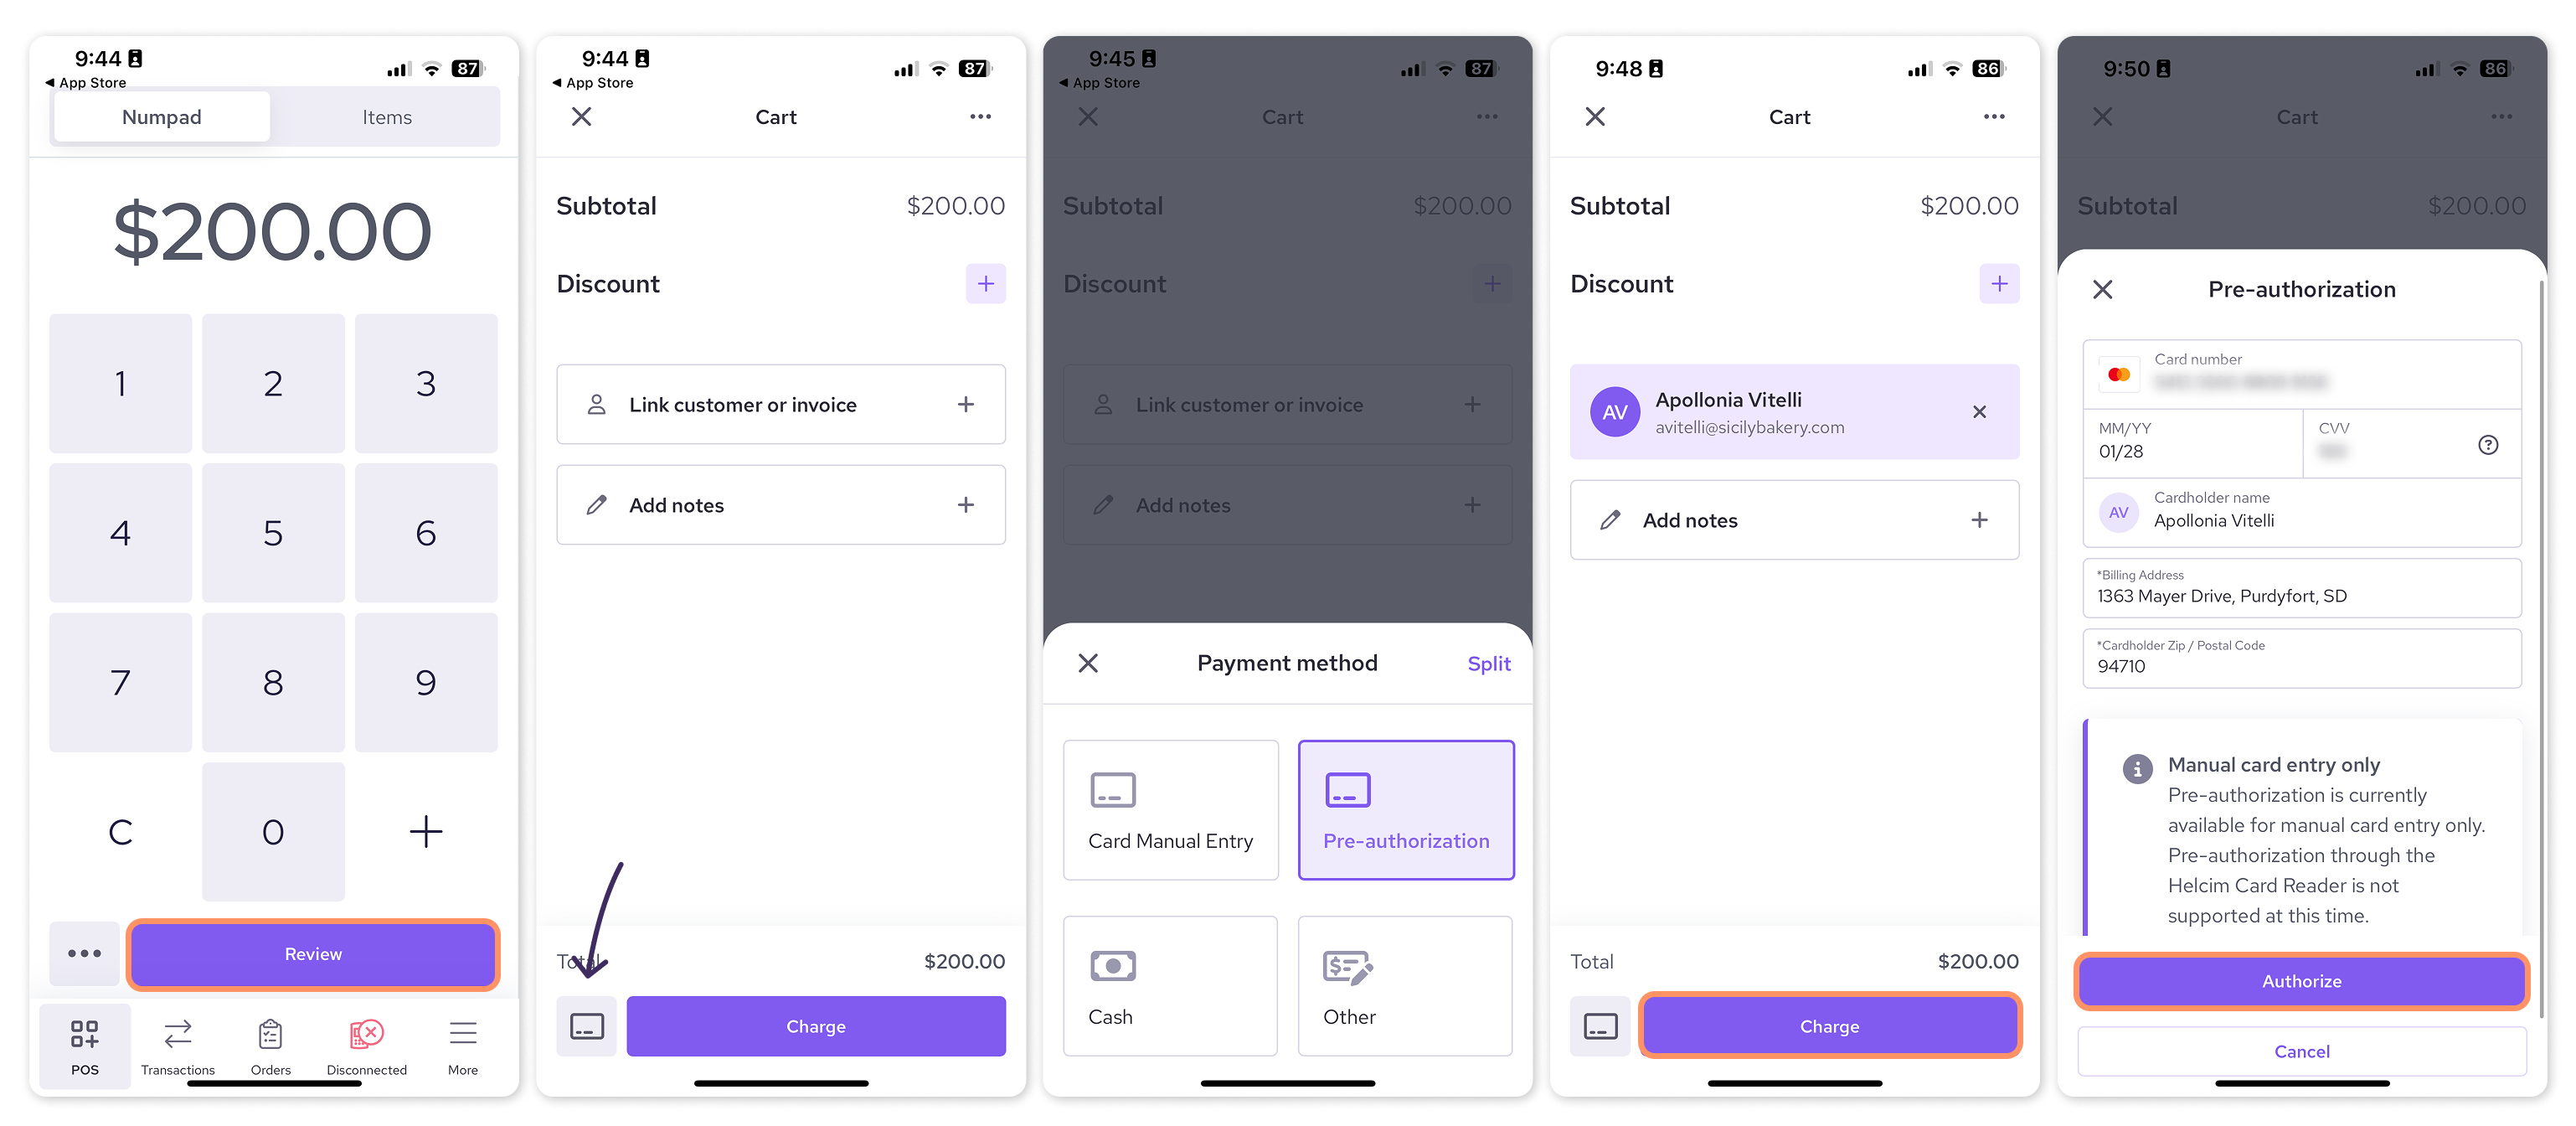
Open the Helcim POS app.
In the POS tab, enter the amount you wish to authorize and select Review.
Tap the icon in the bottom left-corner to select a Payment Method.
Select Pre-authorization.
Optional: Select Link customer to link an already saved customer and their card details.
Select Charge.
If your customer is new, enter their card details through manual entry.
Card details will already be filled in for a saved customer.
Tap Authorize to complete the pre-authorization.
Desktop version
Open the Helcim POS app.
In the POS tab, enter the amount you wish to authorize.
Click the Payment Method dropdown to open it (this will say your default payment method, e.g. ‘card reader’).
Select Pre-authorization.
Optional: Select Link customer to link an already saved customer and their card details.
Select Charge.
If your customer is new, enter their card details through manual entry.
Card details will already be filled in for a saved customer.
Tap Authorize to complete the pre-authorization.
Once processed, the pre-authorization will be valid for seven days. You will need to capture the transaction within this period before the pre-authorization expires.
Create a pre-authorization in the Virtual Terminal
You can also create a pre-authorization using the Helcim Virtual Terminal from any web browser on your computer or mobile device.
Log in to your Helcim account.
Open the Virtual Terminal (via the All Tools menu).
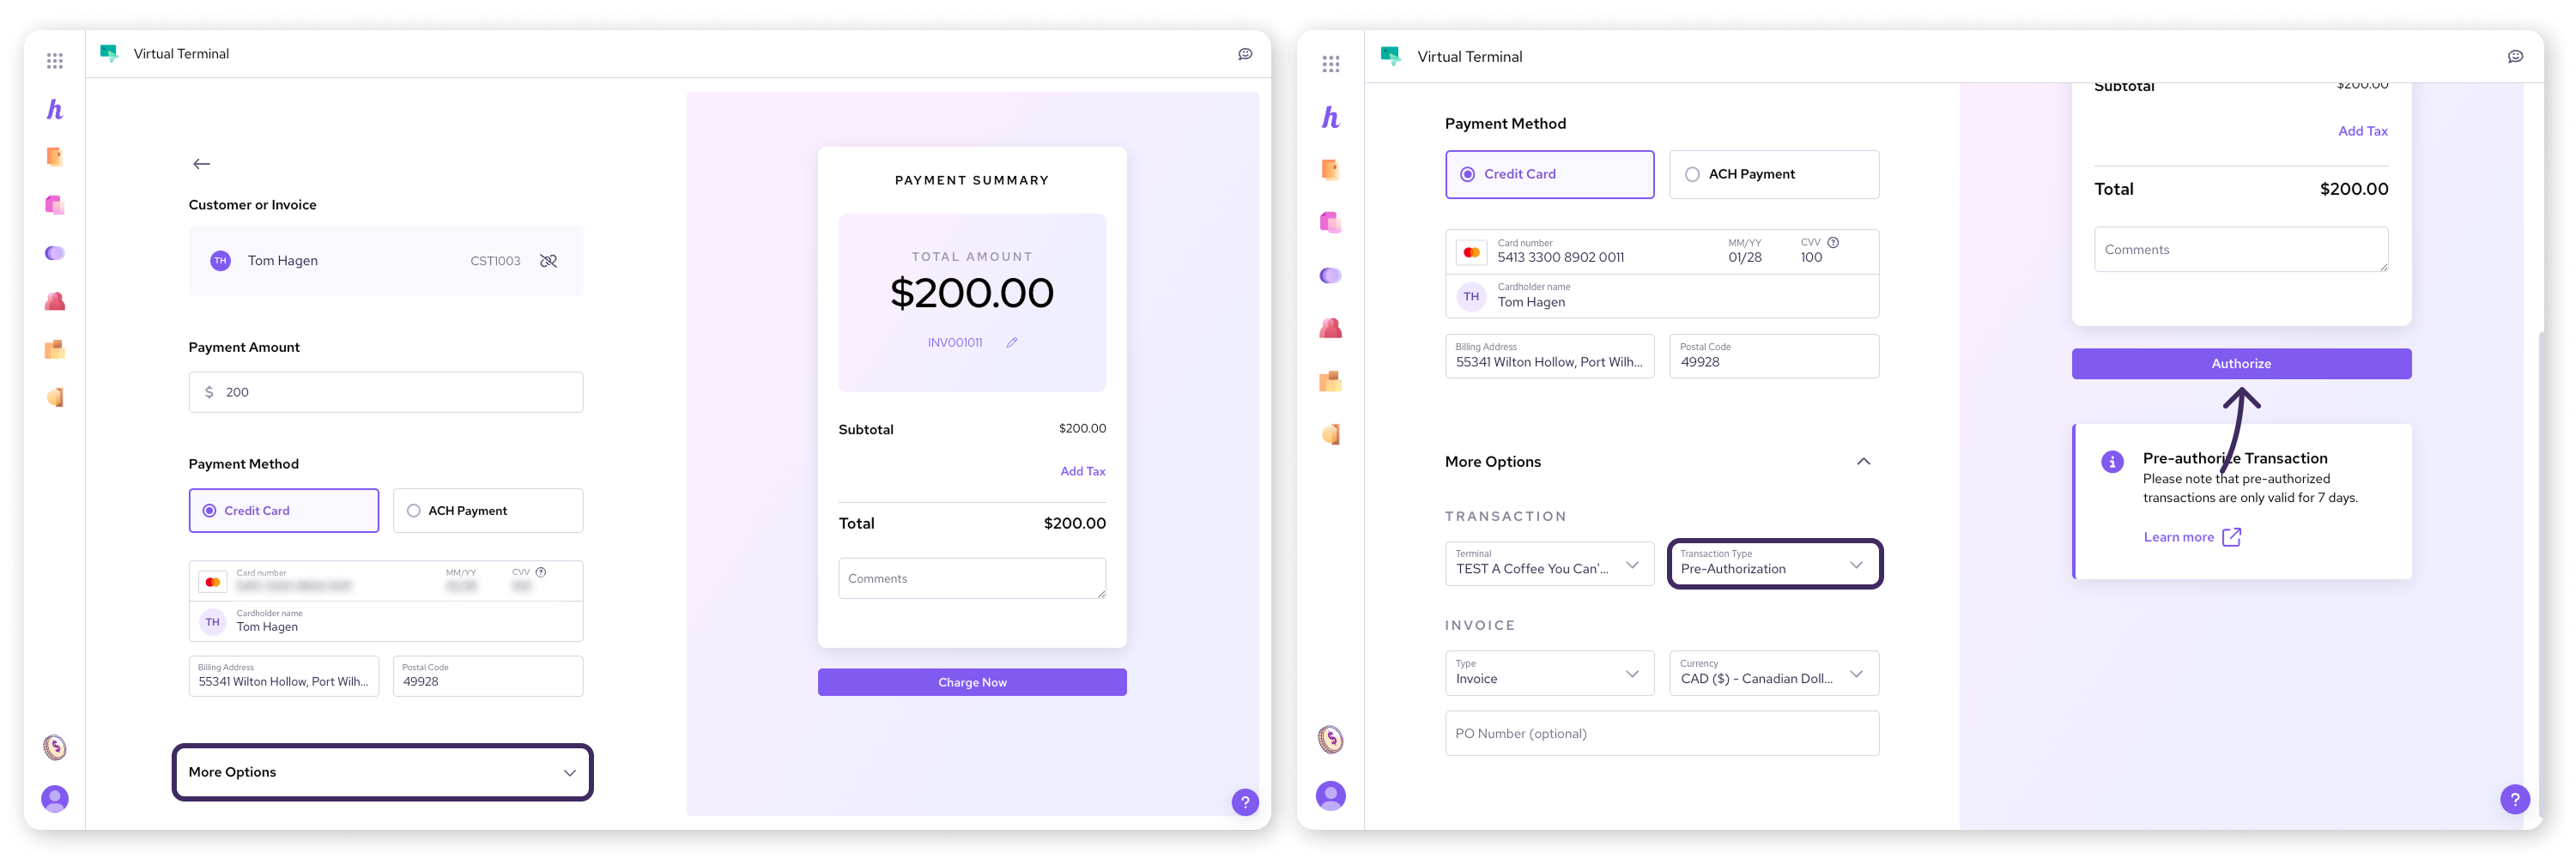
Optional: Select Attach to link a saved customer and their card details.
Enter the transaction amount.
Click More options to expand it, then change the ‘Transaction Type’ to Pre-Authorization.
If your customer is new, enter the customer's credit card details.
Card details will already be filled in for a saved customer.
Click Authorize to complete the pre-authorization.
Create a pre-authorization using a Helcim Payment Page
Helcim Payment Pages offer a great way to collect pre-authorizations directly from your customers online. You can configure a payment page to set a temporary hold on their card when they submit payment details.
Log in to your Helcim Account
Open the Payment Pages tool (via the All Tools menu).
Click New Payment Page.
Choose your desired page type.
If you select Customer registration, the transaction type will automatically be set to Pre-authorization.
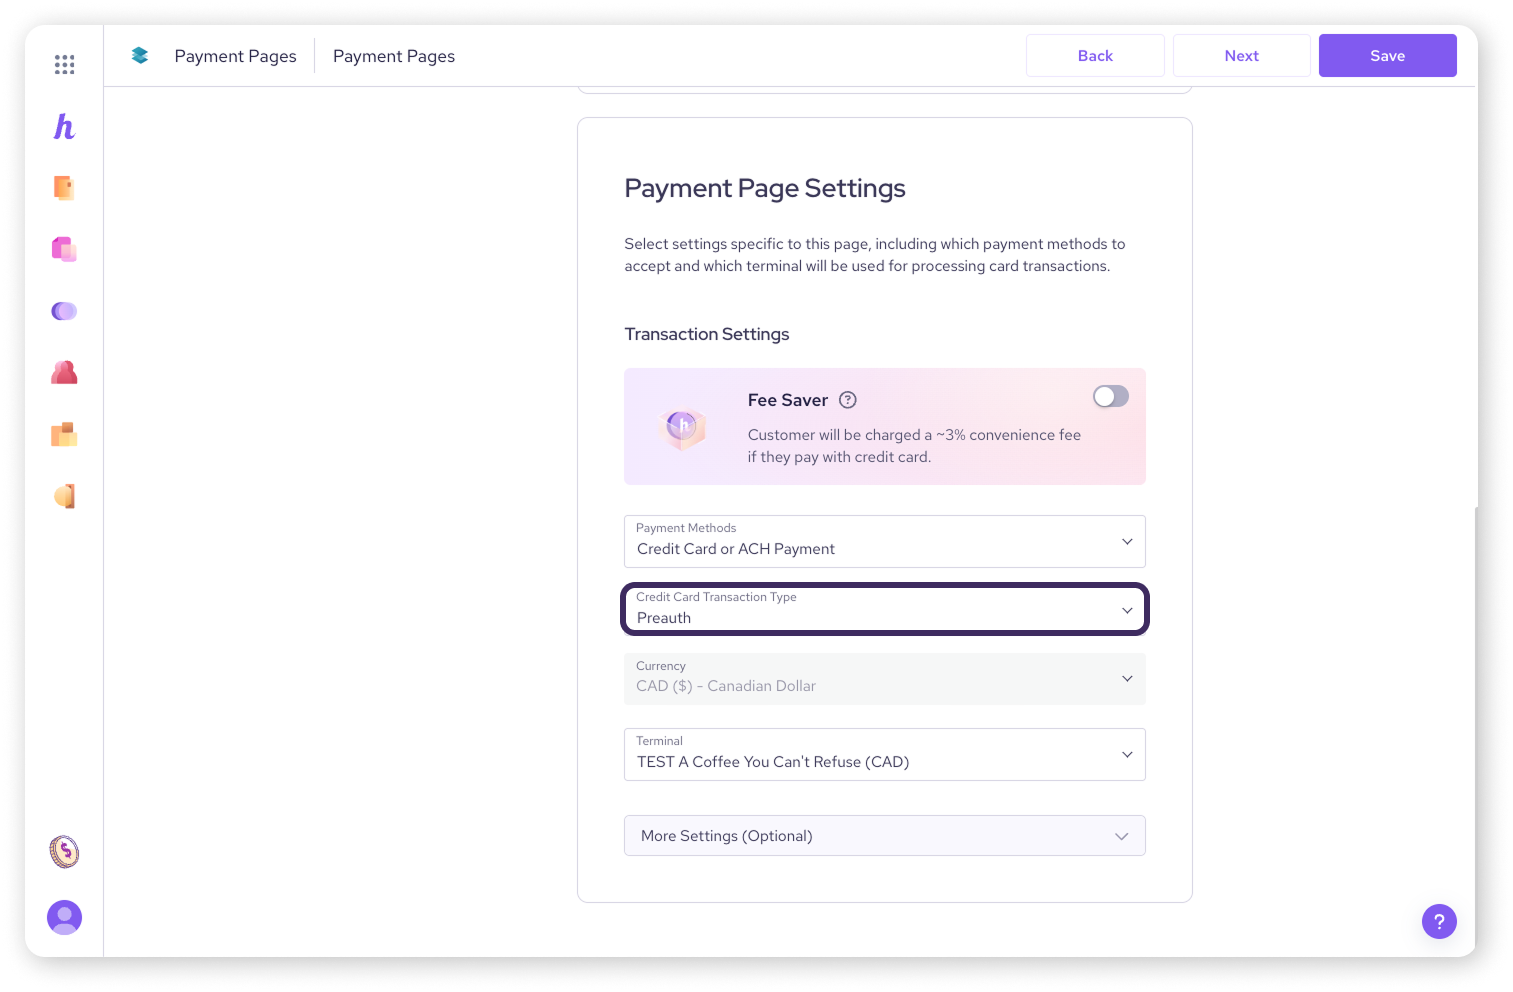
For other page types (Invoice payment, Editable amount, Fixed amount, Product purchase), you will be able to choose between Purchase and Pre-auth under the "Credit card transaction type" setting in the Transaction settings section.
Configure the basic settings and any specific settings for your chosen page type.
Ensure the Credit card transaction type is set to Pre-auth.
Continue configuring your payment page fields and design as needed.
Save and share your payment page link or QR code with your customers.
When customers complete the payment page, a pre-authorization will be placed on their card for the specified amount.
View a pre-authorization after it's created
Once you've created a pre-authorization, you can easily find it in your transaction history.
In the Helcim POS app: Select Transactions from the bottom navigation to see a list of all your transactions.
Pre-authorizations will have a transaction type of ‘Pre-auth.’ You can select Filters and then Payment types to filter your transactions to only display the ‘Pre-auth’ type
In your Helcim Dashboard: Navigate to the Payments page section, and select the Pre-authorization tab to see a list of all your transactions.

Important notes about pre-authorizations
Expiry: Pre-authorizations are only valid for 7 days. After this time, the option to capture the pre-authorization will no longer be available in the action menu.
Manual entry only: At this time, pre-authorizations can only be processed by manually entering card details with the above methods, not by tapping or inserting a card with the Helcim Smart Terminal or Card Reader.
Next steps
You've successfully created a pre-authorization! The next crucial step is to capture those funds when you're ready to complete the transaction.
FAQs
Can I use my Helcim Smart Terminal or Card Reader to create a pre-authorization?
Currently pre-authorizations can only be processed by manually entering card details through the Helcim POS app. The manual entry can be done on a Smart Terminal, or on a mobile or desktop device.
A linked Helcim Card Reader won’t be useful in the process because card details must be manually entered.
What happens if I don't capture a pre-authorization within 7 days?
If a pre-authorization is not captured within 7 days, it will expire. The option to capture the transaction will no longer be available in the action menu, and you would need to create a new pre-authorization if you still wish to charge the customer.
Can I integrate pre-authorizations into my own website or app?
Yes! If you're looking for a more customized integration, you can configure HelcimPay.JS, our developer-ready and low-code payments modal, to collect pre-authorizations.
For more information, please refer to our introductory article on HelcimPay.JS, or our developer docs article on payment types.
🦆