Reconciling your payments shouldn't feel like a full-time job. If you use an external invoicing or job management system, tracking transactions back to your own records often means manual data entry, reprinting receipts, and dealing with end-of-day cleanup headaches.
Custom invoice numbers let you enter your own reference ID at checkout—whether that is a PO number, job ID, or custom invoice code. Every payment maps directly to your external software the moment it is processed, keeping your books balanced without the extra admin work.
Enable custom invoice numbers on your devices
This feature is turned off by default and must be enabled separately on each device you use to accept payments. Enabling it on one device will not automatically turn it on for your other hardware.
| Important: If you don't see the Add custom invoice no. option on your Cart screen during checkout, double-check that the feature is toggled on in the App device settings for that specific device. |

Device | Steps |
iOS | Open the Helcim app → tap More → tap Settings → tap App device settings → tap Custom field → switch Enable custom invoice number to on. |
Android | Open the Helcim app → tap More → tap Settings → tap App device settings → tap Custom field → switch Enable custom invoice number to on. |
Workstation | Click More → click Settings → click Custom fields → toggle Custom invoice number to on. |
Smart Terminal | Tap More → tap Settings → tap App device settings → tap Custom field → switch Enable custom invoice number to on. |
Card Reader | Tap the Stacked menu (top left) → tap Settings → tap App device settings → tap Custom invoice number → switch Enable custom invoice number to on. |
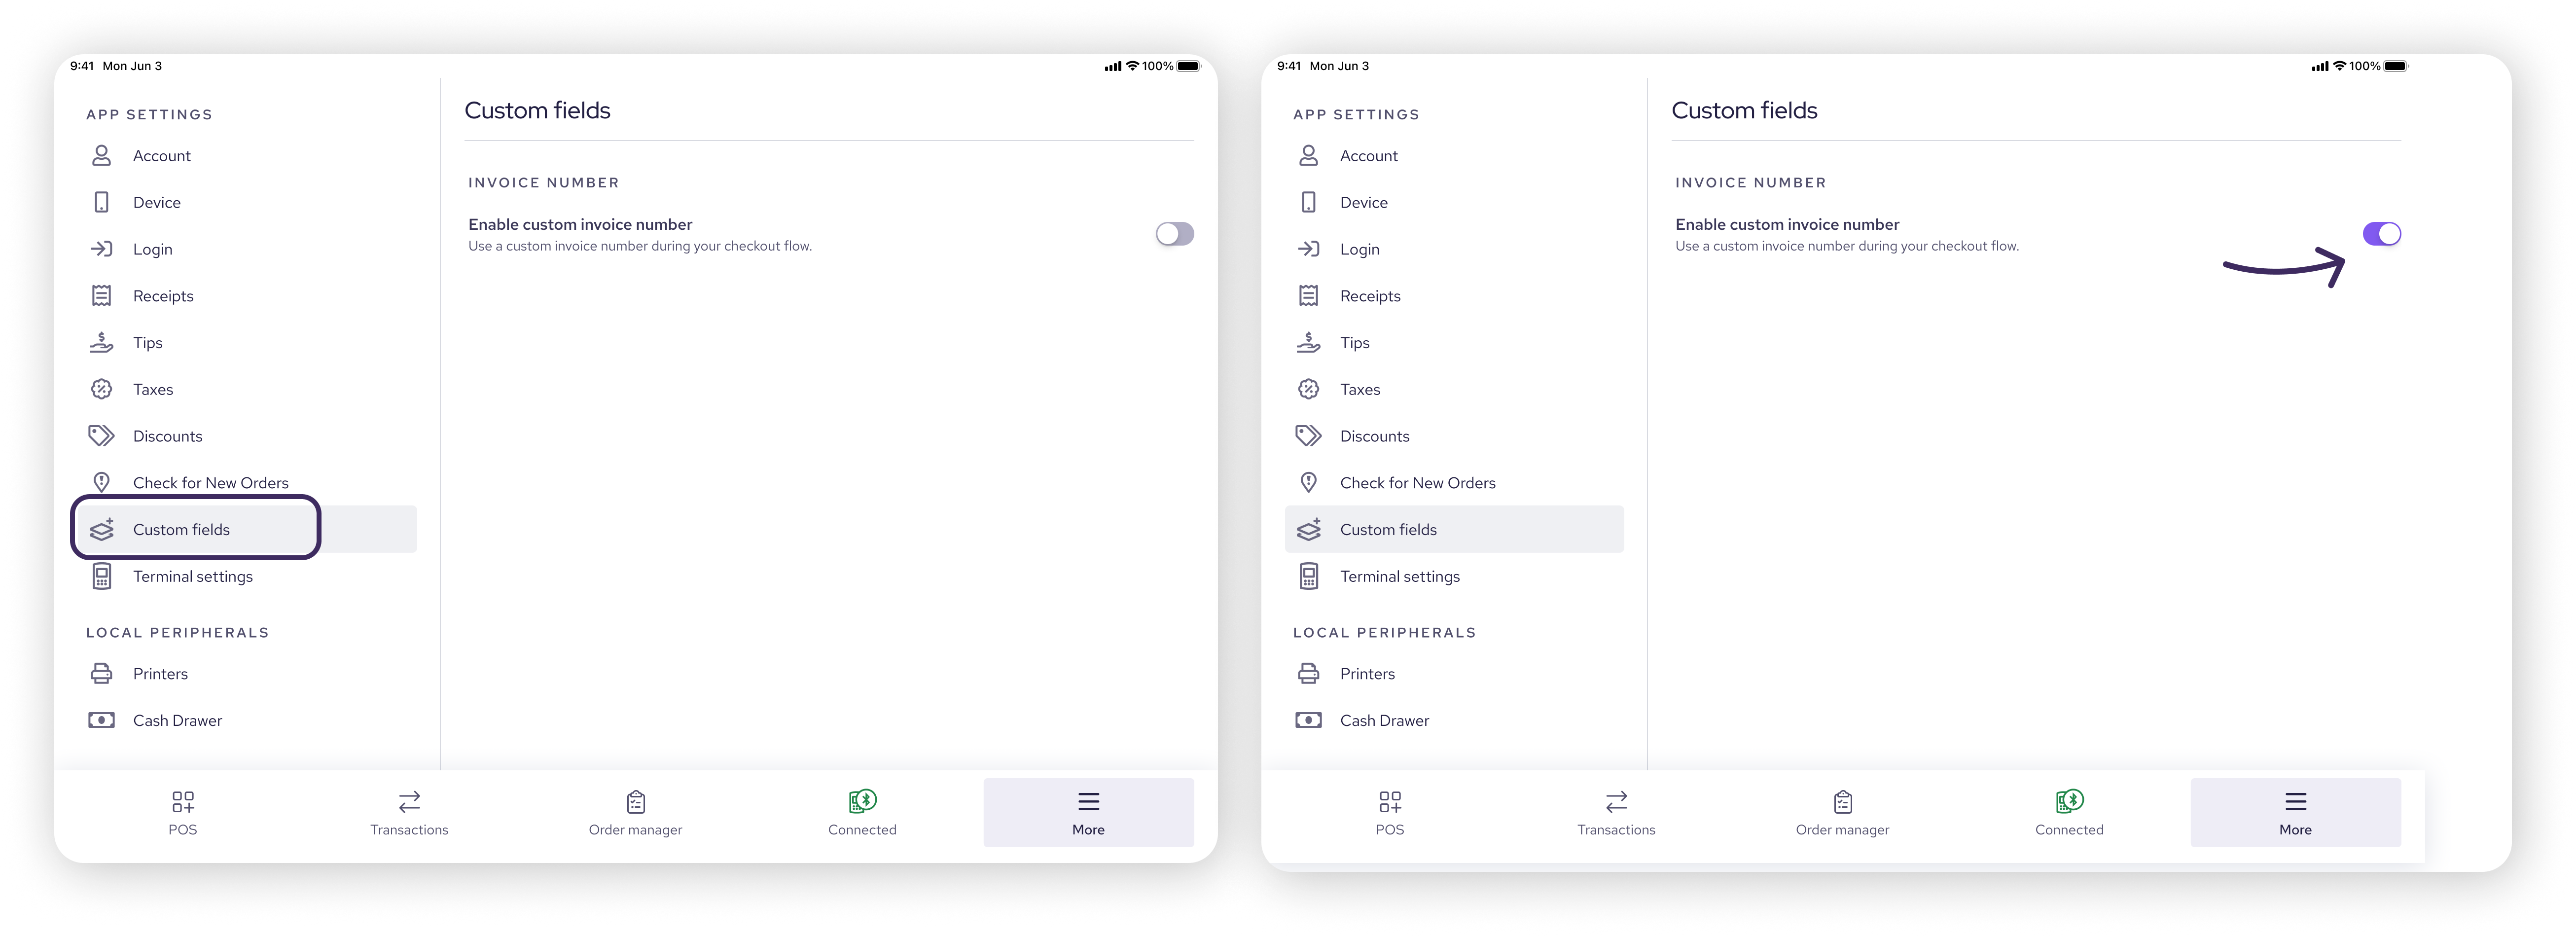
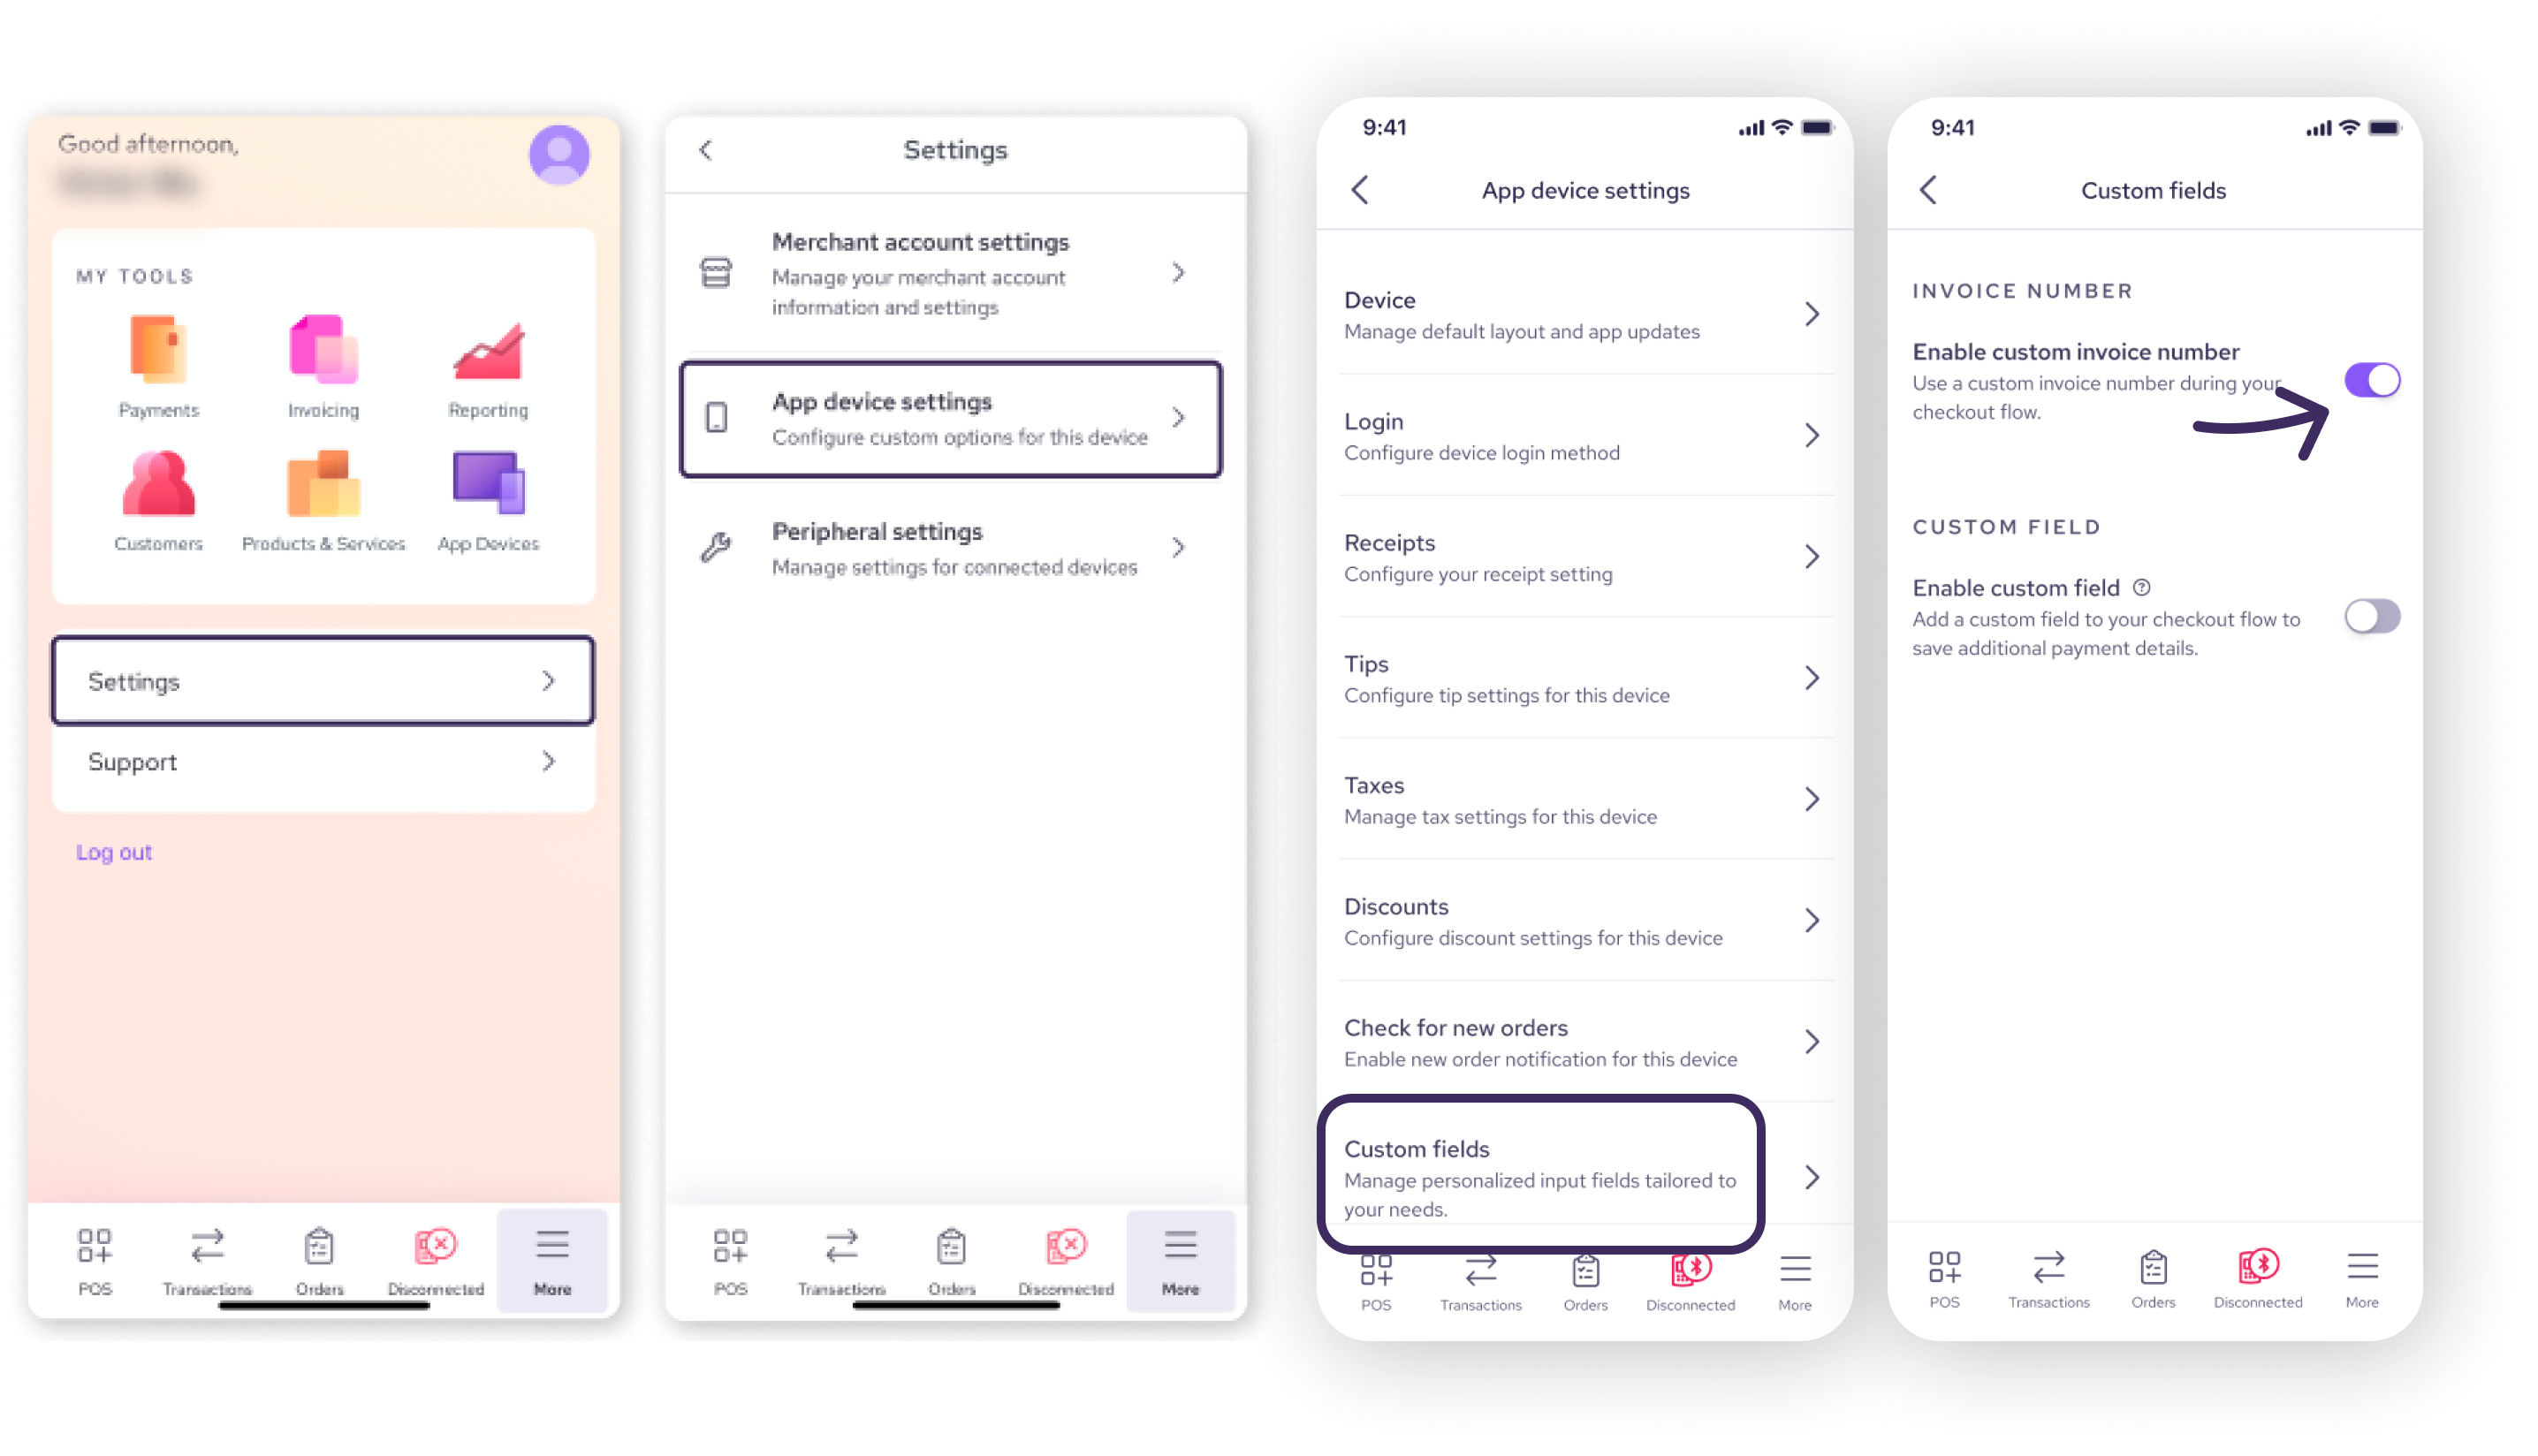
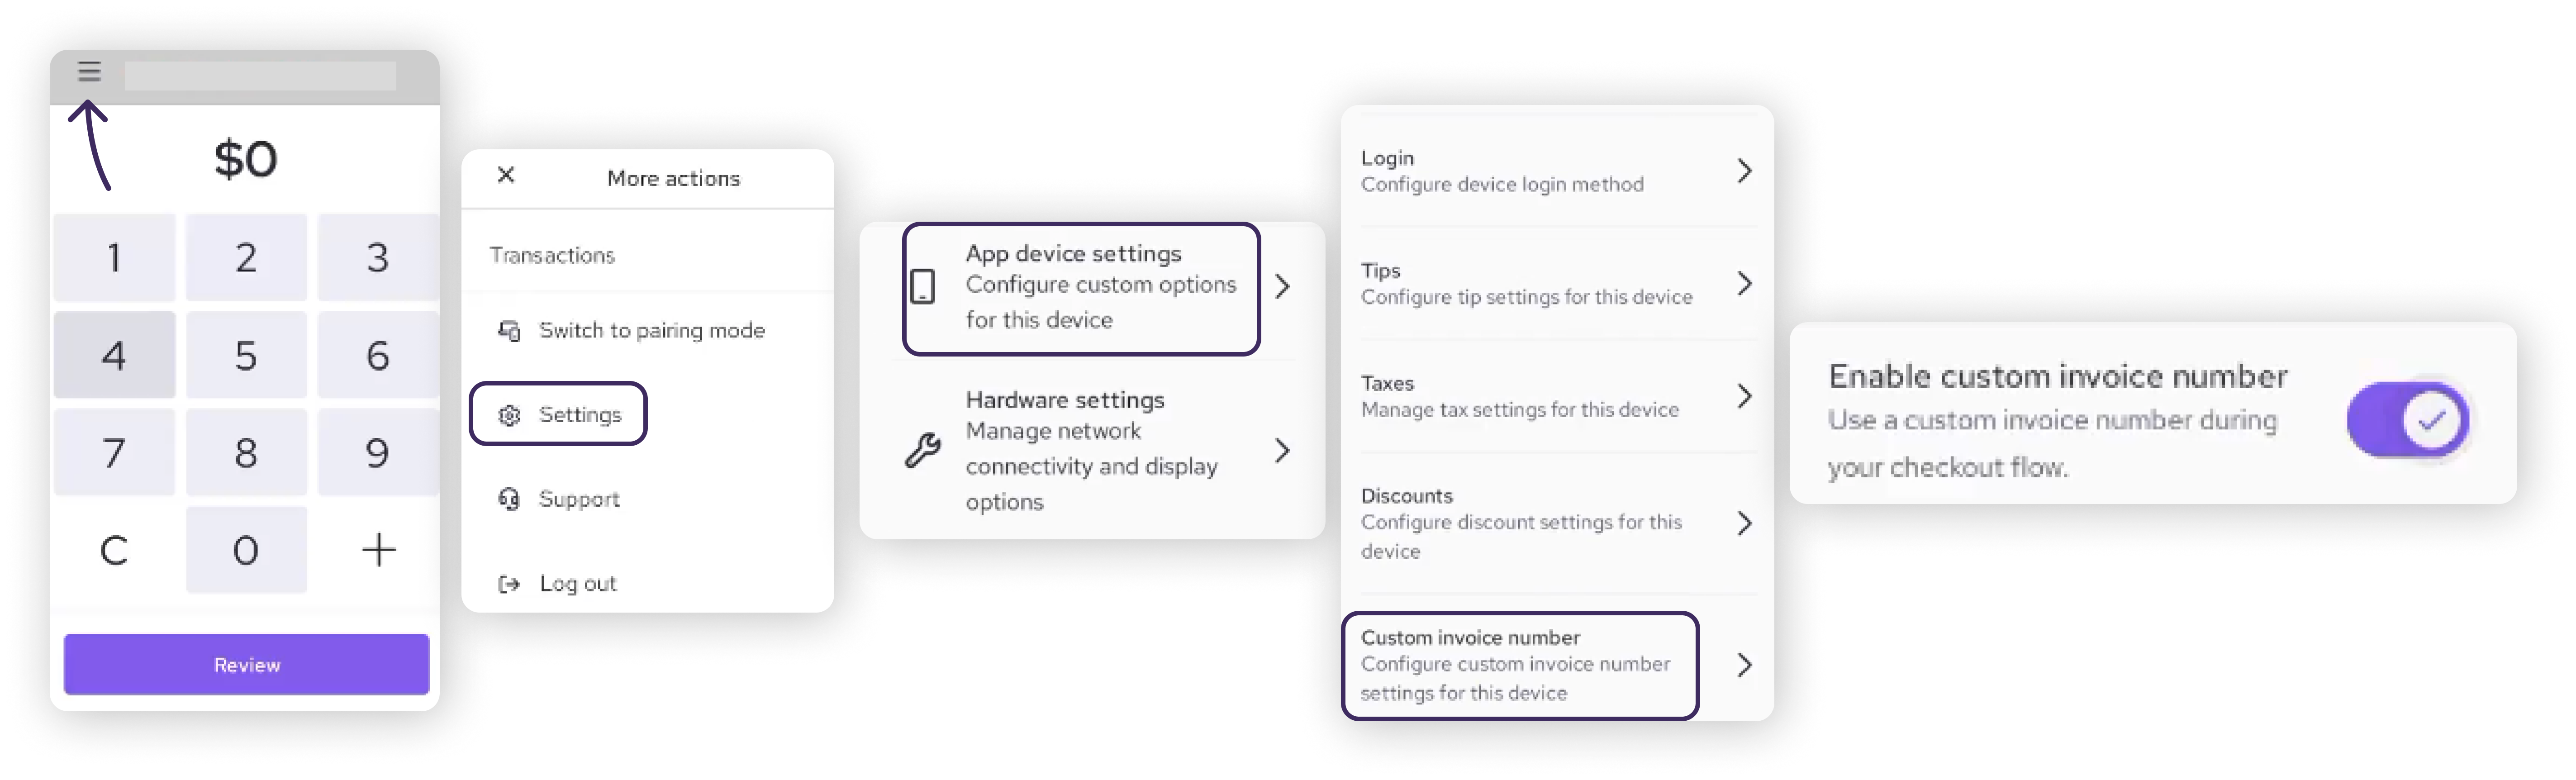
To verify this step was successful, open your Cart screen on the configured device and check that the Add custom invoice no. option is now visible.
Add a custom invoice number at checkout
Once you have enabled the feature on your device, the option appears in your cart during checkout.
On the Cart screen, tap Add custom invoice no.
Enter your unique reference number (for example: PO-10482, JOB_2026_041, or INV.2026.0098).
Tap Add or press Enter to attach the number to the order.
Process the payment as you normally would. Your custom number will remain attached to the transaction and print directly on the customer receipt.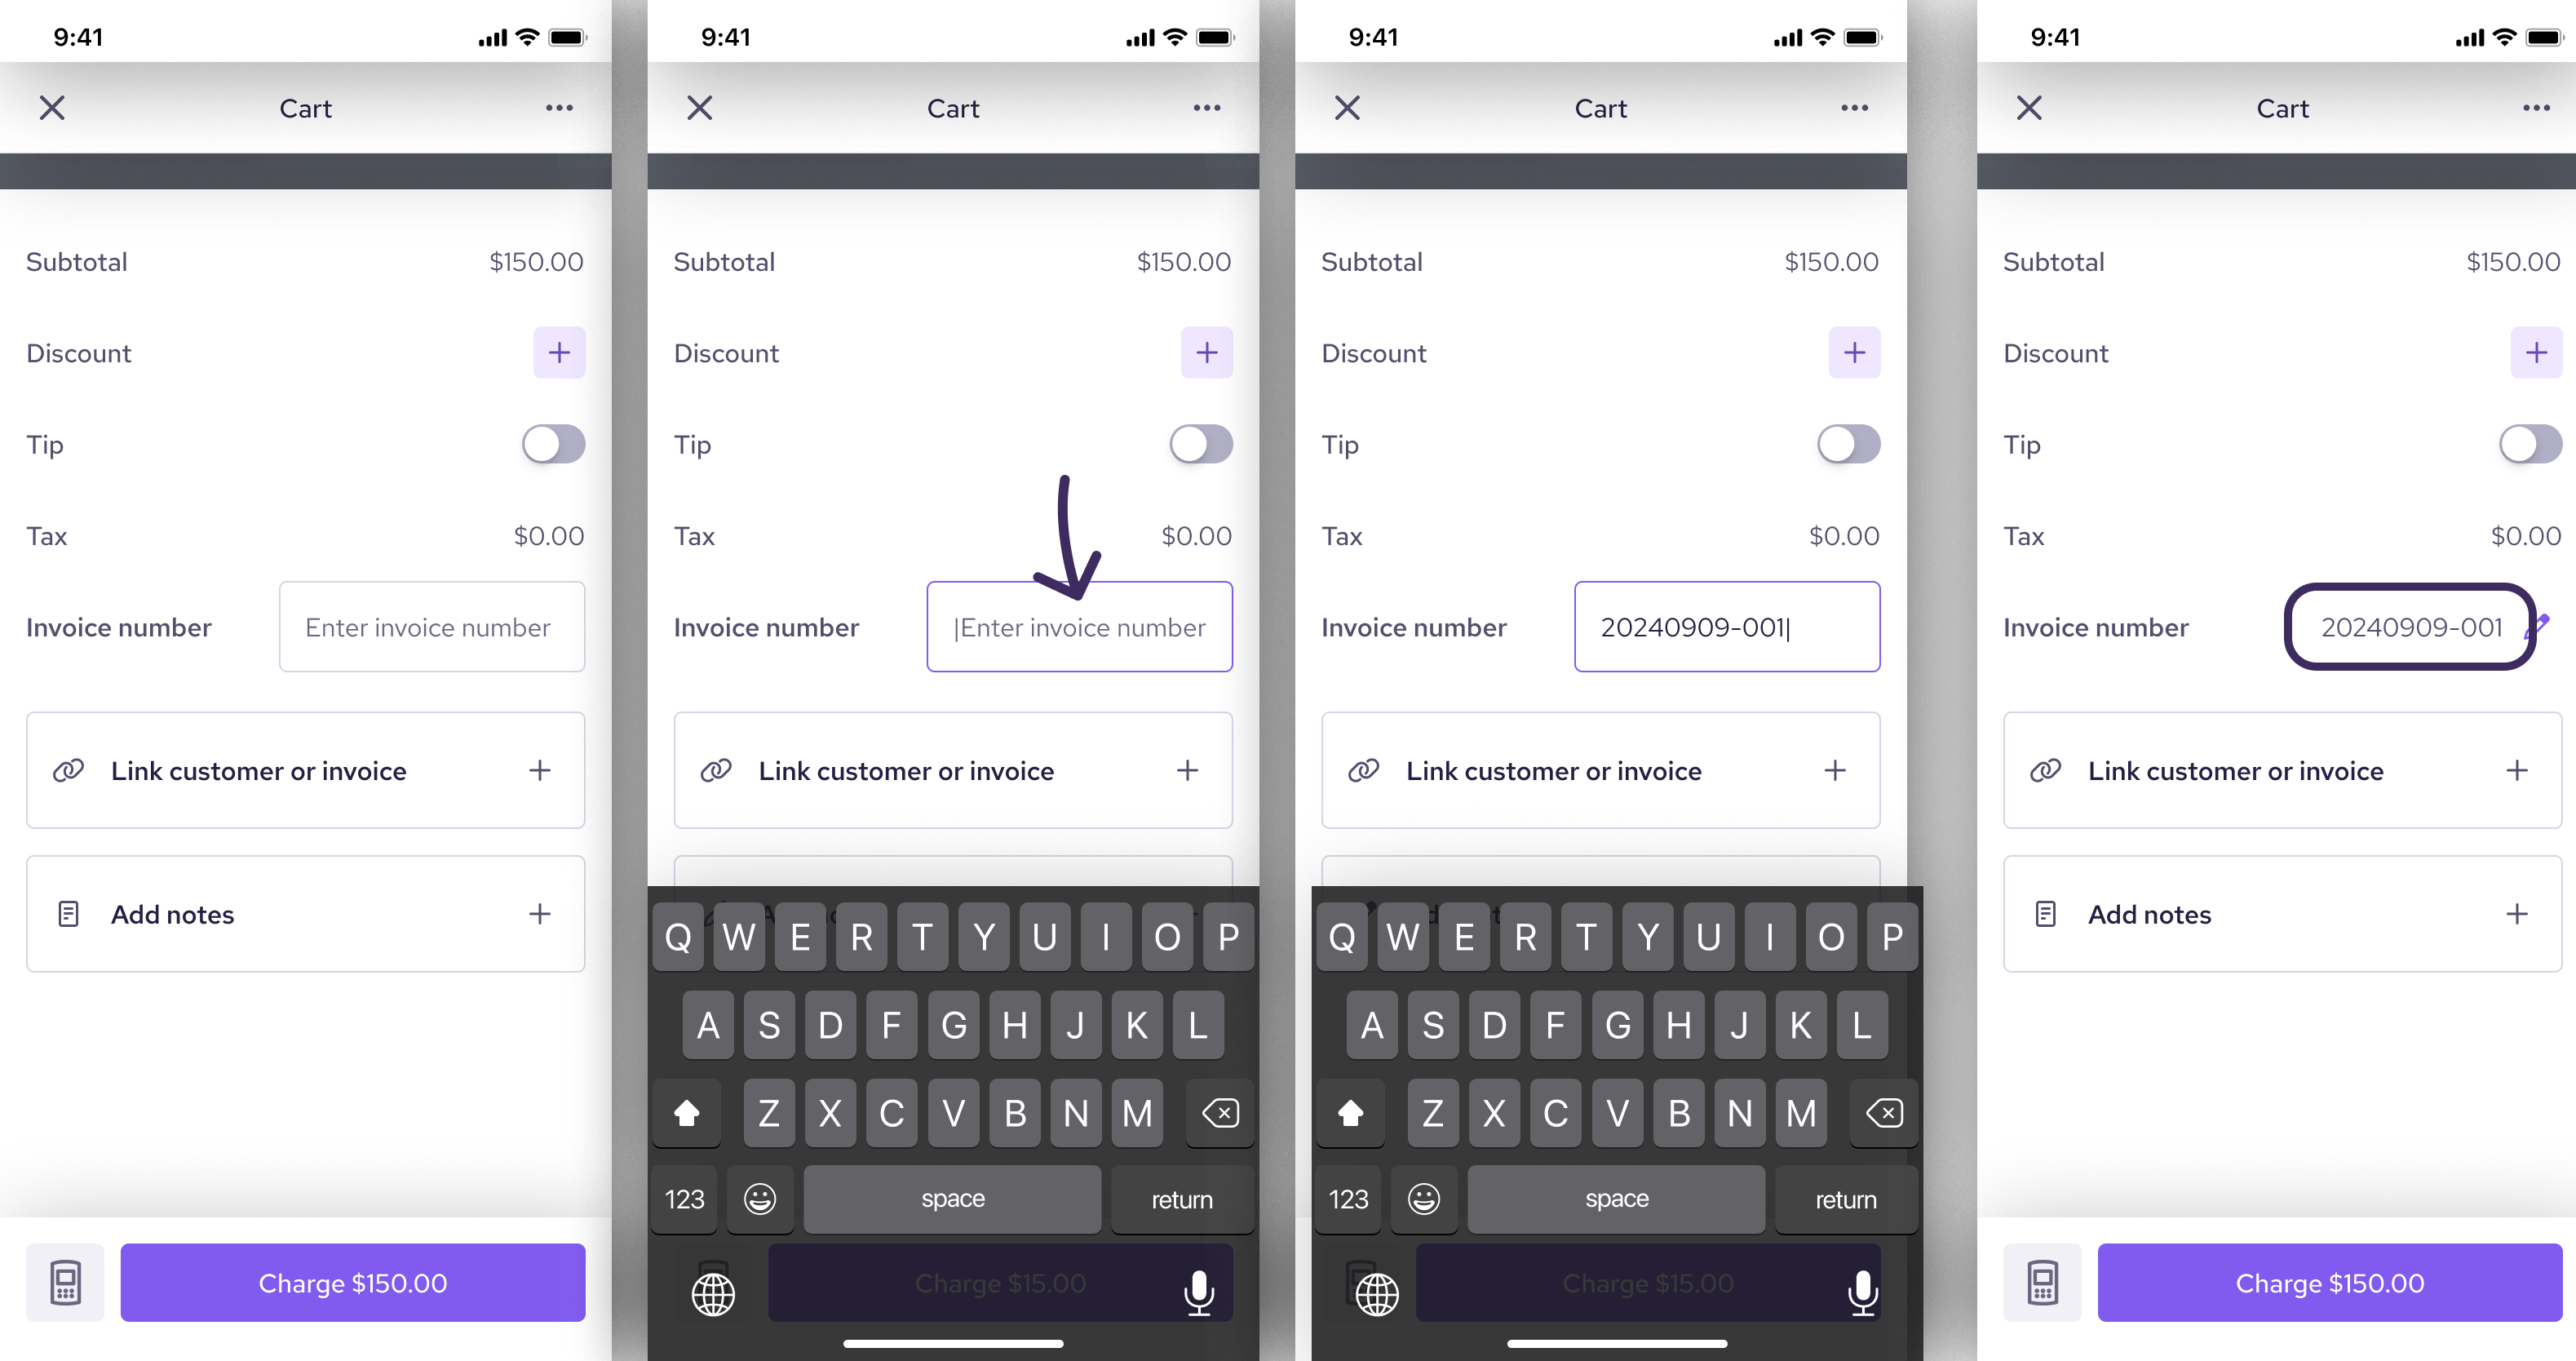
| Note: Closing the entry window without tapping Add will not save your reference code, and the cart will process without one. |

Format rules and allowed characters
To keep your records clean and compatible across systems, custom invoice numbers must follow these formatting rules:
Maximum length: 50 characters
Allowed characters: Letters (A-Z, a-z), numbers (0-9), spaces, and the symbols
-_./Not allowed:
#@\!and all other special symbols
| Pro Tip: Using a consistent naming structure makes end-of-day reconciliation significantly faster. Formats like |

Handle duplicate invoice numbers
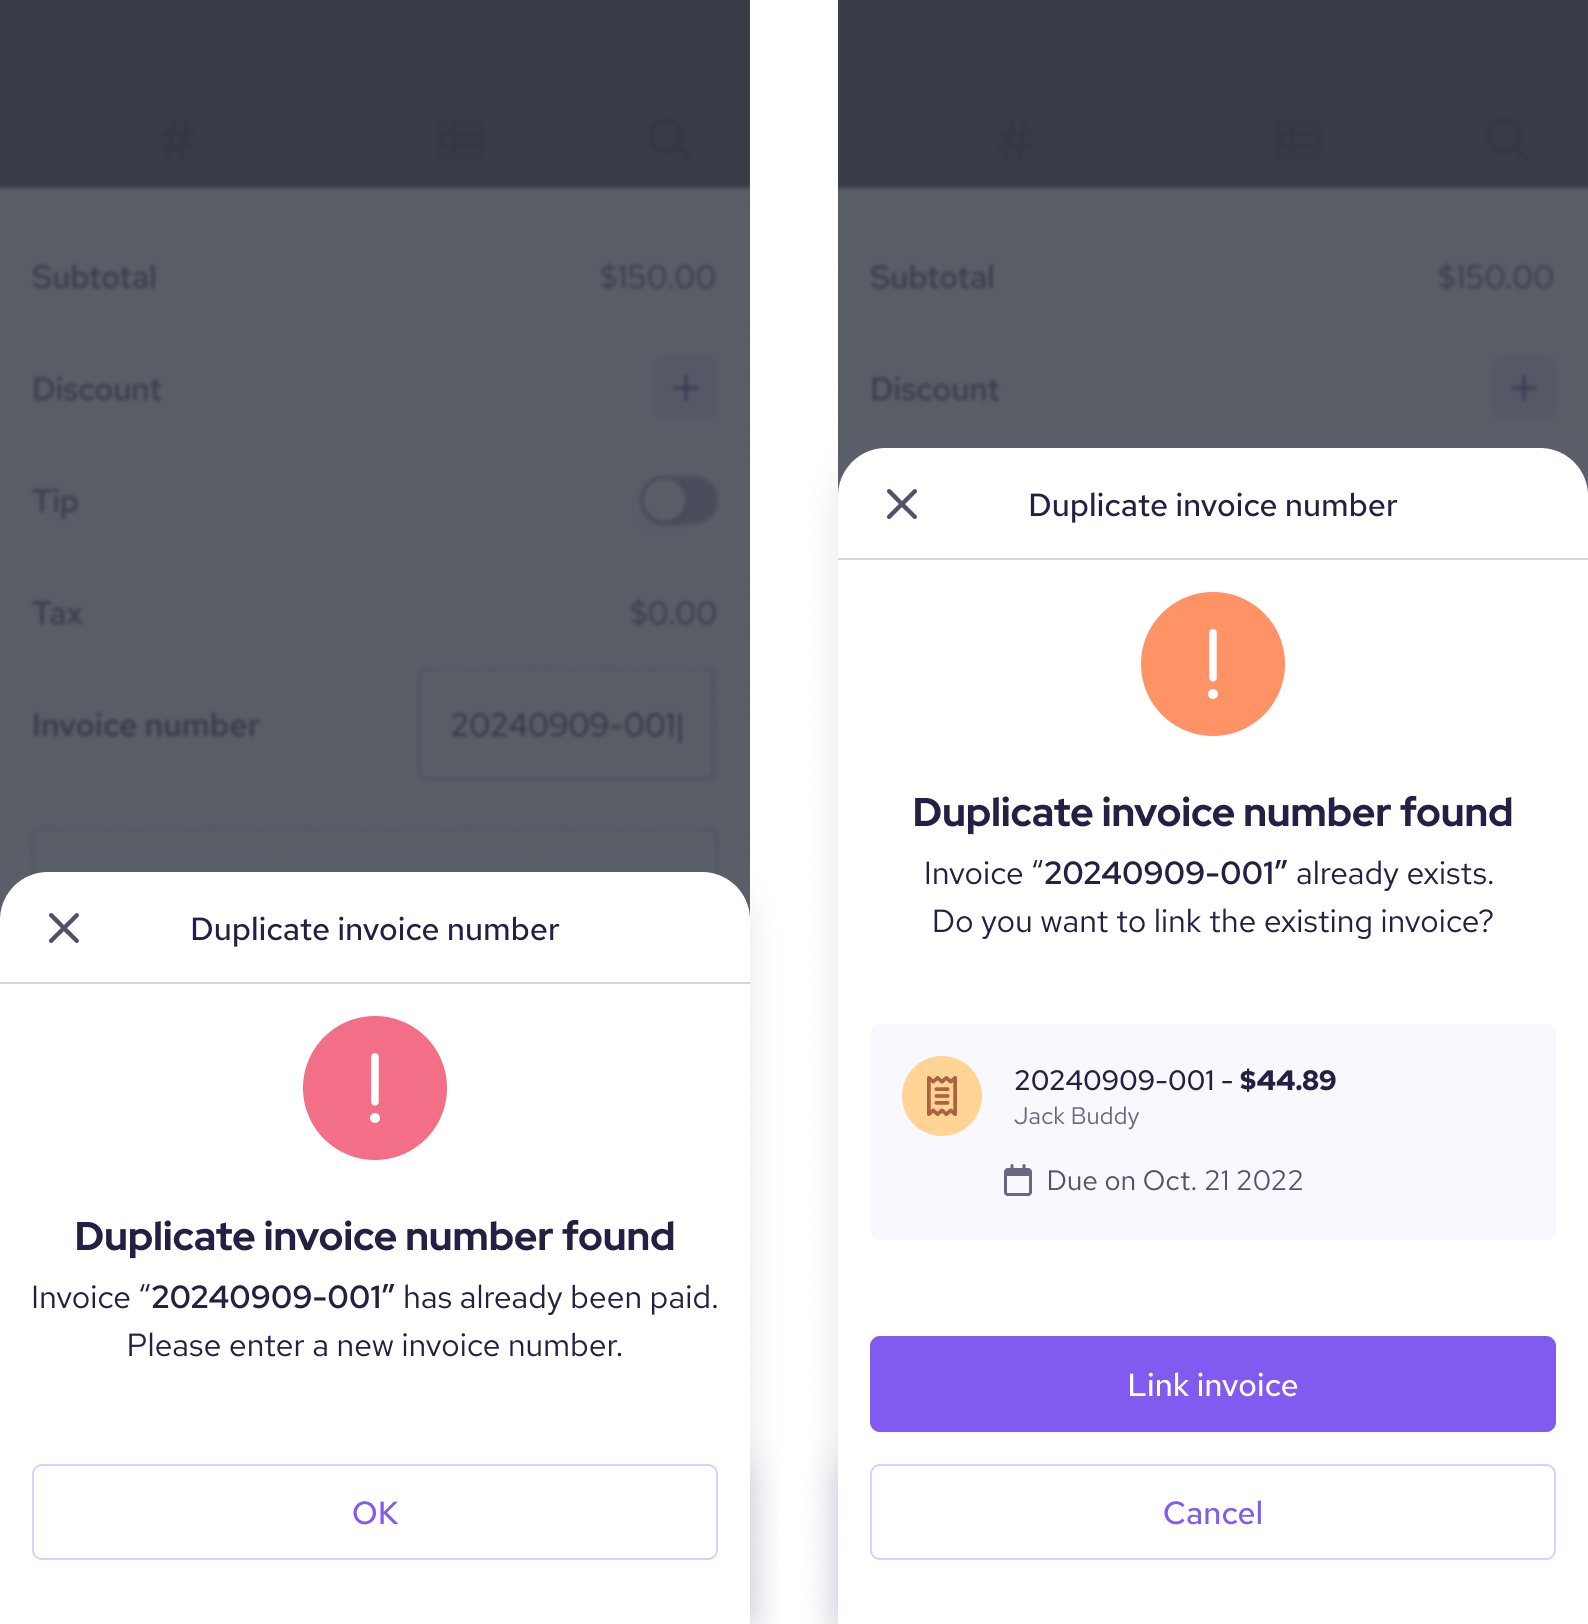
Helcim automatically runs duplicate detection as soon as you finish entering a reference code. If the number you entered already exists in your account, you will receive a prompt with two choices:
Link existing invoice: If the matching invoice is currently unpaid, you can load it directly into your cart and process payment against it.
Enter a different number: Clear the entry field and type in a new, unique reference code.
| Note: When you attach a custom invoice number, it replaces the system-generated Helcim invoice number on customer receipts and reporting exports. Helcim still tracks the internal ID in the background, but your custom number becomes the primary visible reference. |
Edit or remove an invoice number
If you make a typo or need to change a reference number before completing the sale, you can update it directly from the cart.
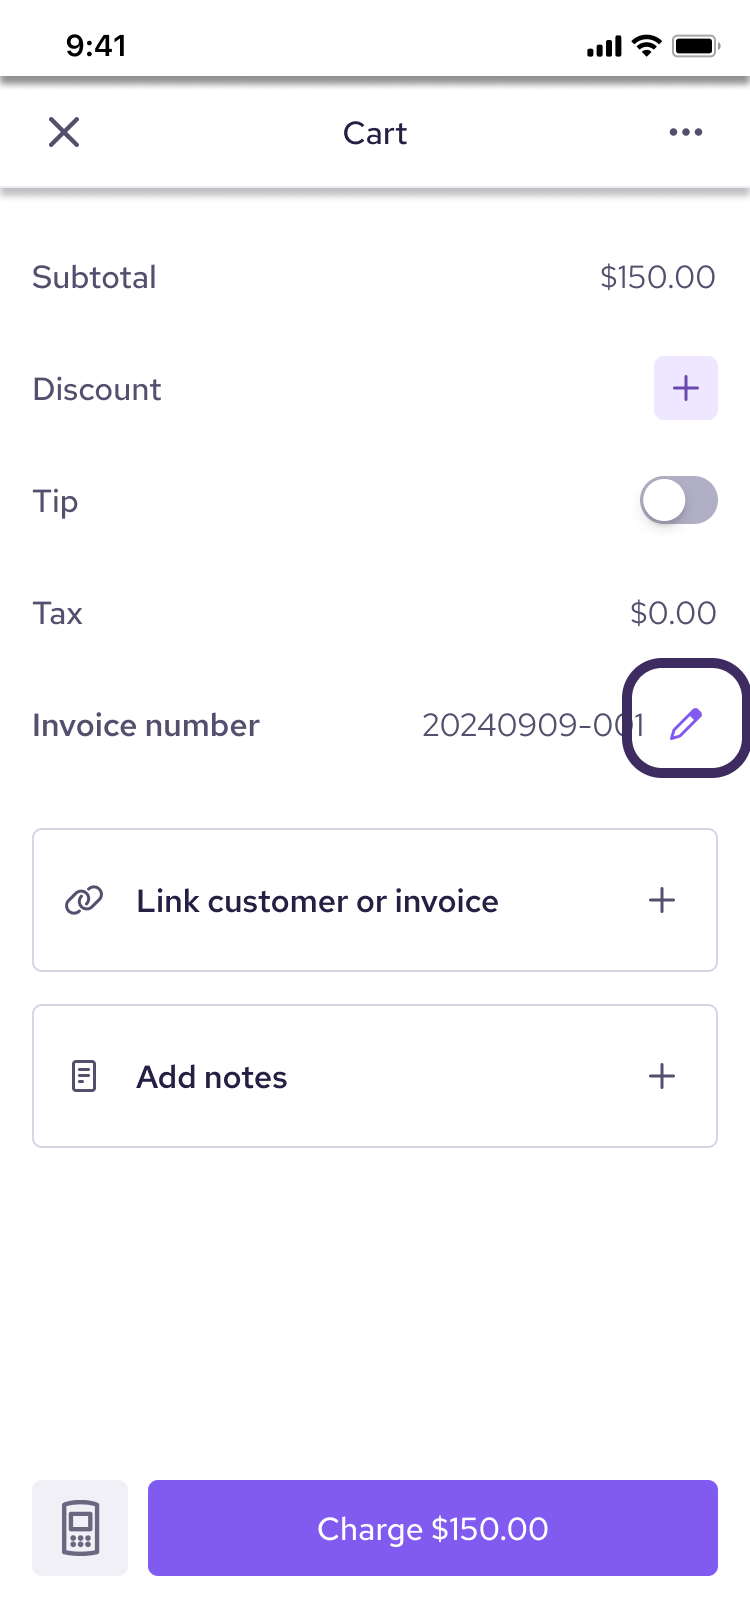
To edit a number: Tap the Pen icon next to the invoice number on the Cart screen, enter your changes, and tap Save.
To remove a number: Tap the Pen icon to open the window, then tap the Trash icon. This removes the custom number and clears the field immediately.
How custom numbers handle split and partial payments
Your custom invoice number stays permanently linked to the sale throughout the entire payment lifecycle:
Split payments: The reference number persists across every partial payment processed under the same order.
Declined and retried cards: If a customer's card is declined, the custom number is not burned or locked. You can retry the payment using the same reference code without triggering a duplicate error.
Reopened invoices: If an invoice is partially paid and reopened later to collect the remaining balance, your custom invoice number stays attached automatically—no re-entry required.
Next steps
Now that you know how to streamline your payment tracking with custom invoice numbers, explore these related tools to optimize your checkout setup:
Take a payment with the Helcim POS — Complete walkthrough for processing in-person payments.
Link customers and invoices to an order — Learn how to load existing invoices directly into your POS cart.
Customize your invoices — Personalize your receipts and invoice layouts with custom logos, branding colors, and fields.
FAQs
Does my custom invoice number appear in reports and exports?
Yes. Your custom invoice numbers appear in your transaction history, batch exports, and throughout your Helcim dashboard so you can reconcile accounts without manual cross-referencing.
What is the difference between a custom invoice number and Helcim's auto-generated invoice number?
Helcim automatically generates a backend invoice ID for every transaction. A custom invoice number is an optional reference you add to match your own internal software. When added, your custom number replaces the Helcim-generated ID as the primary reference on receipts and reports.
Do I need to enable custom invoice numbers on every device?
Yes. Turning this feature on on one terminal does not automatically update your other hardware. Each mobile device, Workstation, or Smart Terminal must be configured individually in App device settings.
Can I add a custom invoice number after a payment is completed?
No. Custom reference codes must be added before completing the transaction. Once a payment is approved, the invoice record is locked to maintain accurate financial audit trails. If you need assistance correcting an entry, reach out to our support team at support@helcim.com or 1-877-643-5246.
What happens if I enter a character that isn't allowed?
An error message will display inside the entry window, preventing you from saving until the invalid character is removed. Remember to stick to letters, numbers, spaces, hyphens, underscores, periods, and forward slashes.