Getting new hardware should be the best part of your day, not the most frustrating. You have the freedom to choose how you take payments. You can use Standalone mode to take payments directly on the reader, or Paired mode to connect the reader to the Helcim App on your computer, tablet, or phone. Because the 3rd Generation Card Reader uses your internet connection instead of Bluetooth, the setup is more stable and has a much longer range. This guide will walk you through unboxing, connecting to your network, and choosing the mode that fits your business.
In this article
Prepare your devices
Before we get into the digital side of things, let’s make sure your hardware is ready to go.
Charge it up: Use the provided USB-C cable to connect your reader to a power source. We recommend a full charge before your first use.
Power on: Press and hold the Black power button on the side of the device until the Helcim logo appears.
Get the app (Optional): If you plan to use Paired mode, ensure you have the Helcim App installed on your laptop or desktop computer.. You can download it directly from the Helcim website.
Connect to your network
Since this reader uses a cloud-based connection, it needs to be online to talk to your account.
On the reader screen, tap Get Started.
Select Wi-Fi and choose your network from the list.
Once connected, the reader will automatically check for any required software updates to ensure you have the latest features, including Standalone mode.
How to update your device
Go to Settings on your Card Reader or Smart Terminal device
Select Hardware Settings
Select Device Info
Select Update App Version (Minimum Version)
Card Reader V1.1.0
Choose your operation mode
Once your reader is online, you need to decide how you want to process sales. You can change this at any time by tapping the Menu icon (three horizontal lines) on the reader.
Standalone mode: This is the default mode and acts as an independent terminal. It allows you to enter a dollar amount and accept a payment directly on the reader. No other device is needed.
Paired mode: This mode allows the reader to "listen" for instructions from the Helcim App on your computer, tablet or mobile device. This allows you to use your full inventory, link payments to specific customers, and manage complex orders.
Feature Comparison
How to Switch Modes
Ready to change how you take payments? Switching modes takes just a few taps on your device.
You no longer need to log into your account settings to change how your reader behaves; it’s all handled on the hardware.
On your card reader, open the Options or stacked menu (the three horizontal lines).
Tap Switch to standalone mode (or Switch to pairing mode if you are already in Standalone).
The device will automatically update and refresh to your new chosen mode.
Standalone is your go-to for speed and simplicity when you only need to enter a dollar amount.
Paired is essential when you need the full power of the Helcim POS, including products, linking an invoice, or adding a customer.
.png)
You can switch between these modes directly on your device whenever you like.
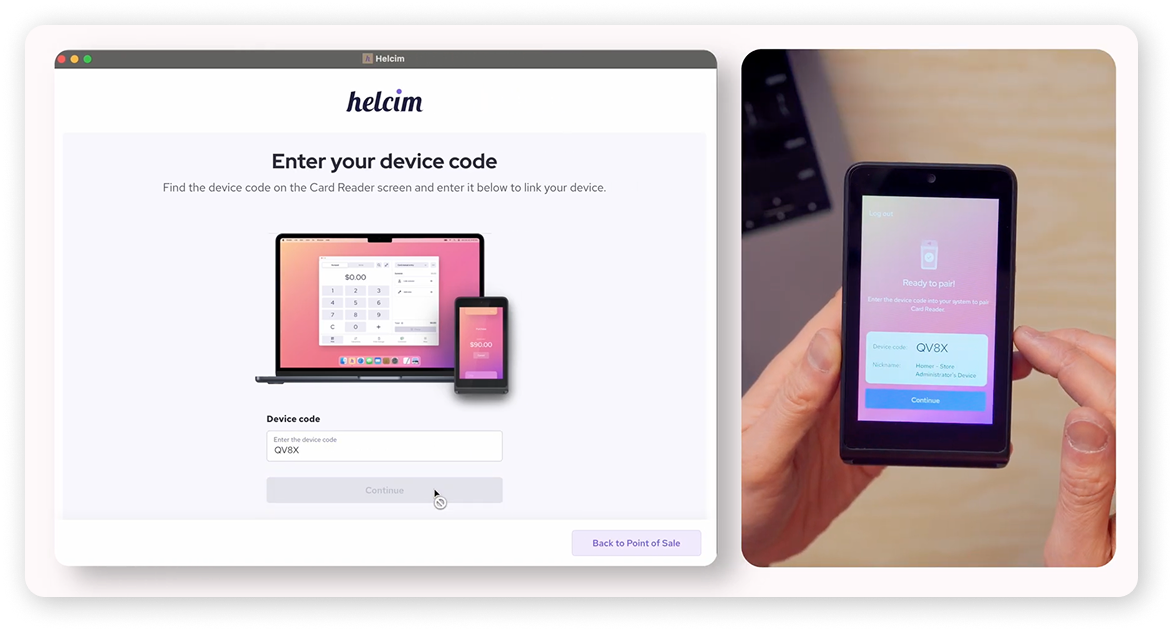
Pair with the Helcim App
If you’ve chosen Paired mode, follow these steps to link the reader to your computer or mobile device.
On the reader, tap the Menu icon and ensure it is set to Paired.
On your computer or mobile device, log into your Helcim account on the Helcim POS app. You will see a the connection icon.
Click on the Hardware Icon and select Connect hardware.
Select Helcim Card Reader (Gen 3).
The app will ask for a Device Code. Look at your card reader’s touchscreen to find its unique code.
Enter that code into the Helcim App and click Connect.
Next steps
Now that you’re paired, you’re ready to take payments! To see how to send a sale from your computer to the reader, head over to our guide on Accepting payments with the 3rd Generation Card Reader.
FAQs
What if my pairing code doesn't appear?
Make sure both your computer and your reader are on the same Wi-Fi network. If they are on different networks (like a "Guest" Wi-Fi and a "Private" Wi-Fi), they won't be able to see each other.
Can I pair one reader to multiple computers?
The reader is designed to pair with one device at a time to prevent transactions from being sent to the wrong desk. If you need to switch computers, you can simply unpair and re-pair the device in your connection settings.
Can I switch between Standalone and Paired modes?
Yes! You can switch back and forth as often as you like via the Menu icon on the reader. This is great if your tablet battery dies and you need to finish a sale quickly in Standalone mode.
Does the reader need to be plugged into my computer?
Nope! As long as both devices are on the same Wi-Fi network, the reader can be anywhere in your shop. You only need the cable for charging.
Why do I need to log out and log back in?
This quick refresh helps the app securely recognize the new API connection we just created with your hardware. It’s a one-time step to make sure everything is synced perfectly.
What exactly is an API connection?
In plain English, it’s a way for two different pieces of software to talk to each other over the internet. Because the 3rd Generation reader uses an API, it’s much harder for the connection to "drop" compared to old-school Bluetooth.