The Helcim Commerce for WooCommerce plugin allows you to seamlessly integrate Helcim's secure payment processing capabilities into your online store. Follow this straightforward, step-by-step guide to get your digital checkout up and running safely.
Configure your API Access
Before touching your website, you need to create a secure key that allows the Helcim plugin to safely talk to your Helcim account. This key is called an API access token.
To create your token:
Log in to your Helcim account.
Click on All Tools and select Integrations from the menu.
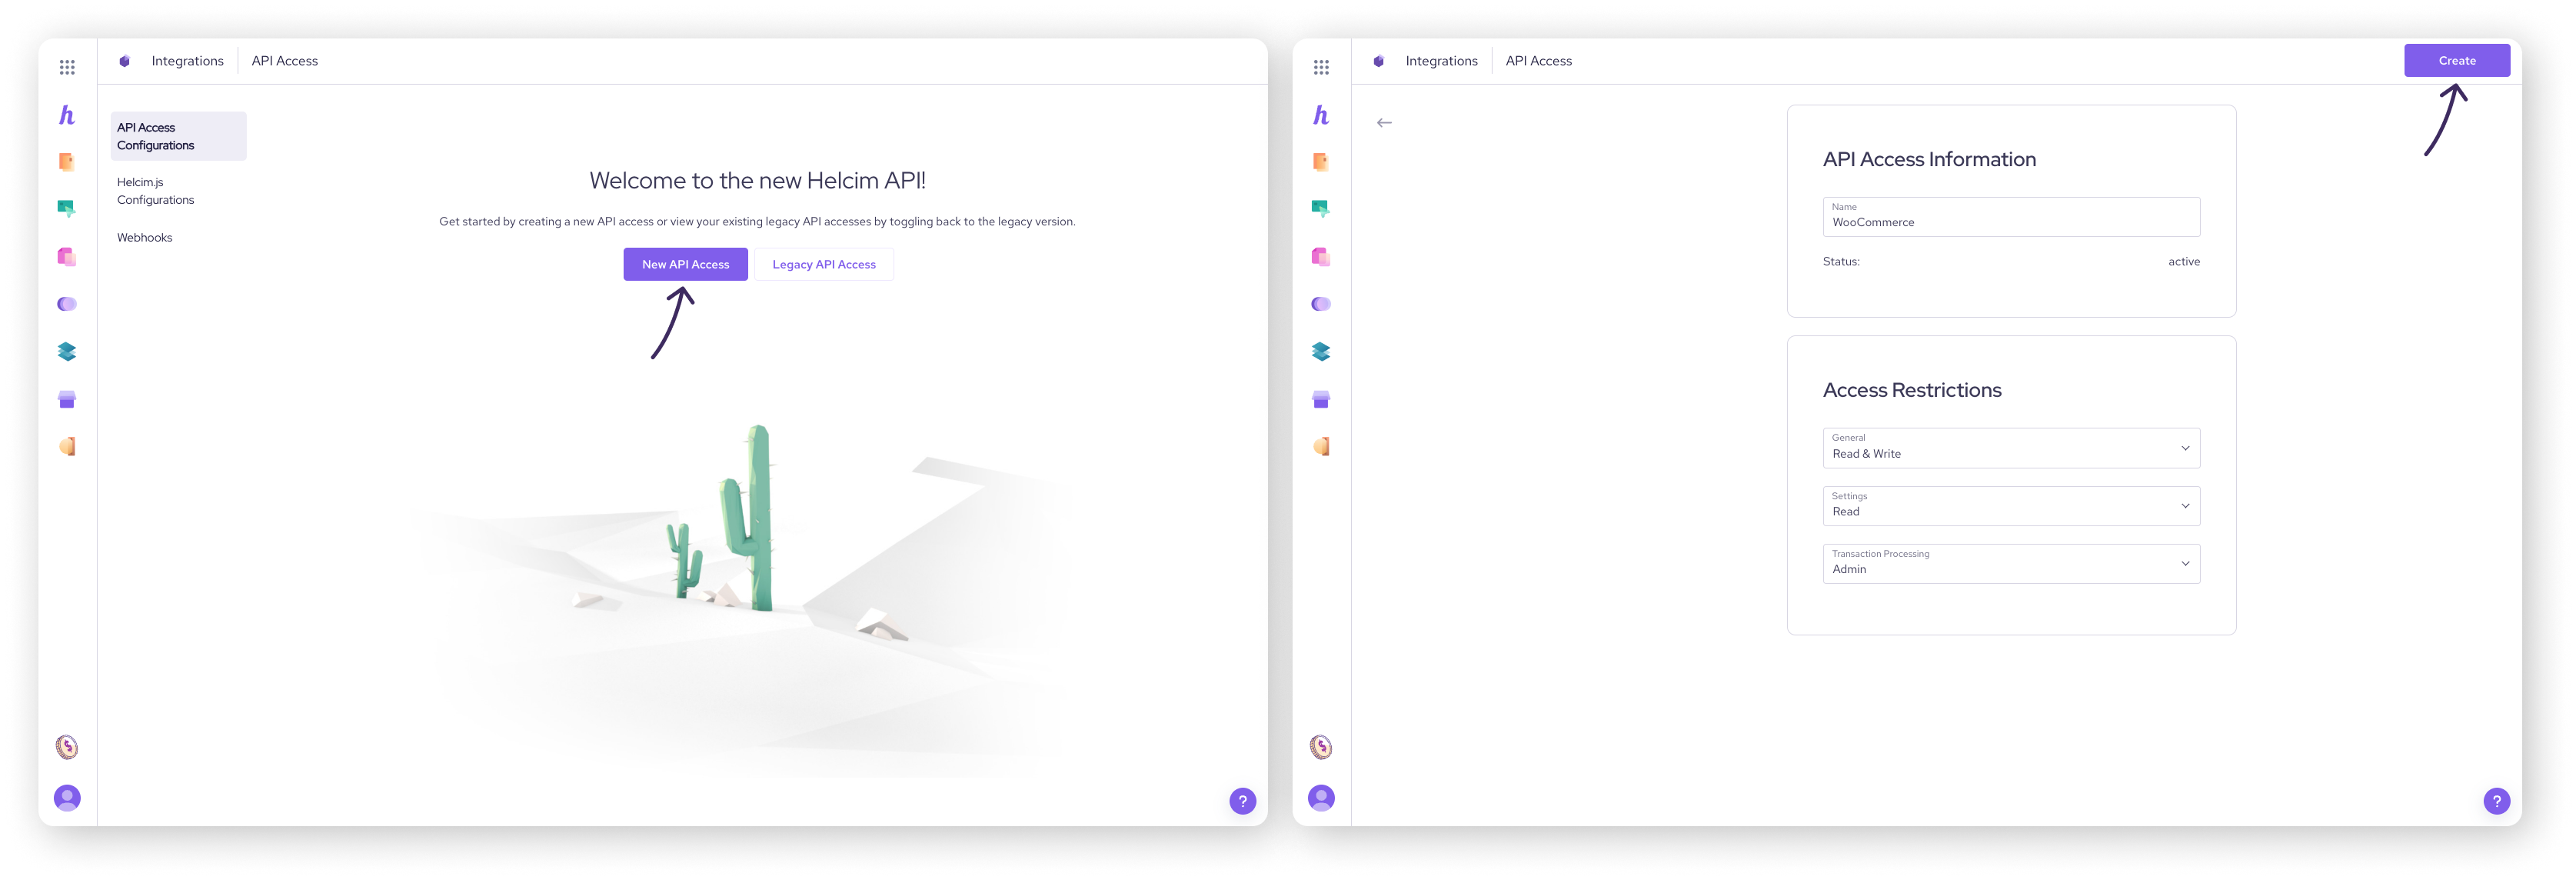
Click on API Access Configurations, then click New API Access on the main page.
Create an API Access Configuration using the following specific settings:
Name: WooCommerce
General: Read & Write
Settings: Read & Write
Transaction Processing: Admin
Click Create to save your new configuration.
Keep this screen open or copy the unique API access token somewhere handy, you will paste it into your WooCommerce settings shortly.
| Don't worry if these settings seem a bit technical! They're designed to ensure secure payment processing. If you're unsure about any setting, it's best to use the recommended values. |

Installing your plugin
Now that your Helcim account is ready, it's time to add the plugin to your website. You can choose the method that best matches your workflow:
Installation method | Where to go |
WordPress Plugin Marketplace | In your WordPress dashboard, go to Plugins > Add New. Search for "Helcim for WooCommerce" and click Install Now. |
WooCommerce Marketplace | Go to the official WooCommerce Extension Marketplace, or browse the WooCommerce > Extensions tab right inside your WordPress dashboard. |
Direct Download | Download the official plugin |
Adjusting your WooCommerce Settings
With the plugin installed, it's time to link your WordPress site directly to your Helcim account.
In your WordPress dashboard, navigate to WooCommerce > Settings and click on the Payments tab.
Locate Helcim Commerce for WooCommerce and click Manage.
Configure your preferences:
Title/Description: Customize what your customers see on your checkout page.
Environment: Select Sandbox if you want to run mock test sales first, or Live for real money transactions.
Live API Token: Paste the unique token you generated during Step 1.
Branding & Add-ons: Customize your checkout colors, upload your business logo, enable Google Pay, or let customers securely save their card details for future visits.
Click Save Changes.
Testing a transaction
After you've installed and configured the plugin, we highly recommend running a quick test transaction to make sure the pipes are connected properly before launch.
Click on an option below to see more.
Testing on a Test Account
We recommend starting here. Toggle your plugin environment to Sandbox and use Helcim's test card numbers to complete a fake purchase. This lets you see exactly how the checkout flows without moving actual funds.
To do this, open a Support Ticket in your Helcim account, or send an email request to tier2support@helcim.com.
Once your test account is set up, go through the setup steps above.
Ensure that Test Mode is disabled in both WooCommerce and your Helcim.js Configuration.
In a test account, the test status of payments is controlled at the processing terminal level.
When using a test account, you'll need to use specific test credit card numbers provided by Helcim.
| Remember that when you're ready to process live transactions, you'll need to repeat the setup steps below for your live Helcim account. |

Testing on a Live Account
Once sandbox testing looks great, switch your plugin environment to Live. Run a real transaction using your own personal credit card (you can process a test item for $1.00). Afterward, you can easily void or refund the transaction right inside your Helcim dashboard to ensure funds return to your card.
If you're new to Helcim, you can create a test product in WooCommerce and process a live transaction to see how the plugin works.
If you're already a Helcim user but new to the WooCommerce plugin, you can also test by processing a transaction through your checkout as a customer would. You'll see two transactions in your Helcim account: a "Verify" and a "Purchase."
To avoid any processing fees during testing, you can void the "Purchase" transaction in your Helcim account and then cancel the corresponding order in WooCommerce.
Next steps
Congratulations, you've successfully set up the Helcim payments plugin for WooCommerce!
| To learn how to troubleshoot common issues with the plugin, check out our article, Troubleshooting your Helcim WooCommerce integration. |

FAQ
Where do I find my Helcim Account ID?
You can find your Helcim Account ID by logging in to your Helcim account, clicking on All Tools, then Settings, and then My Account.
It's important to use your Account ID and not your Helcim Merchant ID, as they are different.
What do I do if I see an "INVALID RESPONSE - Missing or Invalid Fields - Account ID" error?
This error means that the Account ID you entered in your WooCommerce plugin settings doesn't match your Helcim account.
Double-check the Account ID in your Helcim account and make sure you've entered it correctly in WooCommerce.
I'm seeing errors even after following all the steps. What should I do?
Double-check each setting in your Helcim API Access Configuration, Helcim.js Configuration, and WooCommerce plugin settings to ensure they match the instructions.
If you're still encountering errors, Helcim's support team can assist you. You can reach out to us by opening a Support Ticket in your Helcim account, or by giving us a call.