Do you use WooCommerce to manage your online store and want to use Helcim to process your payments? The Helcim Commerce for WooCommerce plugin allows you to seamlessly integrate Helcim's payment processing capabilities into your WooCommerce store.
This article will guide you through the setup process, step by step.
In this article
Configure your API Access
To get started, you'll need to create a special code that allows the Helcim plugin to securely connect to your Helcim account. This code is called an API access token.
Here's how to create it:
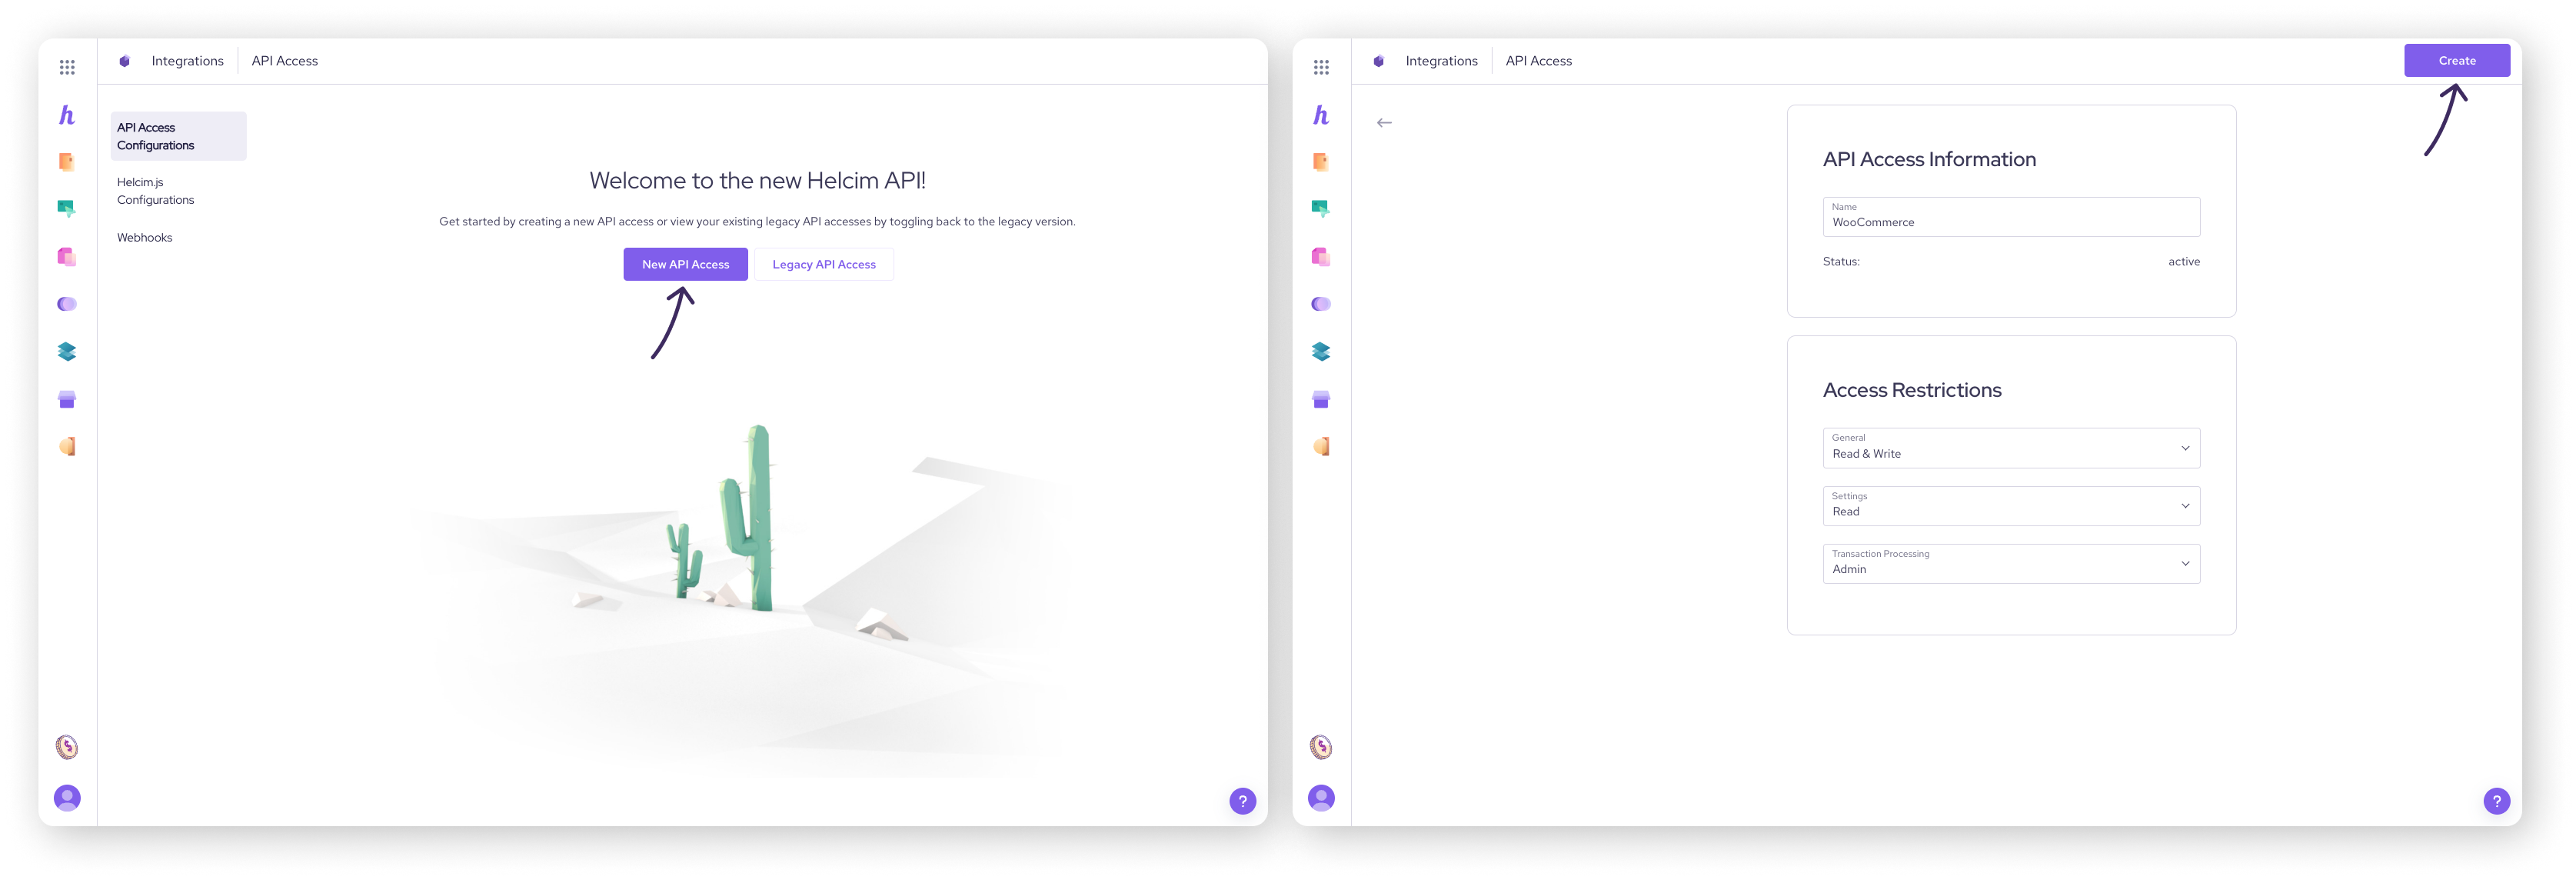
Log in to your Helcim account.
Click on All Tools and select Integrations from the menu.
Click on New API Access from the main page.
Create an API Access Configuration using the following settings:
Name: WooCommerce
Access Restrictions:
General: Read & Write
Settings: Read
Transaction Processing: Admin
Click Create to save your new configuration.
This will create a unique API Access token that you will copy and paste into your WooCommerce settings later in the configuration process.
Configure Helcim.js
The Helcim Commerce for WooCommerce plugin uses a tool called Helcim.js to handle credit card information securely. This helps protect your customers' data and simplifies your security requirements.
Here's how to set it up:
Click on All Tools and select Integrations from the menu.
Click on Helcim.js Configurations in the left sub-menu.
Click on New Configuration on the main page.
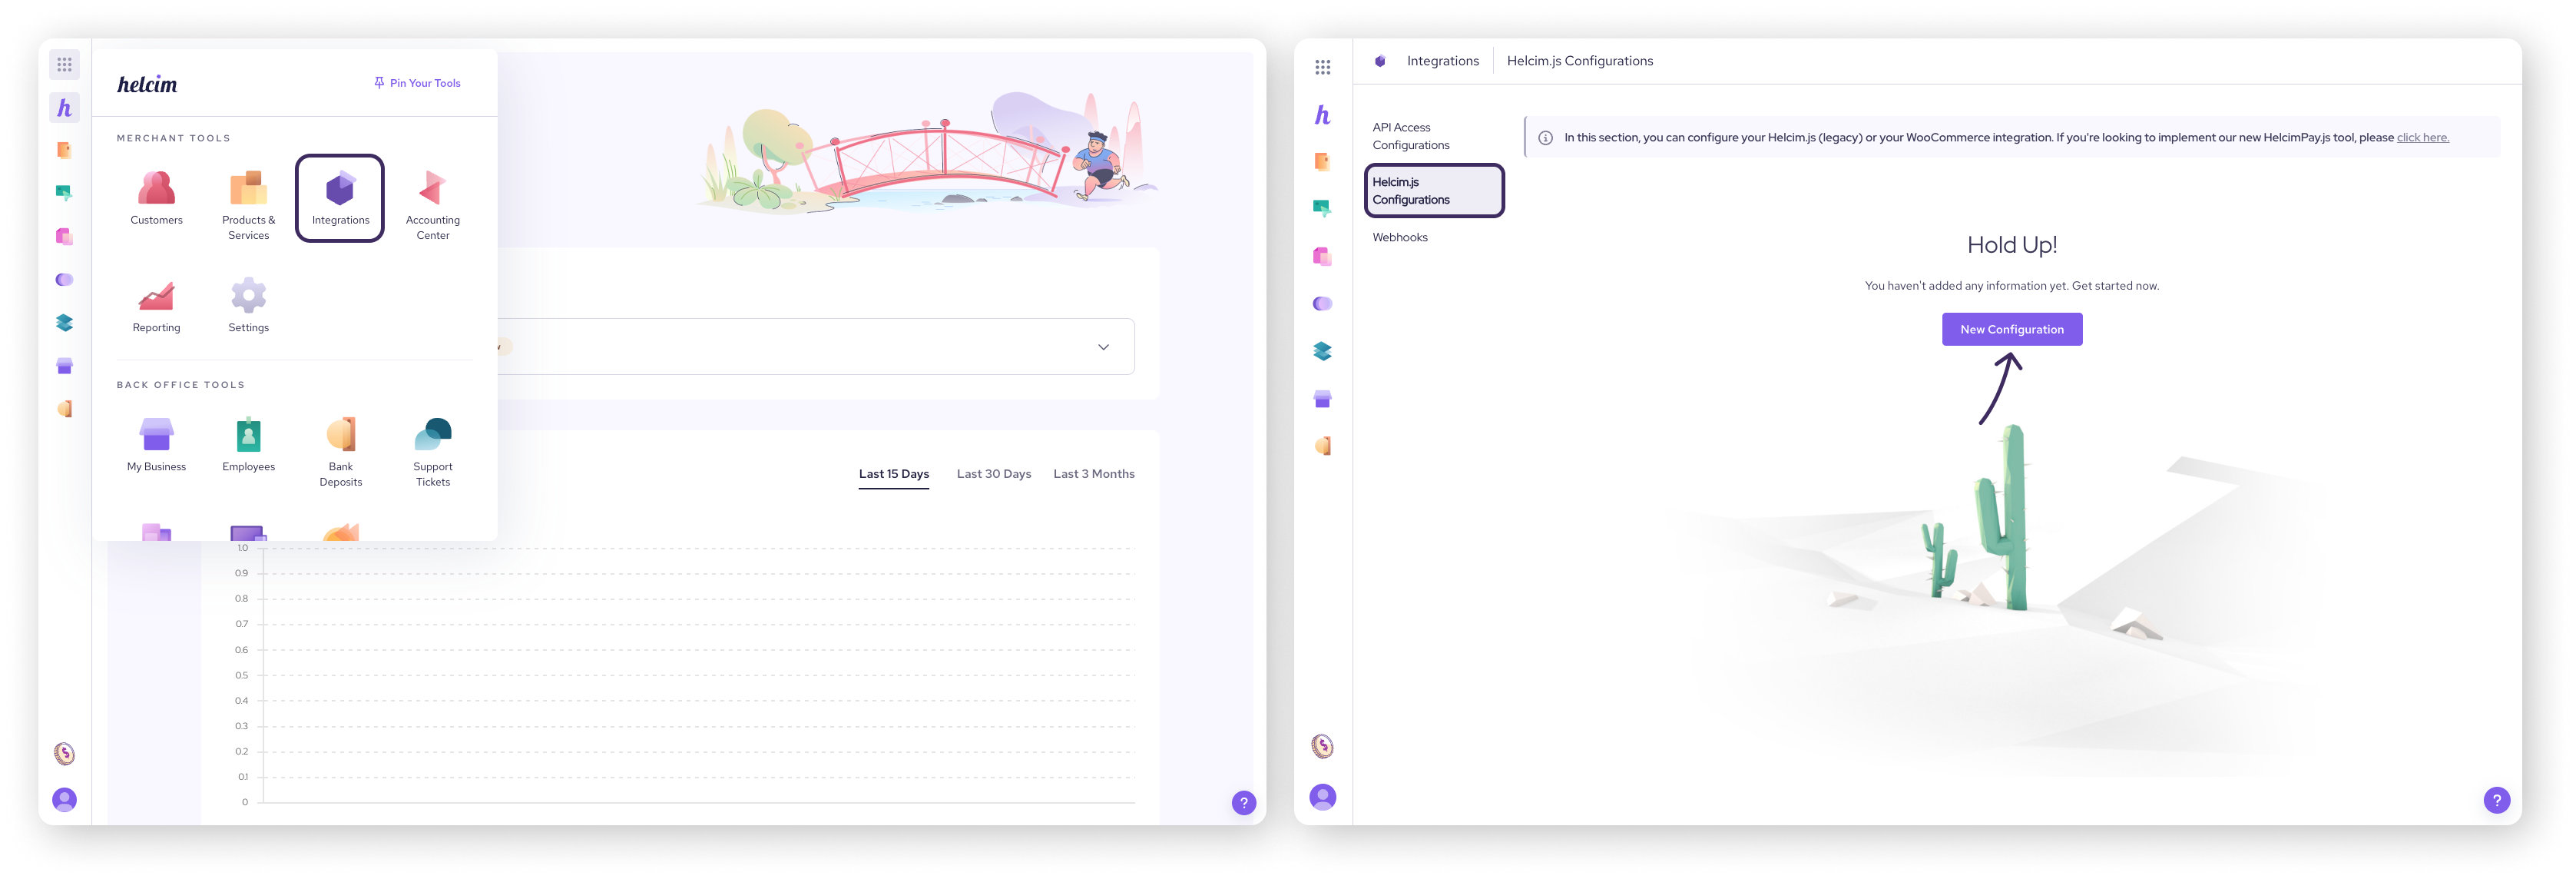
Then, create a Helcim.js Configuration using the following settings (click on each to expand).
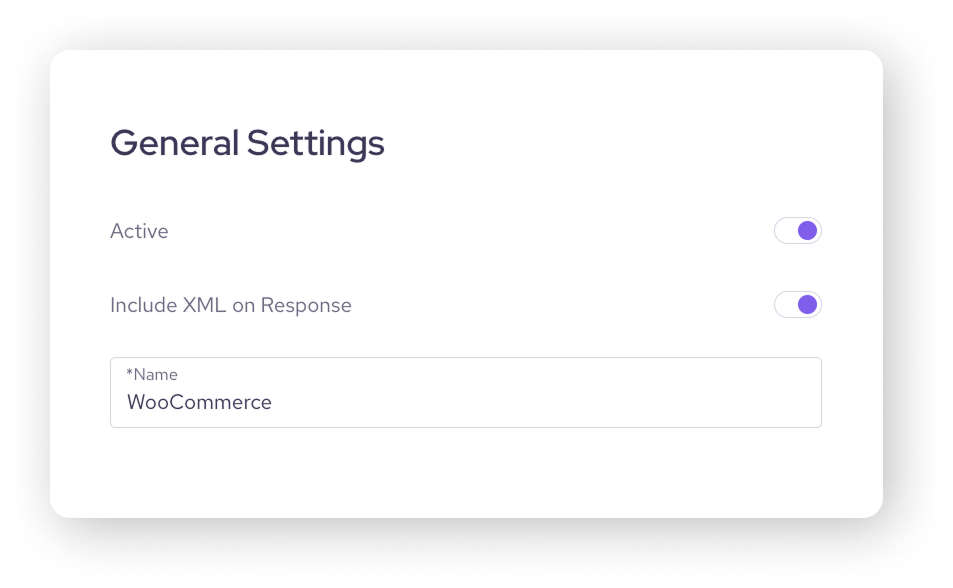
General Settings
Status: Active
Include XML on Response: On
Name: WooCommerce
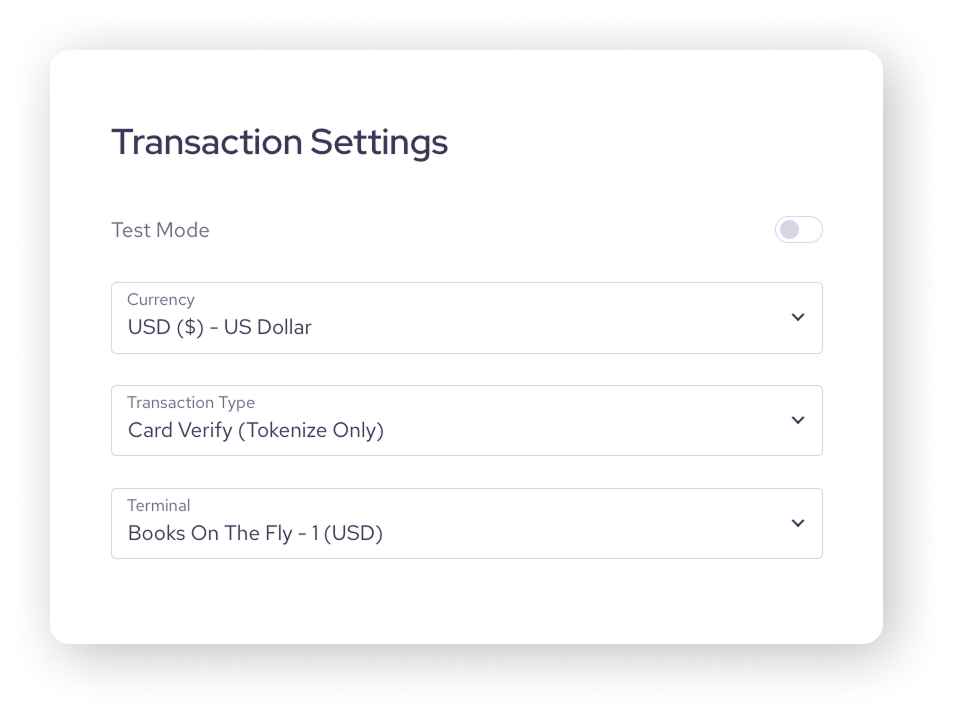
Transaction Settings
Test Mode: No
Currency: Select the currency you use for processing
Transaction Type: Card Verify (Tokenize Only)
Terminal: Select your processing terminal
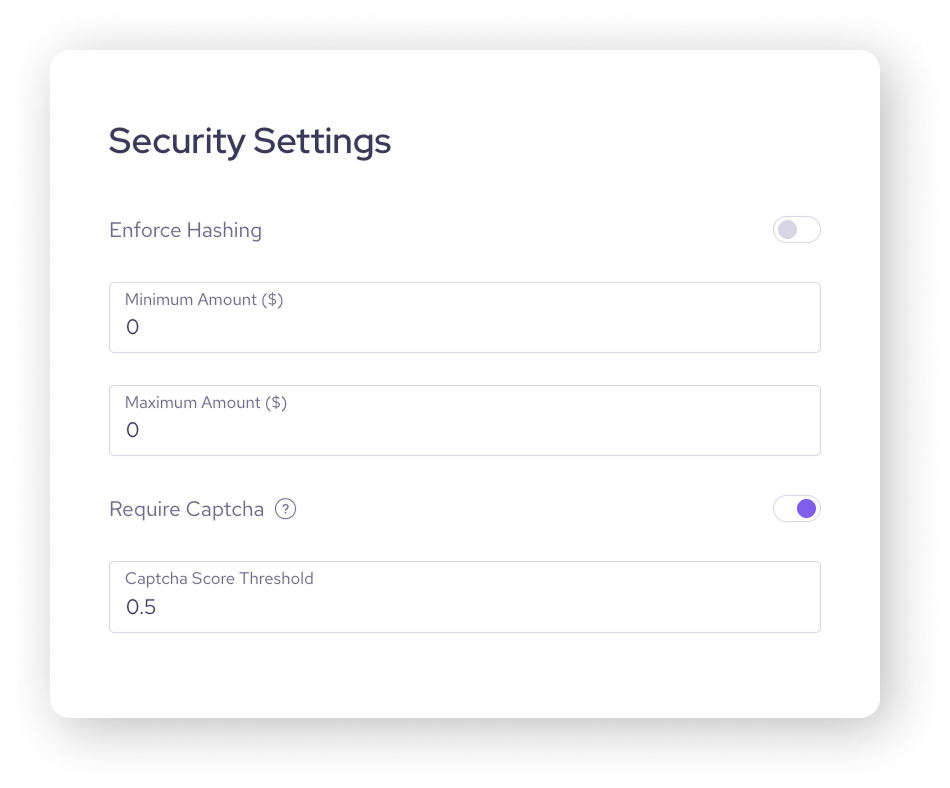
Security Settings
Enforce Hashing: No
Minimum Amount: 0
Maximum Amount: 0
Require Captcha: Yes
Captcha Score Threshold: We recommend starting with 0.5
Click Save to create your Helcim.js Configuration. This will generate a Helcim.js token and a Secret Key.
| You'll need to copy these into your WooCommerce settings. |
| Don't worry if these settings seem a bit technical! They're designed to ensure secure payment processing. If you're unsure about any setting, it's best to use the recommended values. |
.png)
Adjust your WooCommerce Settings
Now that you've set up your Helcim account, you can connect it to your WooCommerce plugin.
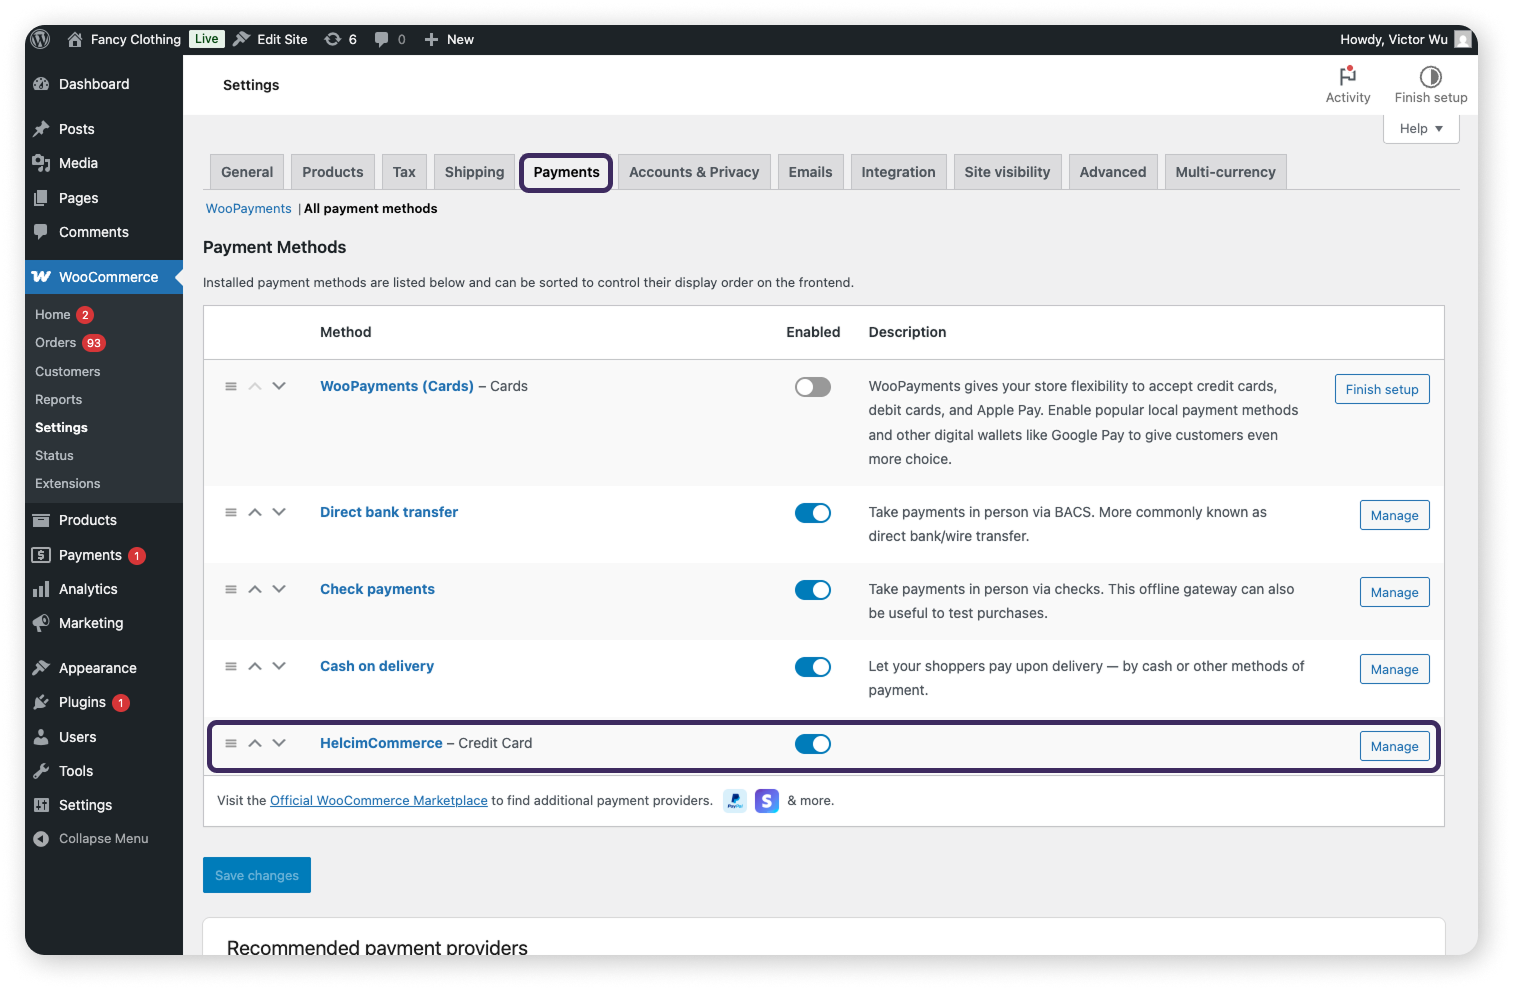
Go to your WordPress dashboard and select WooCommerce, then Settings.
Click on Payments from the tabs at the top of the screen.
Find the "Helcim Commerce for WooCommerce” plugin and click Manage.
Then, enter the following information on the Helcim Commerce for WooCommerce settings page (click on each to expand).
Enable/Disable
Check the Enable Helcim Payment Module box to turn on the plugin.
Test Mode
Check the Test Mode box if you're testing payments.
Keep in mind that enabling Test Mode only affects the initial verification of the payment method, not the actual purchase transaction.
Payment Method
Select “Helcim JS” from the dropdown.
Helcim JS Token
Enter the Helcim.js token you generated in the Configure Helcim.js step.
Helcim JS Secret Key
Enter the Secret Key you generated in the Configure Helcim.js step.
Account Id
Enter your Helcim commerce Account ID.
You can find this in your Helcim account under All Tools, then Settings, and then My Account.
API Token
Enter the API token you generated in the Configure your API Access step.
Transaction Type
Choose between “Purchase” and “Pre-authorization”.
If you choose Pre-authorization, you'll need to manually capture the payments from your Helcim Payments section within 7 days, or they will expire.
Description
Enter the text your customers will see on the checkout page for this payment option. This is required.
Helcim Logo
Check the Show Helcim logo on checkout option to display the Helcim logo.
Click Save changes to finish setting up the Helcim Commerce for WooCommerce plugin.
Manually Install the Plugin
While the easiest way to install the Helcim payments plugin is through the WordPress plugin marketplace, you can also install it manually. Here's how:
Extract the files to the following directory on your WordPress website: /wp-contents/plugins/
Testing your integration
After you've installed and configured the plugin, it's crucial to test it to ensure everything is working correctly. Helcim provides a couple of options for testing your WooCommerce integration.
Click on an option below to see more.
Testing on a Live Account
Helcim provides a small credit for new accounts, allowing you to test $5 worth of live transactions without incurring fees.
f you're new to Helcim, you can create a test product in WooCommerce and process a live transaction to see how the plugin works.
If you're already a Helcim user but new to the WooCommerce plugin, you can also test by processing a transaction through your checkout as a customer would. You'll see two transactions in your Helcim account: a "Verify" and a "Purchase."
To avoid any processing fees during testing, you can void the "Purchase" transaction in your Helcim account and then cancel the corresponding order in WooCommerce.
Testing on a Test Account
For more extensive testing in a safe environment, you can request a test account from Helcim support.
To do this, open a Support Ticket in your Helcim account, or send an email request to tier2support@helcim.com.
Once your test account is set up, go through the setup steps above.
Ensure that Test Mode is disabled in both WooCommerce and your Helcim.js Configuration.
In a test account, the test status of payments is controlled at the processing terminal level.
When using a test account, you'll need to use specific test credit card numbers provided by Helcim.
| Remember that when you're ready to process live transactions, you'll need to repeat the setup steps above for your live Helcim account. |
Next steps
Congratulations, you've successfully set up the Helcim payments plugin for WooCommerce!
| To learn how to troubleshoot common issues with the plugin, check out our article, Troubleshooting your Helcim WooCommerce integration. |
FAQ
Where do I find my Helcim Account ID?
You can find your Helcim Account ID by logging in to your Helcim account, clicking on All Tools, then Settings, and then My Account.
It's important to use your Account ID and not your Helcim Merchant ID, as they are different.
What do I do if I see an "INVALID RESPONSE - Missing or Invalid Fields - Account ID" error?
This error means that the Account ID you entered in your WooCommerce plugin settings doesn't match your Helcim account.
Double-check the Account ID in your Helcim account and make sure you've entered it correctly in WooCommerce.
What's the difference between "Purchase" and "Pre-authorization" for the Transaction Type?
Purchase: This transaction type immediately captures the payment from the customer's card.
Pre-authorization: This transaction type only authorizes the payment, holding the funds on the customer's card. You'll need to manually capture the payment later from your Helcim Payments section.
If you don't capture it within 7 days, the authorization will expire.
I'm seeing errors even after following all the steps. What should I do?
Double-check each setting in your Helcim API Access Configuration, Helcim.js Configuration, and WooCommerce plugin settings to ensure they match the instructions.
If you're still encountering errors, Helcim's support team can assist you. You can reach out to us by opening a Support Ticket in your Helcim account, or by giving us a call.