While Helcim's default employee roles are a great starting point, sometimes your business needs something a bit more specific. That's where custom roles come in!
| Creating your own roles lets you decide exactly what each team member can see and do within your Helcim account. |
This article will guide you through how to create a custom role and explain each available permission, so you can build the perfect setup for your team.
In this article
Why create a custom role?
Default roles like Administrator, Manager, or General Staff cover many common business functions. But what if you need a "Weekend Supervisor" who can do a bit more than General Staff but less than a full Manager? Or perhaps an "Inventory Clerk" who only needs access to products and nothing else?
Custom roles give you that granular control, allowing you to:
Enhance security: By granting only the permissions an employee absolutely needs, you reduce potential risks.
Improve efficiency: When employees only see the tools and options relevant to their job, they can navigate the system more quickly.
Tailor access: Perfectly match permissions to unique job functions within your business.
How to create a new custom role
Ready to build a role that fits your team like a glove? Here’s how.
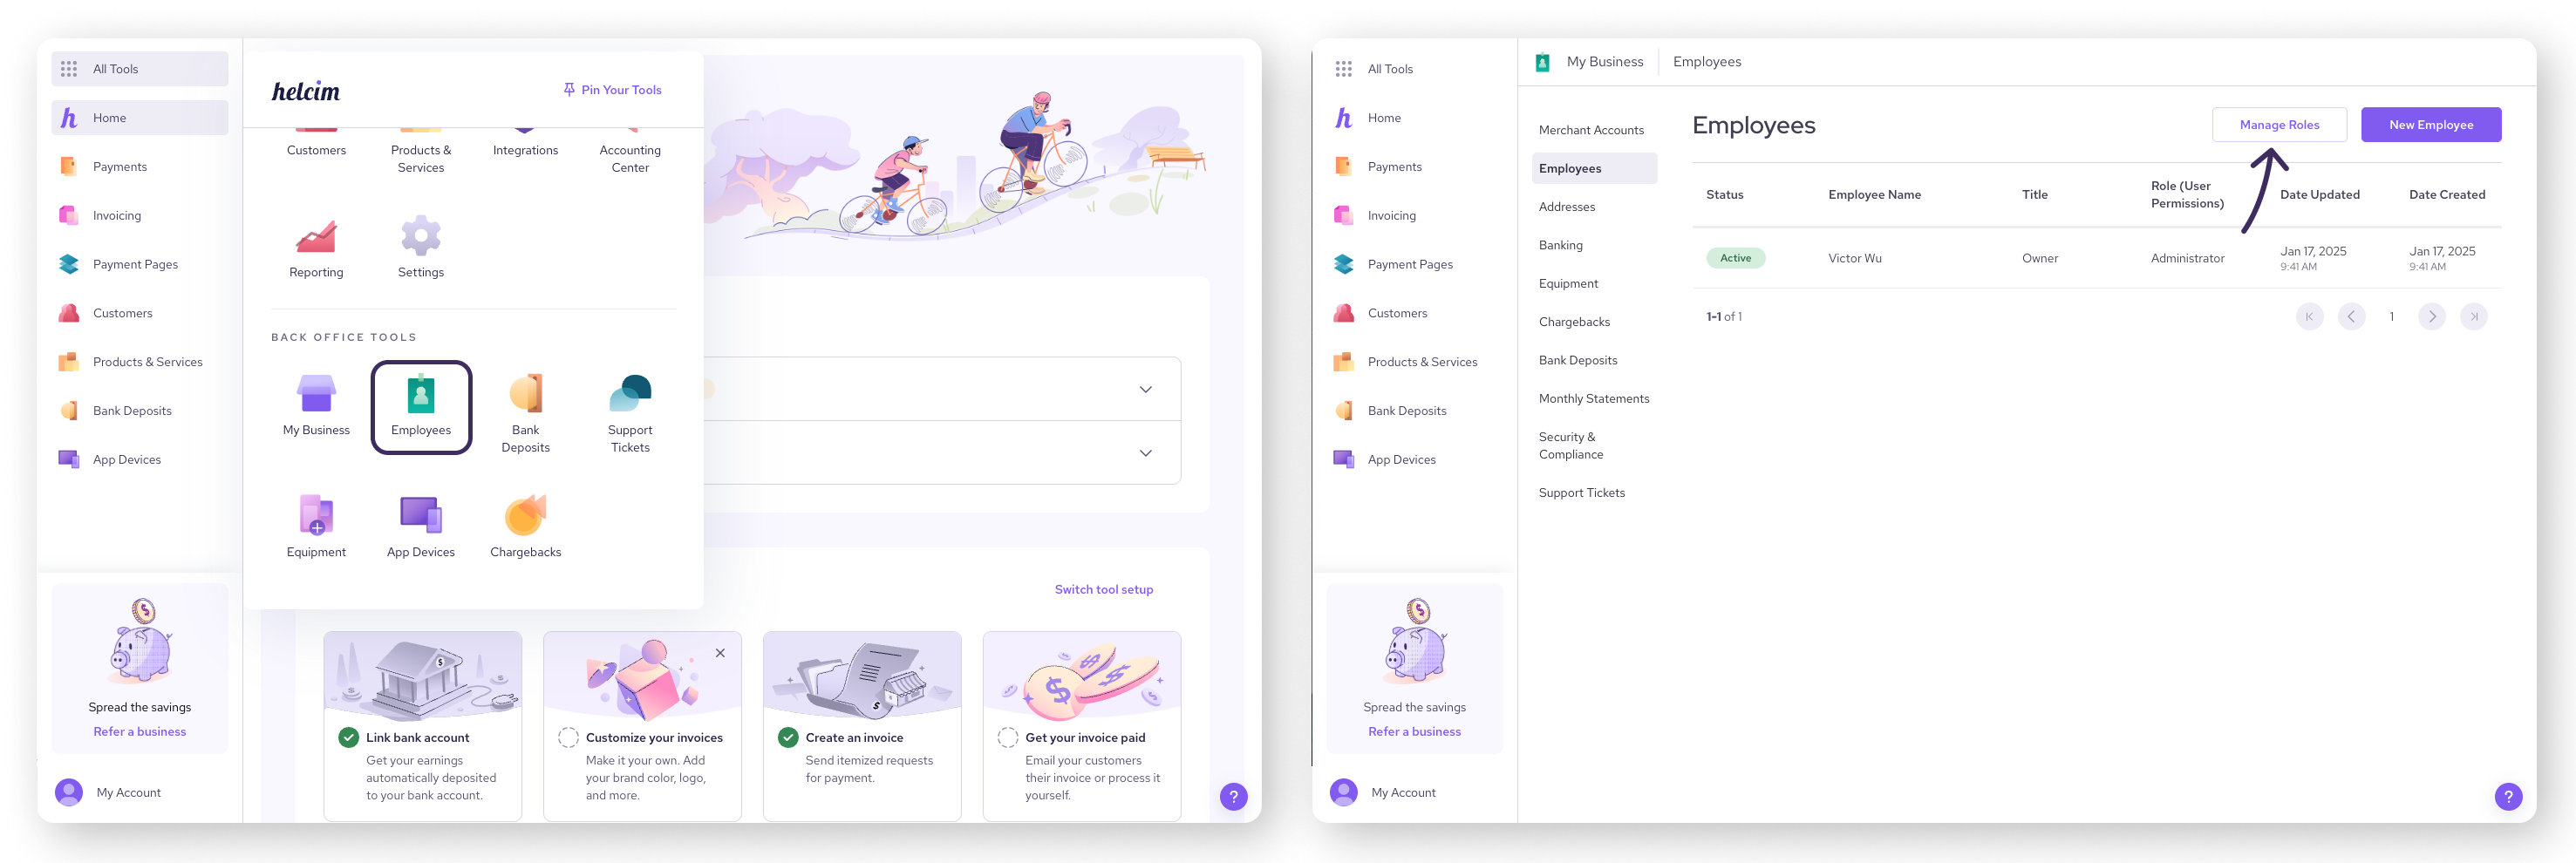
Step 1: Navigate to ‘Manage Roles’
Open the All Tools menu, then click on Employees.
Select Manage Roles.
Step 2: Create a new custom role
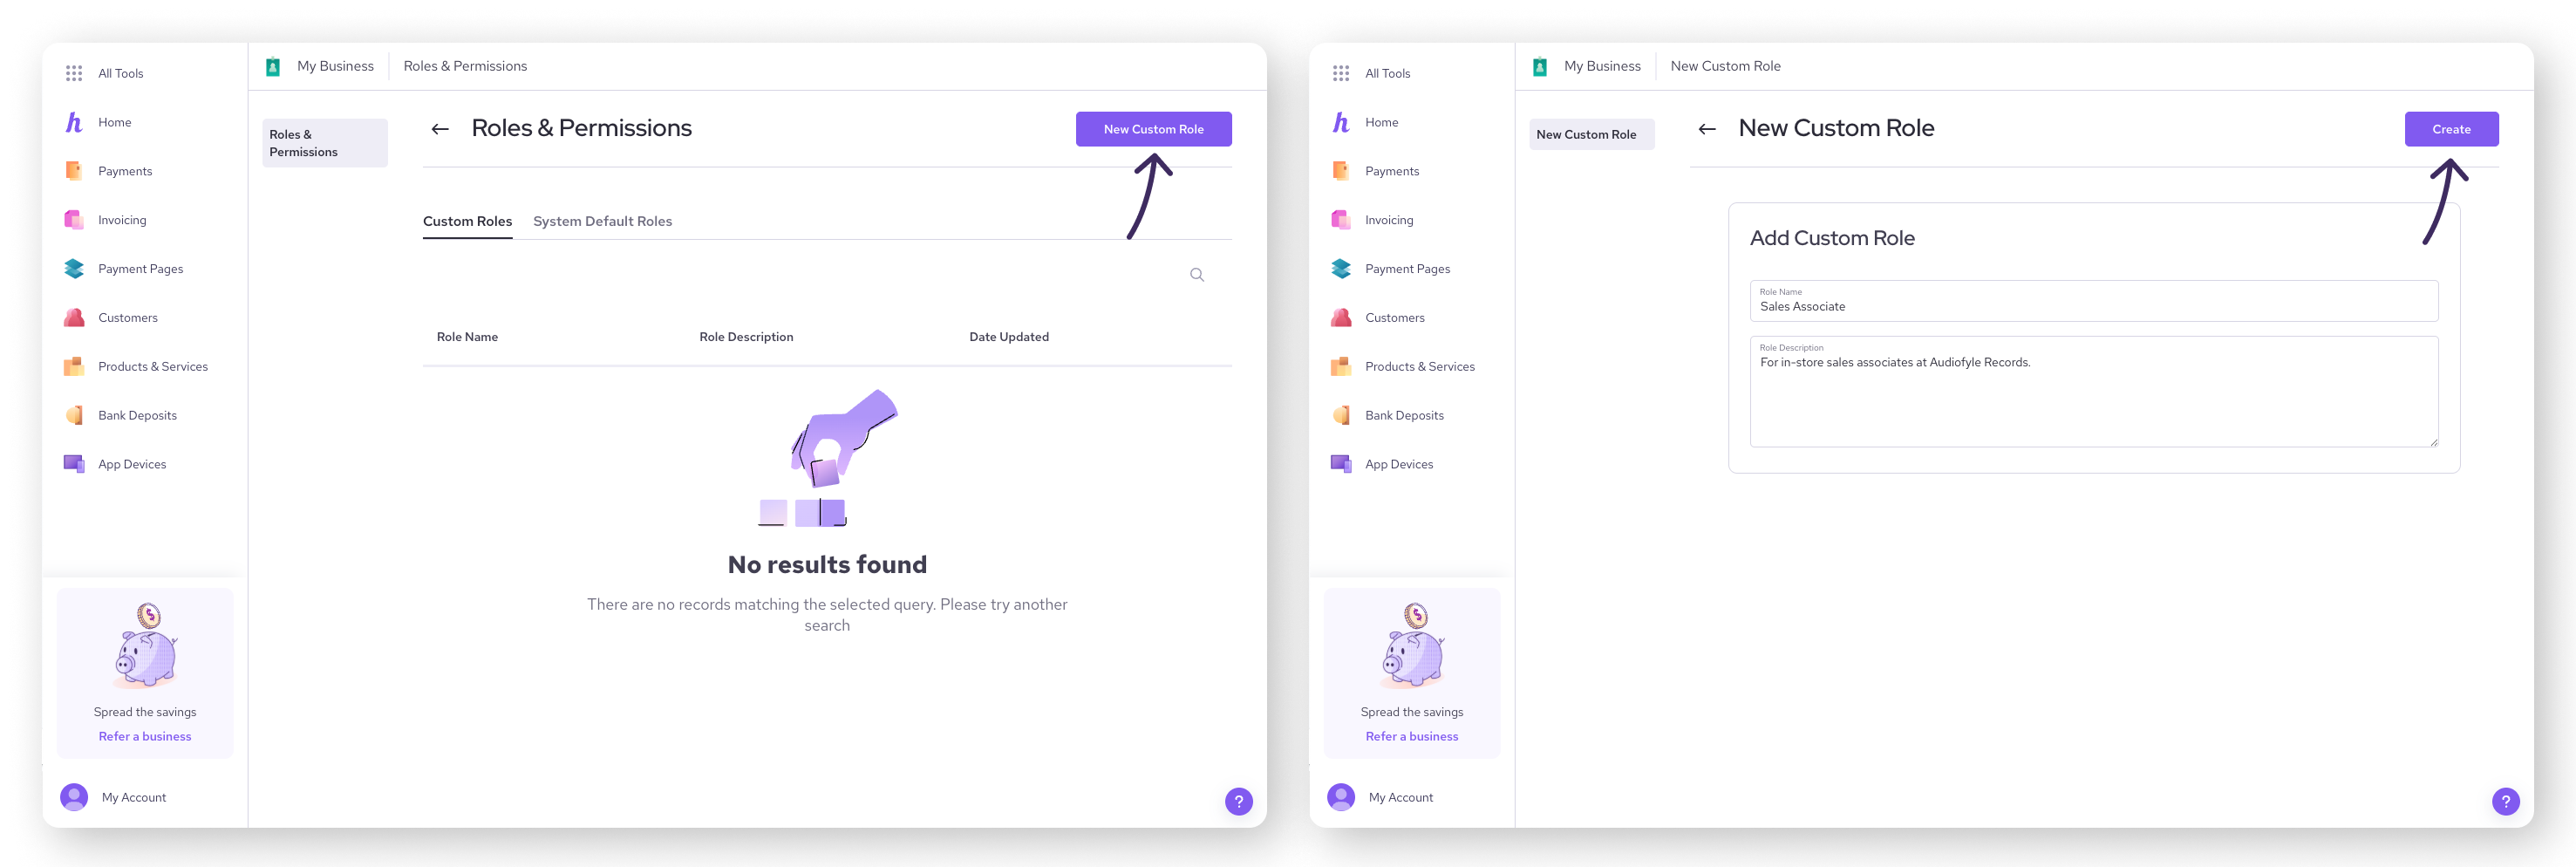
On the Manage Roles page, click on New Custom Role.
Give your role a Name. Choose something clear and descriptive that will make sense to you and your team (e.g. "Cashier Shift Lead," "Order Fulfillment Specialist").
Add a brief Description for the role. This can help you remember the purpose of this role later on.
Click Create. You'll see a confirmation message, and then you'll be taken directly to the page where you can assign specific permissions for the new role.
Step 3: Assign permissions to the role
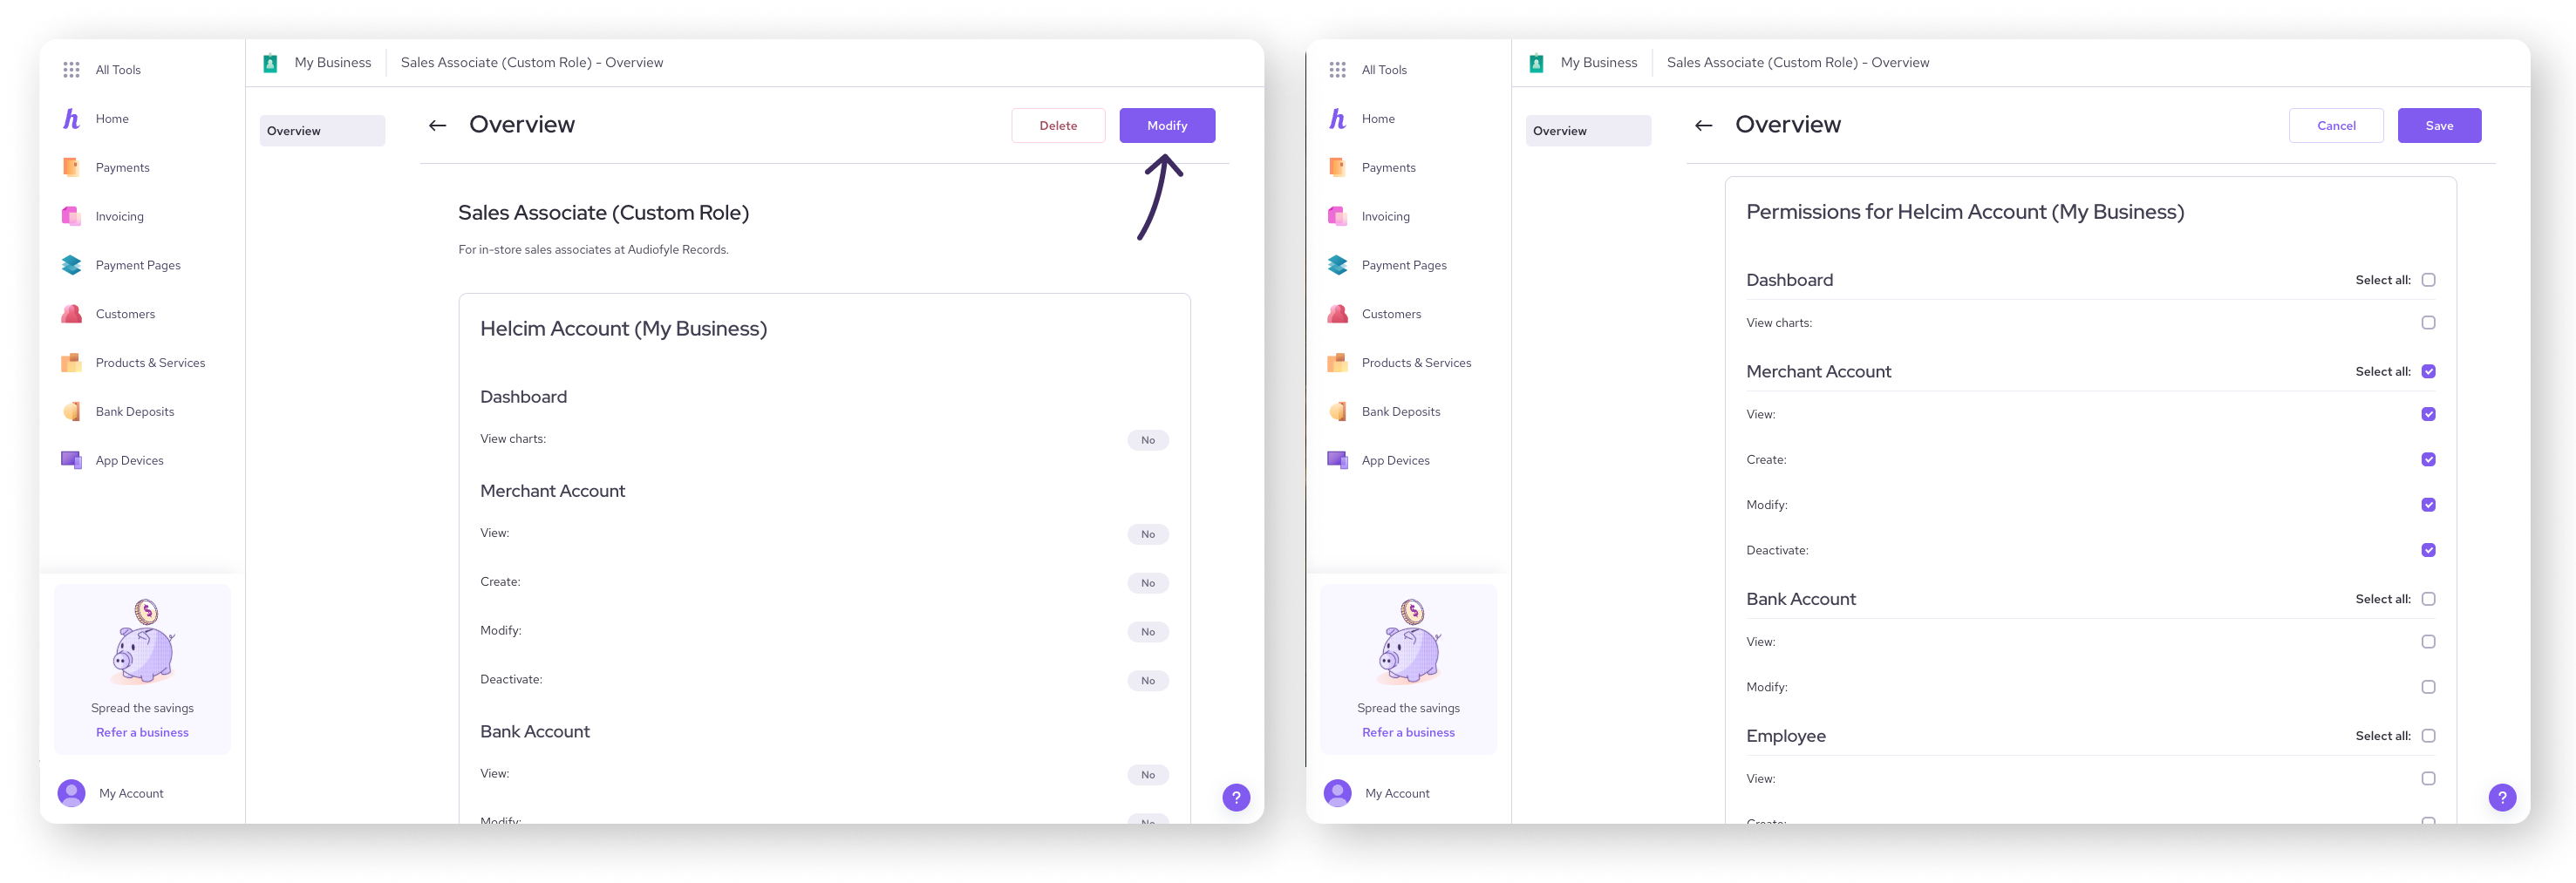
Select Modify to assign permissions for the role.
Scroll through the permission options and check the boxes next to each action to allow it for the role.
Click on Save to apply the changes.
Understanding permissions
Permissions are grouped into categories related to different areas of your Helcim account. For each category, you can check the Select all box to grant all permissions within that group, or pick and choose individual permissions.
Click to expand an option below to see what each permission allows a user to do.
Helcim account permissions
Category | Permission | What the user can do |
Dashboard | View charts | Ability to see the sales and transactions charts on the home page. |
Merchant Account | View | Ability to view merchant accounts. |
Create | Ability to create merchant accounts. | |
Modify | Ability to modify merchant accounts. | |
Deactivate | Ability to deactivate merchant accounts. | |
Bank Account | View | Ability to view linked bank accounts. |
Modify | Ability to add or modify existing linked bank accounts. | |
Employee | View | Ability to view employee information. |
Create | Ability to create new employees. | |
Modify | Ability to edit information for existing employees, including their role. | |
Deactivate | Ability to temporarily deactivate an employee. | |
Delete | Ability to permanently delete an employee. | |
Role | View | Ability to view custom employee roles (under Manage roles). |
Create | Ability to create a new custom employee role. | |
Modify | Ability to modify the permissions for an existing custom role. | |
Delete | Ability to delete a custom employee role. | |
Location | View | Ability to view business addresses. |
Create | Ability to create new addresses (for multiple locations). | |
Modify | Ability to modify existing addresses. | |
Delete | Ability to delete addresses. | |
Equipment | View | Ability to view a list of existing hardware (Smart Terminals, Card Readers, etc.). |
Order | Ability to order new hardware. | |
Chargebacks | View | Ability to view the list of chargebacks. |
Respond | Ability to respond to chargebacks, including accepting or disputing them. | |
Statement | View | Ability to view monthly statements. |
Security | View | Ability to view compliance forms and history. |
Answer | Ability to fill out compliance forms. | |
Ticket | View | Ability to view a list of support tickets. |
Create | Ability to create a new support ticket. | |
Modify | Ability to reply in thread to an existing ticket. | |
Tax Forms | View | Ability to view tax forms (1099-K). |
Helcim tool permissions
Category | Permission | What the user can do |
Transactions | View | Ability to view transactions (Associated actions: viewing, sending, or printing receipts). |
Process | Ability to initiate new payment from the Payments tool. | |
Void | Ability to void transactions. | |
Refund | Ability to refund transactions. | |
Preauth | Ability to create credit card preauthorizations. | |
Capture | Ability to capture existing credit card preauthorizations. | |
Settle | Ability to settle (close) batches. | |
Customers | View | Ability to view customer profiles. |
Create | Ability to create new customer profiles. | |
Modify | Ability to modify customer information (Associated actions: requesting payment information, sending activation emails). | |
Delete | Ability to delete existing customer profiles. | |
Invoices | View | Ability to view invoice history. |
Modify | Ability to modify existing invoices (Associated actions: downloading invoices, emailing PDF copies). | |
Create | Ability to create new invoices. | |
Products | View | Ability to view the product library. |
Modify | Ability to modify products or services. | |
Create | Ability to create new products or services. | |
Delete | Ability to delete products or services. | |
Recurring | View | Ability to view recurring payment plans. |
Modify | Ability to modify existing recurring plans. | |
Create | Ability to create new recurring plans. | |
Delete | Ability to delete existing recurring plans. | |
Subscriptions | View | Ability to view subscriptions to recurring payment plans. |
Modify | Ability to edit subscriptions to recurring payment plans (payment method or schedule) Associated actions: pausing subscriptions. | |
Create | Ability to add a new subscriber to a plan. | |
Delete | Ability to delete subscriptions to a plan. | |
Pay Page | View | Ability to view a list of payment pages. |
Modify | Ability to edit payment pages. | |
Create | Ability to create payment pages. | |
Delete | Ability to delete payment pages. | |
Online Store | View | Ability to view the dashboard for the Online Checkout tool. |
Modify | Ability to modify the design or settings for Online Checkout. | |
Customer Portal | View | Ability to view the customer portal. |
Modify | Ability to make changes to customer portal settings (required information, customer permissions, theme designer, etc.). | |
Settings | View | Ability to view the settings page for the account. |
Modify | Ability to modify any of the settings. | |
Reports | View | Ability to view reports in the Reporting tool. |
After selecting all the necessary permissions, don't forget to click Save to apply your changes to the custom role.
Tips for assigning permissions
Less is more (usually): Only grant permissions an employee absolutely needs to do their job.
Use default roles as a starting point: Is this custom role similar to a "General Staff" but needs to modify customer profiles? Understanding the defaults can help you decide what to add or remove.
Name roles clearly: Use descriptive names for your custom roles so it's easy to know what each one is for. "Front Desk - Returns" is clearer than "Custom Role 1."
Review periodically: As your business changes or employees take on new responsibilities, revisit your custom roles to ensure they're still a good fit.
Test it out: If you can, create a test employee account, assign the new custom role to it, and log in as that user. Click around and make sure they can do what they need to—and can't do what they shouldn't!
Next steps
With your new custom roles defined, you're ready to put them to use!
Add your employees and assign your newly created custom roles.
Refresh your memory on default employee roles to see how your custom roles compare.
Know how to remove an employee from your account when the time comes.
FAQs
How many custom roles can I create?
You can create as many custom roles as your business needs. There's no limit!
Can I change the permissions for a custom role after I've created it?
Absolutely! Just go back to All Tools > Employees > Manage Roles. Click on the custom role you want to edit, and you'll be able to check or uncheck permissions as needed. Remember to Save your changes.
What happens if I don't assign any permissions to a new custom role?
If a custom role has no permissions selected, users assigned to that role will have very limited access. They won't be able to perform any specific actions or access most tools.
Can I copy an existing custom role to use as a template for a new one?
Currently, there isn't a direct "copy" or "duplicate" function for roles. You would create a new custom role and then select the desired permissions, using an existing role as your guide for which permissions to enable.