Auto-Collect for QuickBooks Online helps you automate the process of collecting payments on your QuickBooks Online invoices directly through your Helcim account. It's designed to reduce your administrative burden, keep your accounting tidy, and give you peace of mind – all at no extra cost.
Keep reading to learn how to get Auto-Collect for QuickBooks Online up and running for your business.
In this article
Enable Auto-Collect in your Helcim account
First things first, let's activate Auto-Collect across your Helcim account. This is a one-time setup that tells our system you're ready to start automating payments.
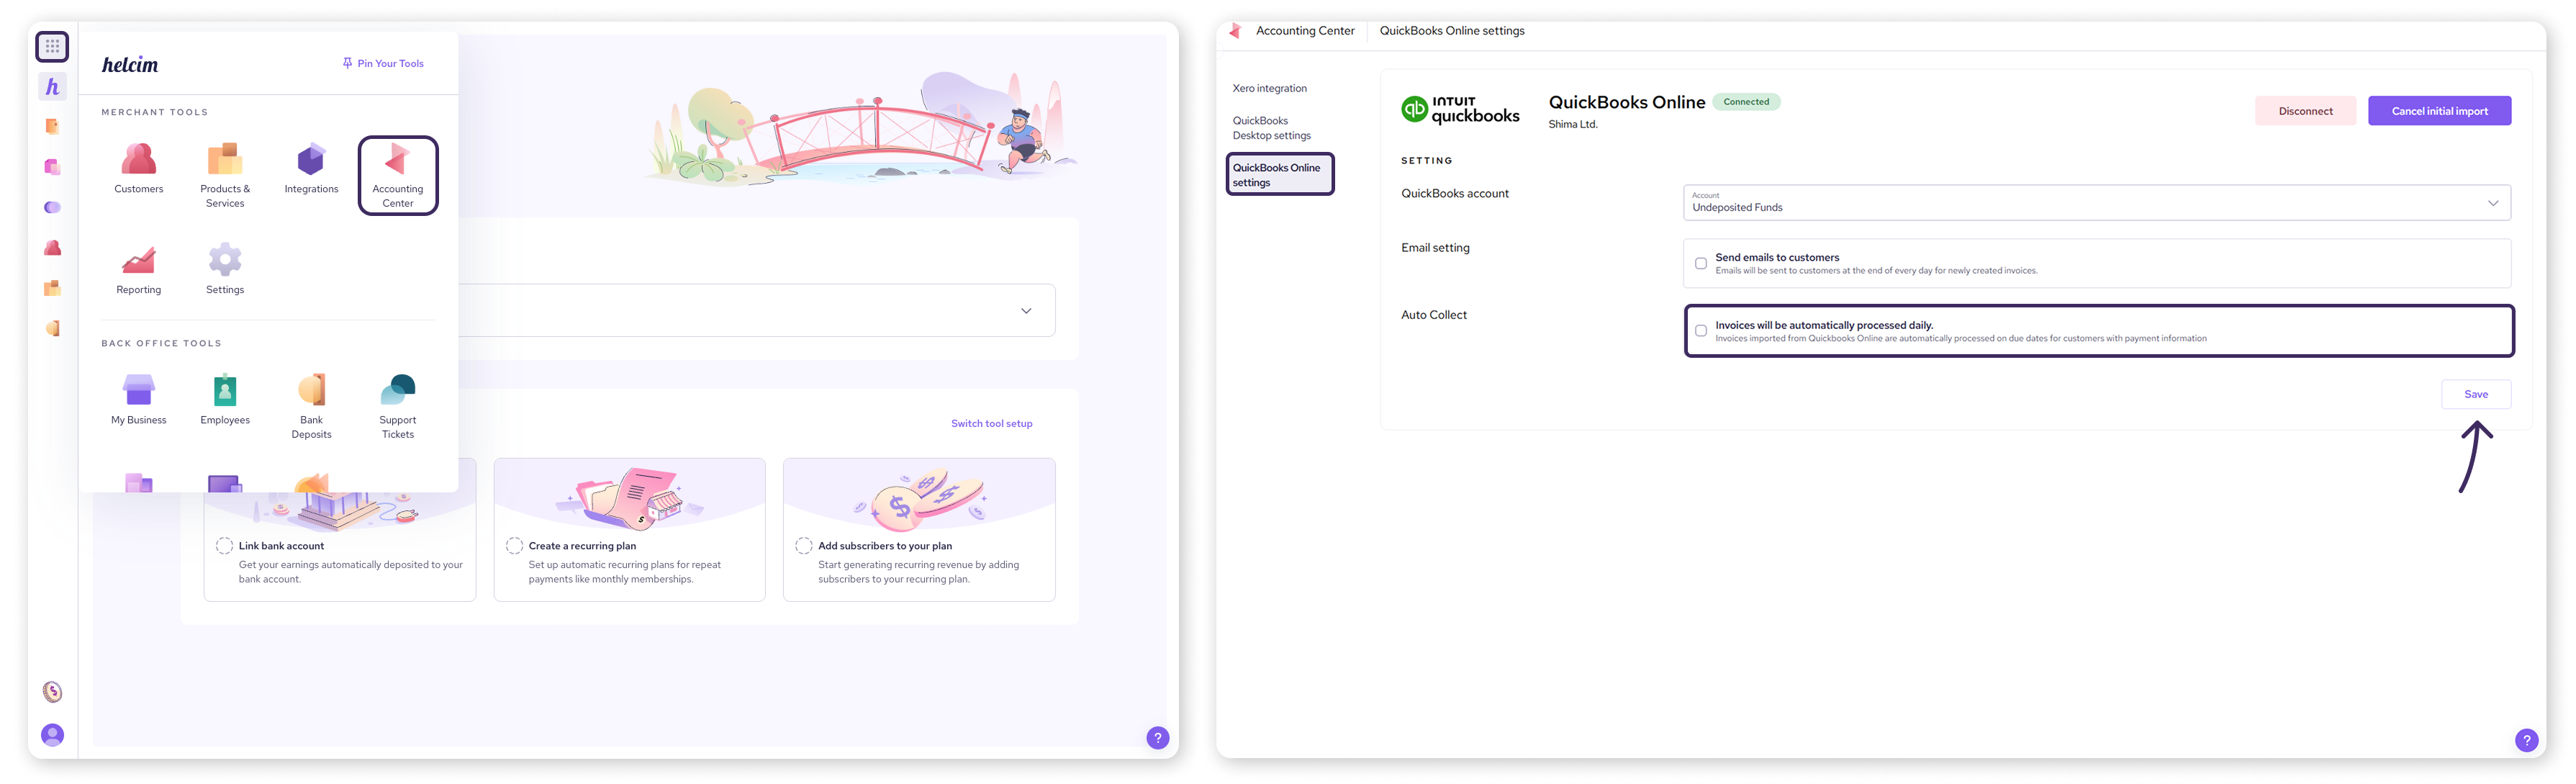
Log in to your Helcim account.
Select All Tools from the main menu.
Choose Accounting Center.
Click on QuickBooks Online settings from the left-side menu.
| At this point, you should see your active QuickBooks Online connection. If you haven’t yet linked your QuickBooks Online account to Helcim, then follow the steps in this article: Setting up the QuickBooks Online integration. |
From this settings page, find the Auto Collect toggle and turn it ON.
Hit Save to enable Auto-Collect for your account.
Enable Auto-Collect for individual customers
With Auto-Collect enabled account-wide, you must now choose which customers you want to apply this automation to. This gives you full control over who gets charged automatically.
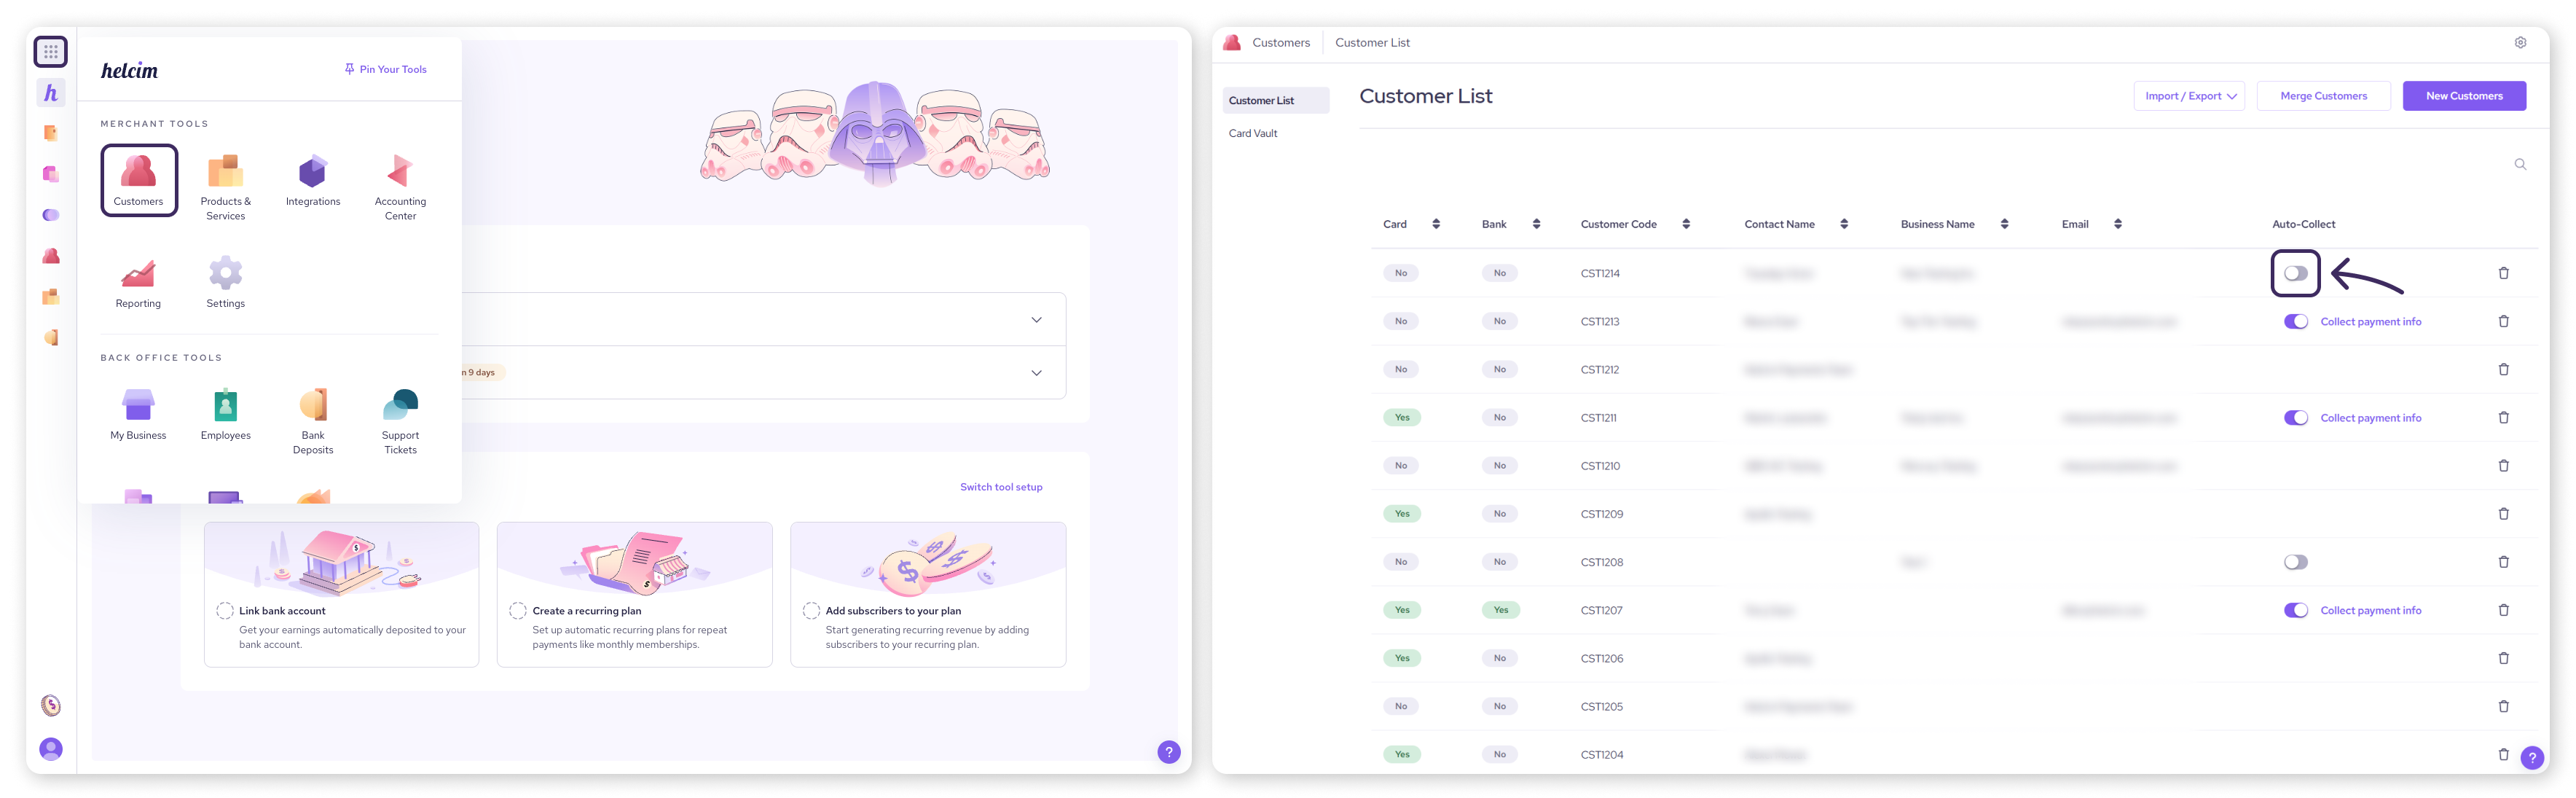
Go back to All Tools.
Select Customers.
Find the customer you want to enable Auto-Collect for.
In the customer's row, you'll see a new column called Auto Collect. Turn the toggle in the column ON.
The customer must have been created in your QuickBooks Online account and synced for this toggle to show.
| If the customer has a payment method (a credit card or bank account) on file, the invoices for that customer linked to QuickBooks Online will be automatically processed daily according to their due dates. |
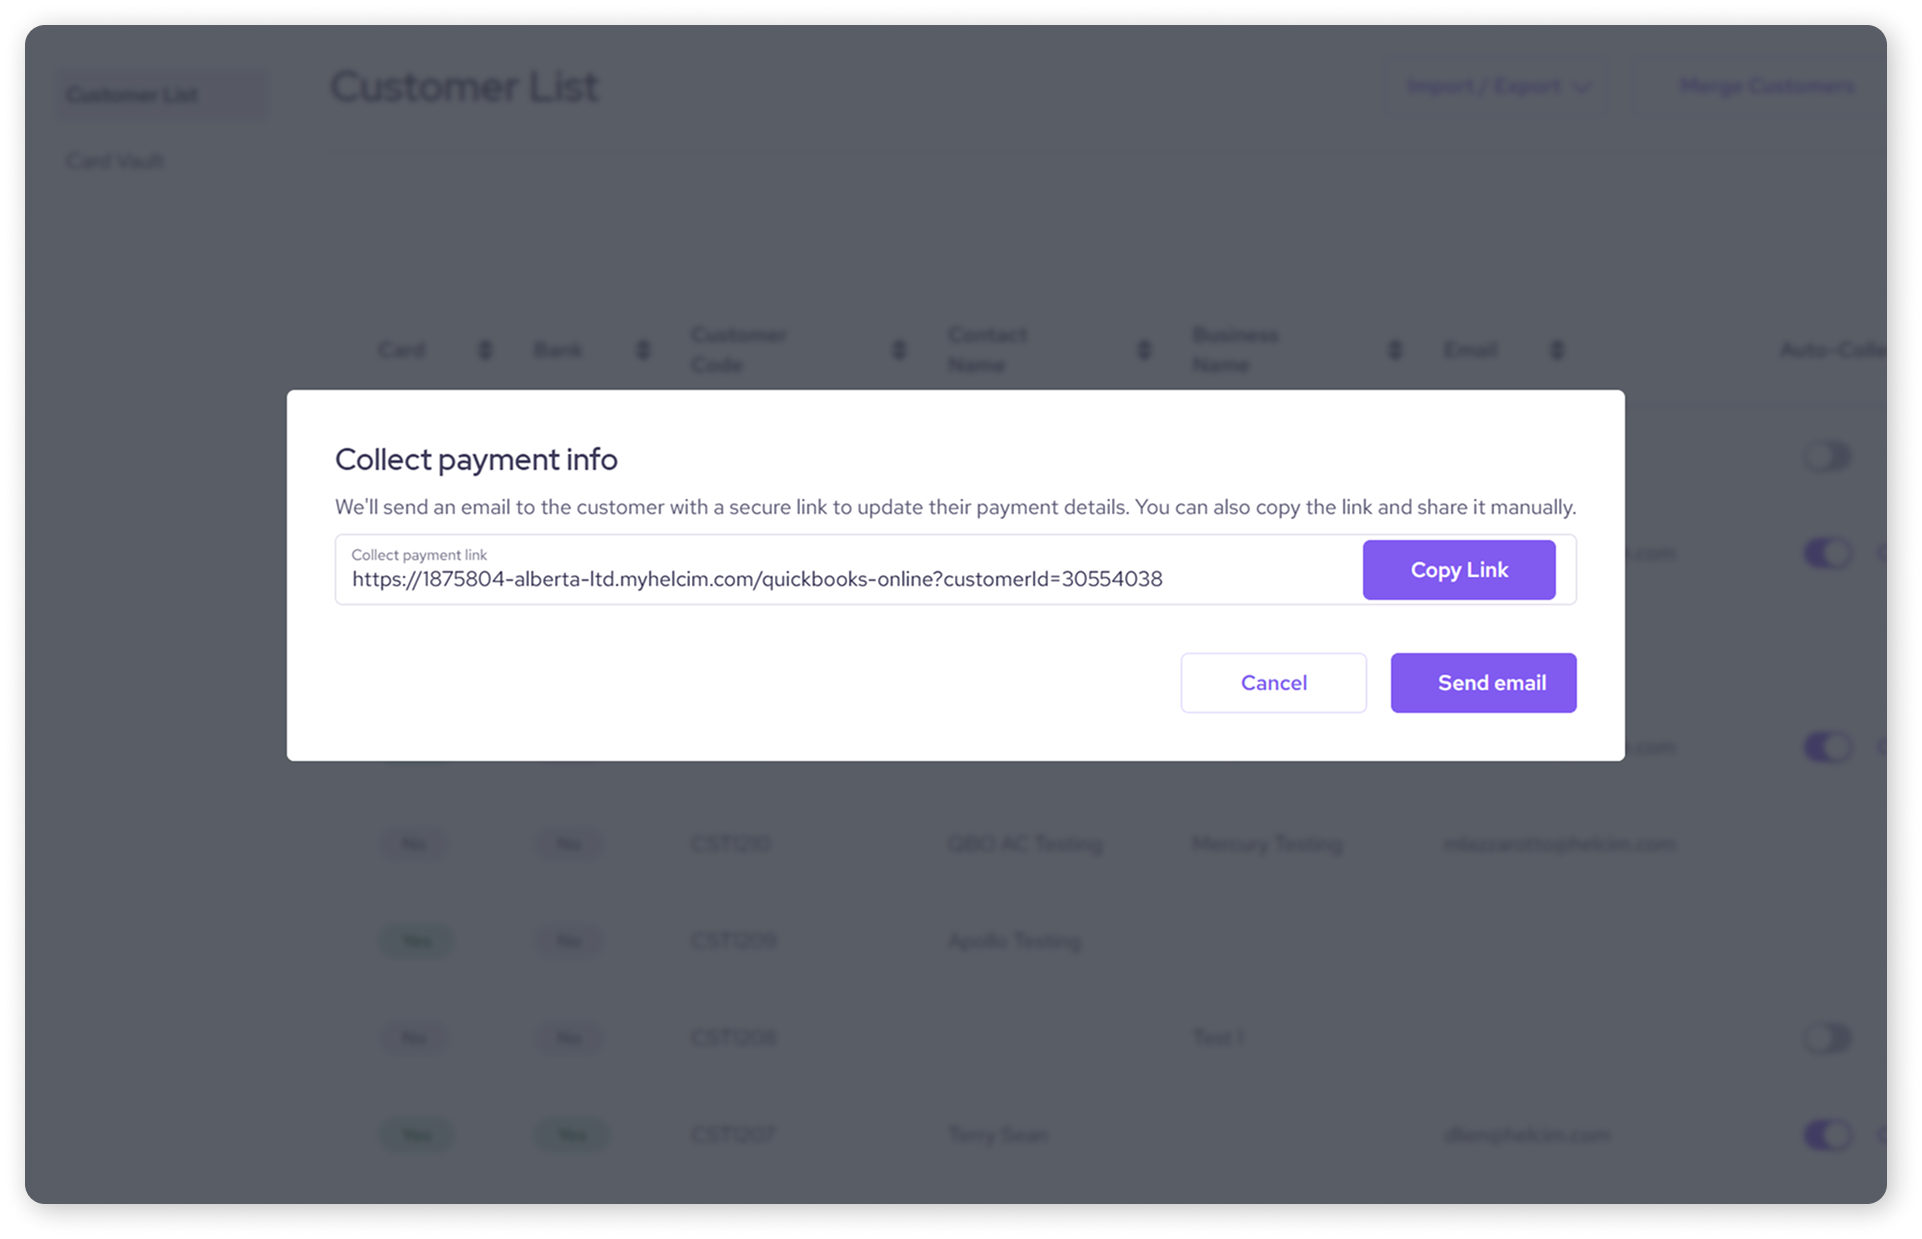
What if a customer doesn't have payment info saved?
If a customer doesn't have a payment method on file, you’ll see a ‘No’ tile in either the Card or Bank columns in the customer list.
For Auto-Collect to work, you'll need to either add or request a payment method.
Go back to the Customer List in the Customers tool.
You’ll see a Collect payment info link next to the Auto-Collect toggle for your QuickBooks Online customers.
Click this to launch a pop-up that allows you to share a link or send an email to your customer to securely provide their payment details.
Select Copy Link or Send an email, depending on your preferred method.
Once they've added their information, Auto-Collect will be enabled for that customer.

How Auto-Collect works with QuickBooks Online
Once you've set up Auto-Collect, here's a quick peek at how it simplifies your payment collection:
You create an invoice in QuickBooks Online and set a due date, just like you normally would.
Your invoice is automatically imported into Helcim.
If you've enabled Auto-Collect for that customer and they have a saved payment method, Helcim takes over!
On the invoice due date, our system will automatically try to process the payment.
It will first attempt to charge the customer’s ACH account on file. If that's unavailable or unsuccessful, it will then try the credit card on file as a fallback.
The payment is then exported back to QuickBooks Online, automatically marking the invoice as Paid. No manual reconciliation needed!
You'll receive a payment confirmation, and your customer will also be notified of the successful transaction.
Once you return to your Helcim account you’ll see a matching invoice, also with the status Paid.
| Keep in mind that currently, Auto-Collect applies to the full invoice amount only and does not support partial payments. |
Troubleshooting failed payments
While Auto-Collect is designed to be smooth sailing, sometimes payments don't go through. If a payment fails, don't worry!
| Our system will automatically retry the payment once a day for 5 consecutive days. If the payment is still unsuccessful after these attempts, its status will be marked as Failed. |
At this point, you can choose to retry the payment manually or reach out to your client directly to resolve the issue.
Next steps
If you haven't yet connected your QuickBooks Online account to Helcim, you'll need to do that first for Auto-Collect to work. You can find detailed instructions in our article: Setting up the QuickBooks Online integration.
Looking for information on Xero’s Auto-Collect feature? Visit this article: Automate invoices with Xero Auto-Collect.
FAQs
Is Auto-Collect automatic for all invoices?
No. Auto-Collect gives you control! You can enable or disable the feature for specific customers, and it will apply to invoices for those customers.
Can I also use Auto-Collect with Xero?
Yes! Auto-Collect is available for merchants using both our QuickBooks Online and Xero integrations. While they are separate features, they operate with similar benefits and functionality.
To learn how to use Xero Auto-Collect, visit this article: Automate invoices with Xero Auto-Collect.
Why can’t I see the Auto-Collect toggle for my customer?
The Auto Collect toggle will only appear for customers who were originally created in QuickBooks Online and then synced to your Helcim account. If you created a customer directly in Helcim, or if they haven't synced properly, the toggle won't be visible for them.
To enable Auto-Collect for a customer, they must originate from QuickBooks Online. Here's what to do:
Create or ensure the customer exists in QuickBooks Online.
Allow time for the customer data to sync. You may need to refresh your Helcim account, or perform a manual sync if needed, to see the updated list.
Once the customer appears in your Helcim Customers list and is linked to QuickBooks, the Auto Collect toggle should be visible.
If you find you have duplicate customer entries (one created in Helcim and one from QuickBooks), you might want to consider merging them to keep your records tidy.
You can find more information on how to merge customers in our article: Add, edit, and merge customer profiles
What if a payment fails?
If an Auto-Collect payment fails, our system will automatically retry it once a day for 5 consecutive days. If the payment is still unsuccessful after these attempts, its status will be marked as Failed.
You can choose to retry the payment manually or reach out to your client directly to resolve the issue.
Will this work for partial payments?
Not currently. Auto-Collect is designed to process the full invoice amount.
How do I turn off Auto-collect?
You can turn off Auto-collect by following the same steps in reverse.
First, go to All Tools > Accounting Center > QuickBooks Online settings
Toggle Auto Collect to OFF.
Remember that once you turn off the toggle, invoice payments for those customers will no longer be automated.