Alright, you've connected Helcim and Xero – now let's put that integration to work! This article will guide you through the everyday tasks of using the integration to manage your payments and accounting.
We'll cover everything from accepting payments on your Xero invoices to reconciling those payouts and handling refunds. Plus, we'll explore how ACH payments fit into the picture.
In this article
Accepting payments on Xero invoices
Once the integration is set up, you can accept payments directly from your Xero invoices.
Create and send an invoice to your customers from your selected branding theme in Xero.
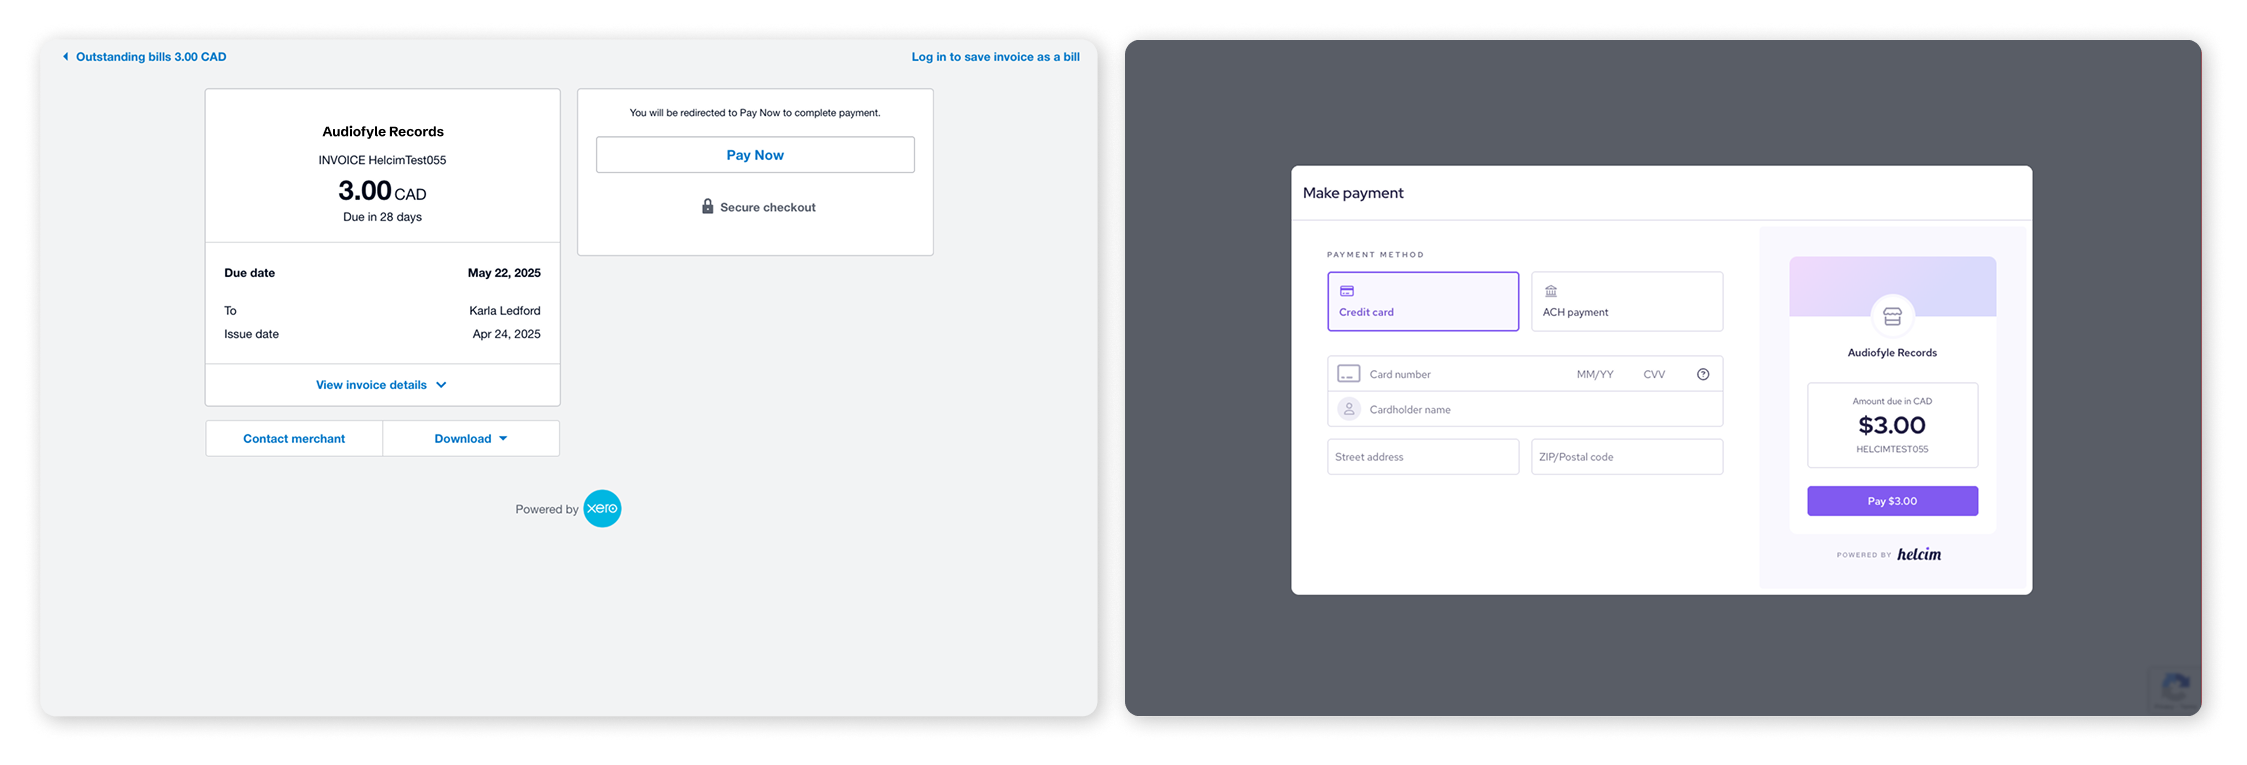
Your customers will see a Pay Now button on the invoice.
Customers can click this button, enter their payment information, and hit Pay to pay the invoice.
When the invoice is paid, the Xero contact is saved as a customer in Helcim, and their payment information is securely stored. This makes it easy for repeat customers to pay future invoices with just one click.
Understanding the Helcim clearing account
Xero automatically creates a clearing account to help you track your Helcim transactions.
You can find it in the bank accounts section of your Xero dashboard.
This account shows payments received, processing fees, and bank transfers for invoices paid through Helcim.
Transactions in the clearing account are automatically reconciled, so no additional action is required from you.
The Batch ID is used as the payment reference, making it easy to match payments, fees, and transfers to specific batches.
.png)
Reconciling payouts with Xero
When Helcim sends you a payout, it will appear as a bank transfer in the Account transactions tab of your Helcim Clearing Account in Xero. These transactions are marked as "reconciled".
To reconcile the payout in your bank account:
Select Accounting, then Bank accounts.
Select your Helcim clearing account.
Select the Reconcile tab in your bank account.
Find the Helcim deposit from your bank statement that matches the bank transfer in the clearing account.
Select OK to reconcile the transaction.
| For detailed steps on reconciling your bank account in Xero, visit this help center article. |
Processing refunds with Xero
If you need to refund a payment received through the Xero integration, you'll need to take action in both your Helcim and Xero accounts.
Step 1: Process the refund in Helcim
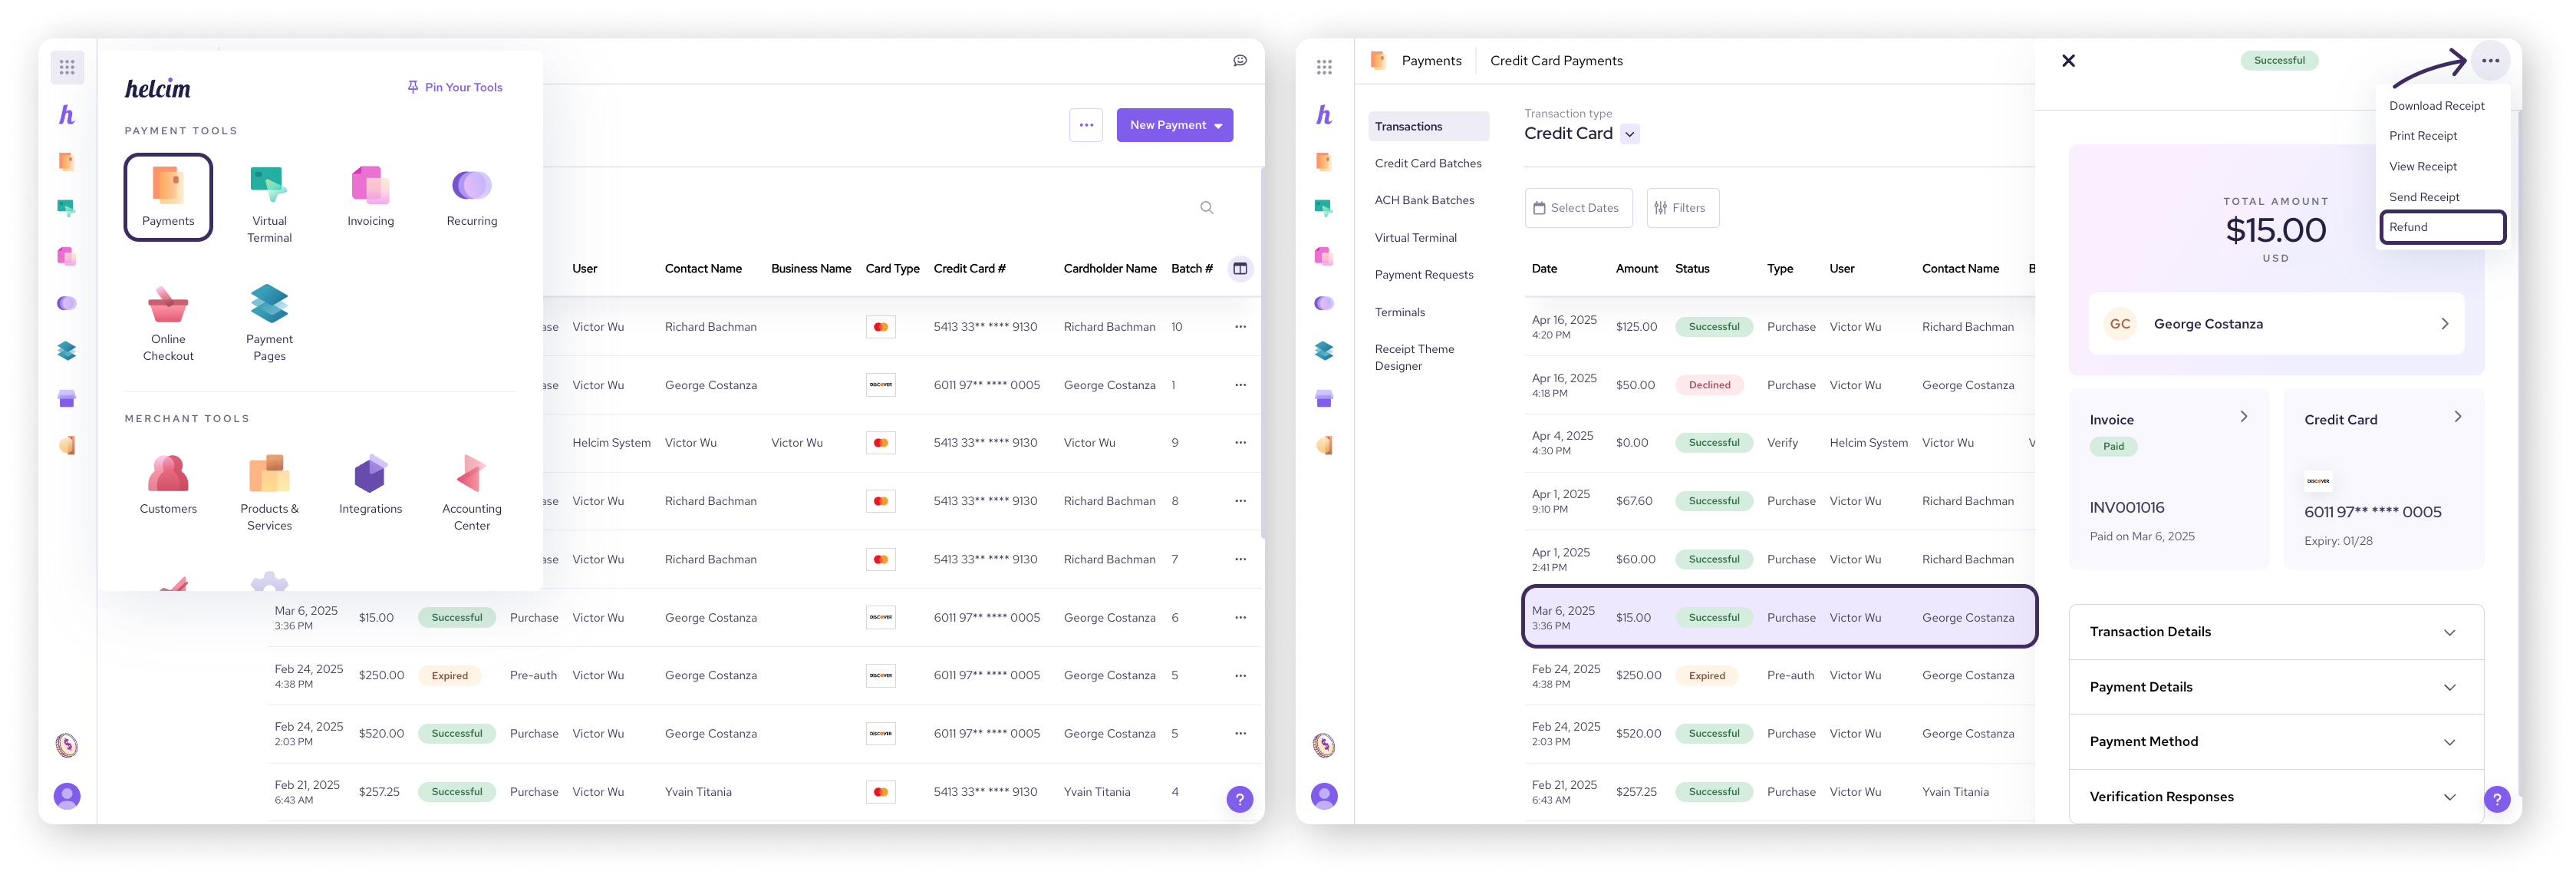
In your Helcim account, go to the Payments section.
Select the transaction you want to refund.
Open the actions menu and choose "Refund".
Step 2: Record the refund in Xero
In Xero, search for the customer you're refunding by clicking the magnifying glass icon in the top right corner and selecting their contact.
Under their contact, click the New dropdown menu in the top left corner and select Sales credit note.
| Credit notes in Xero are documents used to reduce the amount of an invoice, either partially or fully, or to credit clients for refunds. They are essentially negative invoices that adjust the amounts owed by customers or owed to suppliers. |
| If a transaction is reversed or voided, you don’t need to use a credit note to adjust an invoice. You can just delete the reversed payment from the invoice. |
Step 3: Complete the credit note
Enter the refund date, original invoice details, original invoice number, and a description of why the payment is being refunded.
Step 4: Issue a "Cash Refund"
Enter the date of the refund and the account it was paid from. For refunds related to the Helcim integration, select the Helcim clearing account.
Step 5: Reconcile the credit note
Once you've paid the credit note, it shows up in the account transactions tab of your bank account and can be reconciled. The refund also appears as a "Spent" transaction in your Helcim clearing account.
When you receive your next payout from Helcim, the refund amount and any related fees will be deducted.
You can then reconcile this payout with the corresponding bank transfer.
When to process refunds
To ensure reconciliation, it's best to process refunds on days when your total payments are greater than the refund amount.
| Here's why: If a refund exceeds your total payments for a batch, the result could be a negative deposit amount. In some cases, this could lead to your bank account being debited. |
Unfortunately, the Helcim Xero integration can't process negative deposit amounts in your clearing account, so they won't be recorded.
Handling ACH payments with Xero
When you enable ACH payments for your Xero integration, here's what you and your customers need to know:
Customer experience: Customers will see an ACH payment option at checkout. First-time ACH users must agree to a Pre-authorized Debit Agreement (PAD) or ACH Mandate (depending on location). You can access these in the customer's Helcim profile.
Clearing account visibility: ACH payments appear in your Xero clearing account right away, but the payment details and fees might take up to five business days to show.
Tracking payments: You can monitor all ACH transactions in the ACH transaction list in your Helcim account.
Important considerations: Be prepared for potential returns or chargebacks on ACH payments. Xero provides guidance on managing these situations in their support article.
| Note: Helcim Fee Saver doesn't currently work with the Xero integration. |
Using other Helcim payment tools with Xero
Helcim's Xero integration is designed specifically for payments received through Xero invoices. If you also use other Helcim payment tools, such as the Virtual Terminal or Payment Pages, here are the key things to keep in mind for accurate accounting.
Clearing account contents
Your Helcim clearing account in Xero will include all Helcim transactions, not just those from your Xero integration.
| Example: If you process a $100 invoice through Xero and also make a $50 Virtual Terminal sale, your Helcim clearing account will show a total of $150. |
Reconciliation challenges
Because the clearing account combines all Helcim transactions, the total payments shown may not match the payouts and fees specifically related to your Xero invoices.
| Example: Let's say your Helcim payout for a day is $450, but only $300 of that came from Xero invoices. Your clearing account will show the full $450, making it harder to reconcile with your Xero records. |
How to reconcile transactions in Xero
To accurately reconcile transactions from other Helcim tools within Xero, you'll need to manually create corresponding invoices and payments in Xero.
Click on the tiles below to see how.
Create an invoice
You have two options for creating invoices in Xero for transactions processed through Helcim but outside the Xero integration:
Create an individual invoice for each transaction. Enter the same details as the transaction in Helcim, including applicable taxes.
Create a single invoice for the total transaction amount for the batch (excluding Xero integration transactions), including applicable taxes.
The best option depends on your accounting processes. Consider consulting with an accountant to determine the most suitable approach for your business.
Import an invoice
You can also import Helcim invoices into Xero:
Step 1: Export invoices from Helcim
Go to the Invoicing section of your Helcim account.
Select the Import/Export tab.
Choose Export as a CSV file.
Step 2: Import into Xero
Download the Xero invoice template CSV file.
Export your invoices from Helcim as a comma-separated list.
Using a spreadsheet program like Excel or Google Sheets, copy and paste the invoice data from the exported file into the Xero template. Ensure the copied data matches the column headings in the Xero template.
Import the updated CSV file into Xero.
Create payments
Once the invoices are in Xero, you can create the corresponding payments. It's crucial to ensure these payments are visible in your Helcim clearing account so that the account balances correctly with bank transfers and fees.
Follow these steps to create payments:
Open the newly created invoice (either individual or batch).
Find the receive a payment section at the bottom.
Enter the payment amount and date.
Select your Helcim clearing account from the Paid to dropdown menu.
Click Add Payment.
Go to your Helcim Clearing account in the Bank Account section.
Confirm the payment is recorded in the Account transactions tab.
Reconcile the new payment if desired.
By creating these payments for transactions processed outside the Xero integration, your clearing account will accurately reflect payouts and fees from your Helcim account.
Next steps
To further enhance your Xero integration experience, check out our article on automating payments with Xero Auto-Collect.
FAQ
Why don't transactions from other Helcim tools show up in my Xero clearing account as invoices?
The Helcim Xero integration is designed to specifically track invoices created from Xero. While the payments from other Helcim tools will appear in the clearing account, the corresponding invoices won't be there unless you create them in Xero.
How do I handle refunds for Xero integration payments?
Refunds require actions in both Helcim and Xero. You'll need to process the refund in your Helcim account and then record the refund as a sales credit note in Xero. We've outlined the detailed steps in the "Processing refunds with Xero" section of this article.
Can I accept ACH payments through the Xero integration?
Yes, if you've enabled ACH payments in your integration settings, your customers can use ACH to pay Xero invoices.
Keep in mind that there are specific requirements for customers using ACH, and the processing time for ACH payments is slightly different. See the "Handling ACH payments with Xero" section for details.