This direct integration connects Helcim to your QuickBooks Online account at the back-end level. When you turn this on, Helcim automatically adds a secure payment link to every invoice you send from QuickBooks.
In this article, we'll walk you through the benefits of integrating Helcim with QuickBooks Online and provide step-by-step instructions on how to connect the two. We'll also share some tips on how to use the integration and some troubleshooting advice.
Is this the right connection for you?
Use the Direct Integration if: You want to email invoices to customers for them to pay online or use Auto-Collect.
Use the Helcim Payment Extension instead if: You want to use a Helcim Card Reader, manually key-in credit card details, or use Fee Saver (Surcharging) to pass on processing costs.
Video
Benefits of QuickBooks Online integration
Integrating Helcim with QuickBooks Online offers several key advantages:
Automatic syncing of transactions: No more manual data entry! Your Helcim transactions will automatically sync to QuickBooks Online, saving you time and effort.
Automated invoice payments: Use Auto-Collect to automatically process payments for your QuickBooks Online invoices, ensuring timely collections without manual follow-up.
Simplified reconciliation: Reconciling your accounts becomes much easier when your transaction data is automatically synced. This reduces the risk of errors and ensures your financial records are accurate.
Improved accuracy of financial records: By eliminating manual data entry, you'll reduce the chance of human error, leading to more accurate financial records.
Time savings: Automating your accounting processes frees up your time to focus on other important aspects of your business.
Connecting to QuickBooks Online
Before you connect
Before you connect, please note
To prevent issues with importing invoices, make sure the invoice numbers in your QuickBooks Online account are different from any invoice numbers already in your Helcim account.
When an invoice with a customer attached is imported from QuickBooks, a matching customer profile will be created in your Helcim account. If this duplicates an existing customer, you can merge them (see our note below on the limitations of this).
The integration only syncs invoices from QuickBooksOnline, and not in-person payments made with the QuickBooks GoPayment app.
Activate the QuickBooks Online integration
Here’s how to activate the QuickBooks Online integration with Helcim.
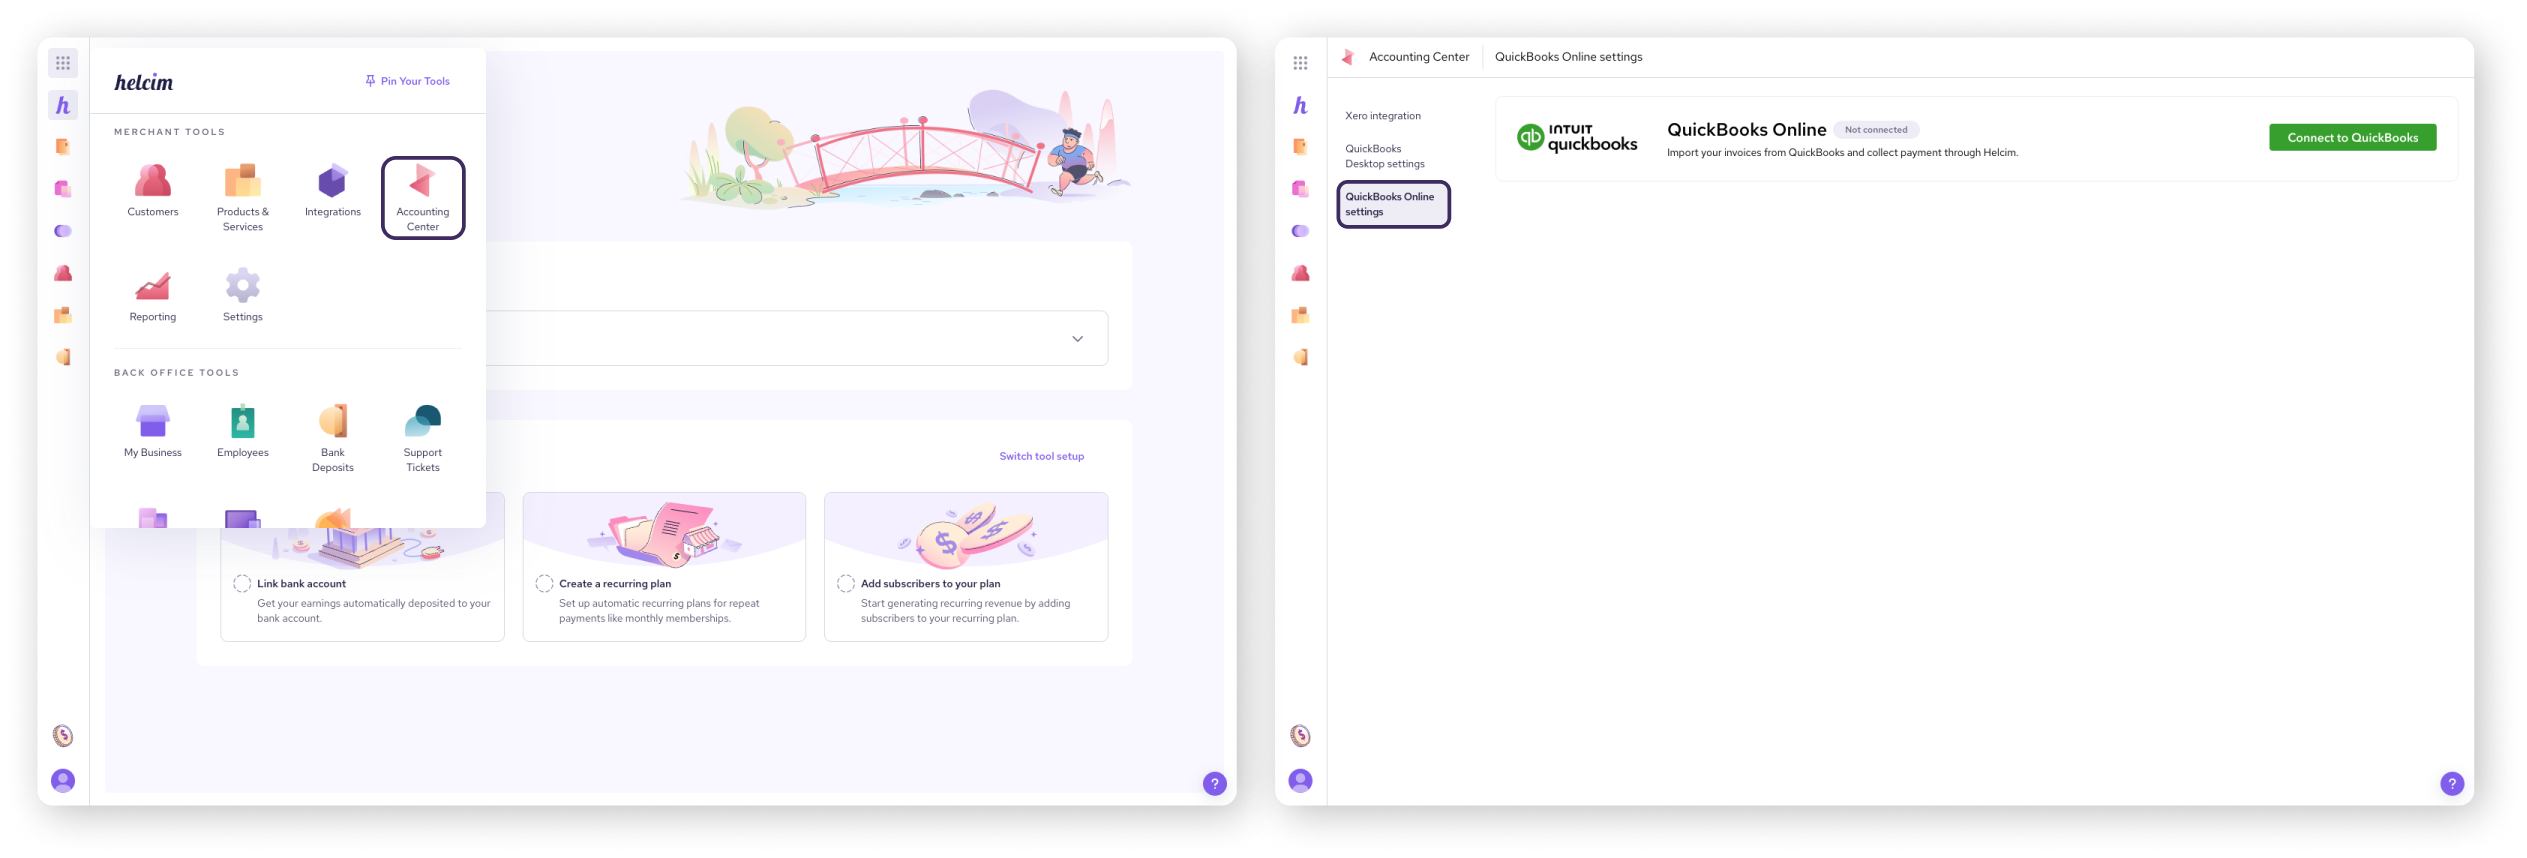
Login to your Helcim account.
Click on All Tools from the top left corner of your dashboard, and navigate to Accounting Center under Merchant Tools.
Select QuickBooks Online settings.
Select Connect to QuickBooks Online.
Sign in to your QuickBooks Online account and select the company you want to connect.
Note: Each Helcim account can only be linked to a single QuickBooks Online company, and vice versa.
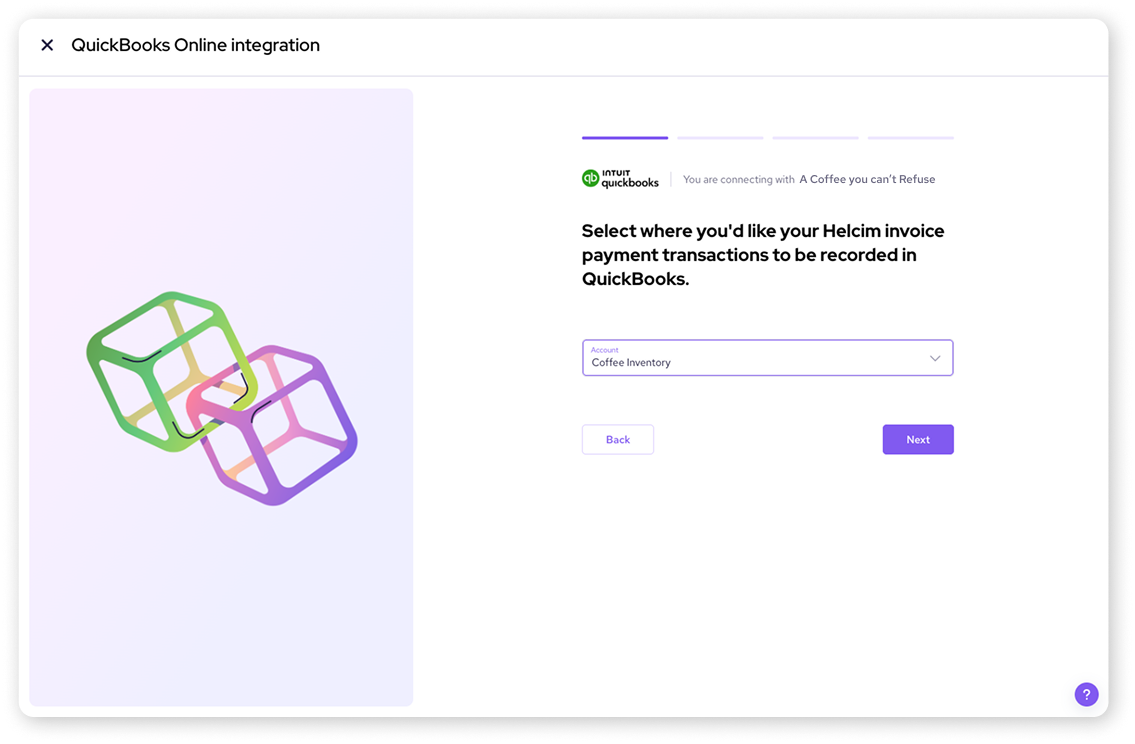
Complete the integration onboarding wizard
Next, complete the integration onboarding wizard, where you'll configure the following.
Select account
Choose the account from your QuickBooks Online chart of accounts where your Helcim transactions will be recorded. This is separate from the bank account you use for Helcim deposits.
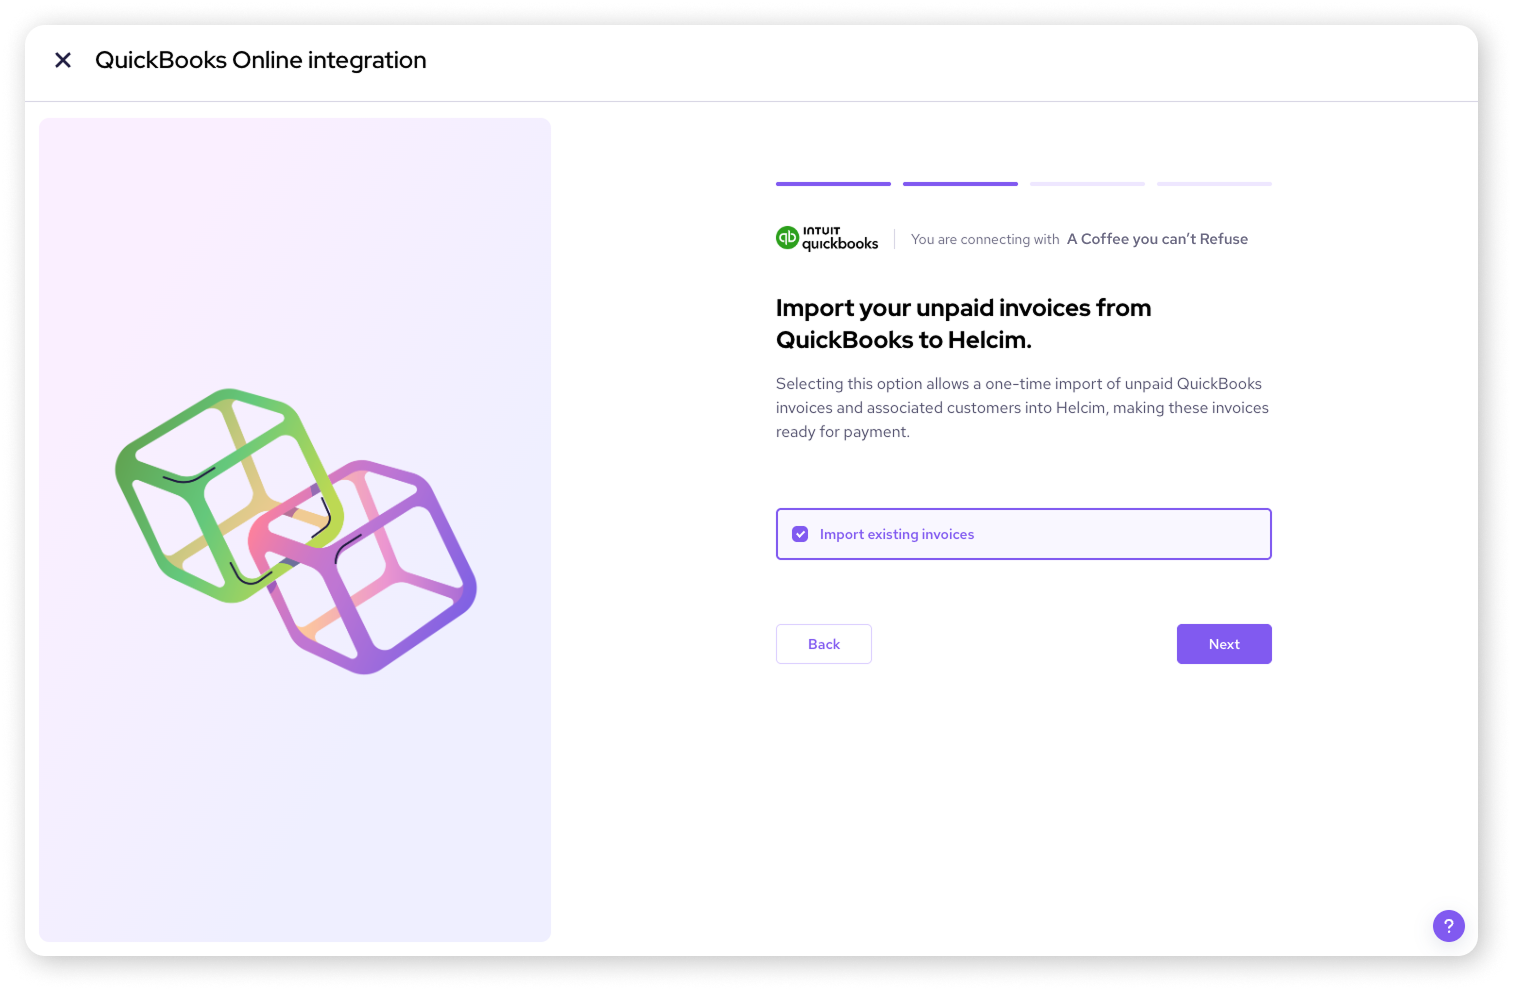
Import unpaid invoices
Optionally import any unpaid invoices from QuickBooks Online. This will also import the associated customer information into Helcim.
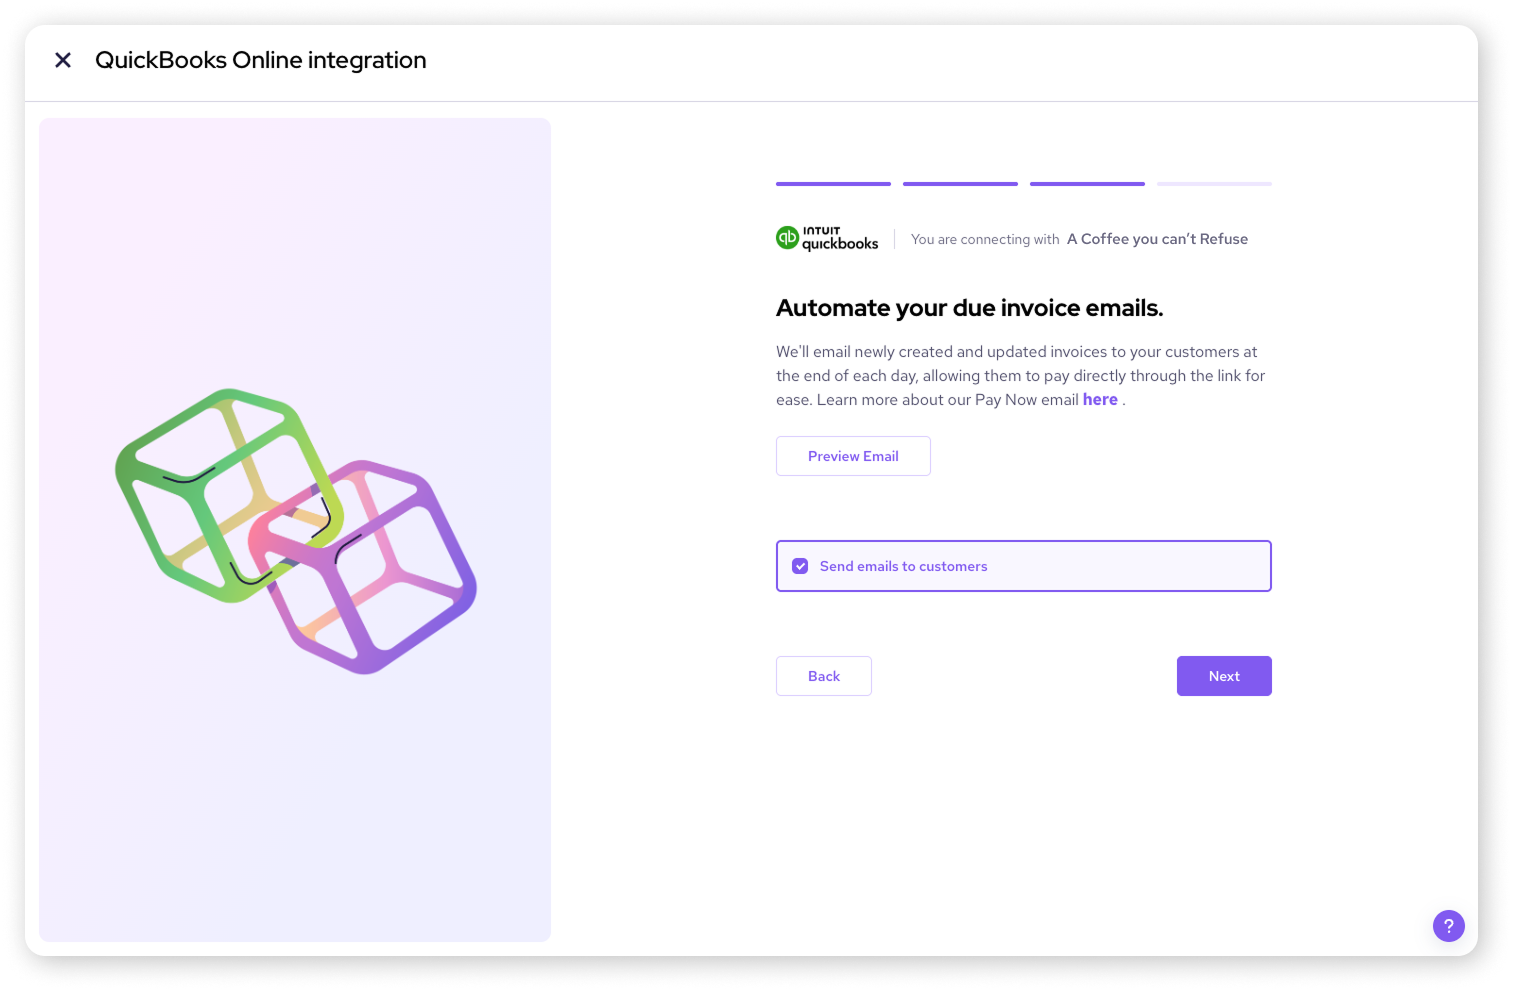
Automate emails to your customers
Choose whether to automatically send invoices to customers at the end of the day for them to pay using a Pay Now button.
A note on merging customers
As invoices are imported from QuickBooks to Helcim, a duplicate customer profile may be created in your Helcim account. In this case, you can merge the two profiles.
| When doing this, make sure the primary customer in the merge is the one imported from QuickBooks. The secondary customer should be the one that originated in your Helcim account. |
You can make sure of this by making note of the customer code for the Helcim customer profile before importing the invoice.
Using your integration
Once you've connected Helcim and QuickBooks Online, here's how you can use the integration to streamline your workflow:
Create your invoices in QuickBooks Online as you normally would.
Invoices you create or update in QuickBooks Online will be automatically imported and updated in Helcim. This keeps your invoice information consistent across both platforms.
Any customers you create in QuickBooks Online will also automatically be synced and created in your Helcim account.
Collect payments on your invoices through Helcim. You can use Helcim's various payment tools, such as:
Invoicing: Send invoices to customers with a secure link for online payment.
Virtual Terminal: Process payments manually on a mobile device or computer.
Other Helcim integrations: Explore other Helcim integrations to accept payments in different ways.
When a customer pays an invoice through Helcim, the payment will be recorded in QuickBooks Online and linked to the corresponding invoice. This simplifies your reconciliation process and keeps your accounting records accurate.
Automate your invoice collections
Once connected, you can set up Auto-Collect to automatically process payments for your QuickBooks Online invoices on their due dates.
| Learn more about how to get this powerful feature set up in our article: Automate invoice payments with QuickBooks Online Auto-Collect. |
Next steps
Ready to simplify your accounting? Try connecting Helcim with QuickBooks Online today!
For additional help with QuickBooks Online, check out the QuickBooks Support website.
If you have any questions or need assistance with the Helcim integration, get in touch with our support team.
If you’d like to connect via the payment extension, navigate here.
FAQ
Can I use Helcim Fee Saver with QuickBooks Online?
No, Fee Saver is not available for online invoice payments via the Direct Integration. To use surcharging, we recommend using the Payment Extension for transactions processed through your Smart Terminal or the Card Reader.
Can I use a Card Reader with this integration?
No. The QuickBooks Online Direct Integration is designed for online and automated payments. To use a Helcim Card Reader with QuickBooks, you must use and install the Helcim Payment Extension.
Does this support ACH/Bank Transfers?
Yes. This is the recommended way to accept ACH payments for your QuickBooks invoices.
What happens if I edit an invoice in QuickBooks?
Helcim will detect the change and update the payment link and balance due automatically.
Can I use both direct integration and payment extension for my QuickBooks Online?
While you can have both the Direct Integration and the Payment Extension active, you must be careful with how you process payments to avoid duplicate entries in QuickBooks.
The direct integration automatically "listens" for payments and marks invoices as paid.
The payment extension manually pushes a "Payment" entry into QuickBooks when you click 'Process' in the browser.
How do I avoid duplication when using both the direct integration and payment extension with QuickBooks Online?
If you use the Payment Extension to take an in-person payment for a QuickBooks invoice, we recommend not manually sync that same transaction through the Direct Integration settings later. The Extension performs the "Mark as Paid" action instantly.