| You are currently viewing instructions for the 1st generation model (white) of the Helcim Smart Terminal. If you have the 2nd generation Smart Terminal (black), please click here for the relevant article. |
.png)
The Helcim Smart Terminal is designed to be an all-in-one solution for your payment processing needs. This guide will walk you through the initial setup process, from unboxing your new terminal to configuring its basic settings, ensuring you can start accepting payments quickly and easily.
In this article
Unboxing your Helcim Smart Terminal (Gen 1)
When you receive your Helcim Smart Terminal, the box will contain:
Helcim Smart Terminal: This is the all-in-one device that will process your payments.
Barrel Charger: Use this cord to connect the Smart Terminal to a wall outlet for charging.
Charging Cable (USB-C to USB-A): This is a supplementary charging cable you can use for USB charging.
Receipt paper rolls: Two rolls of receipt paper are included so you can start printing customer receipts right away.
QR Code: Scan this code to access additional information and support resources for your Smart Terminal.
.png)
Setting up your Helcim Smart Terminal (Gen 1)
Before you start taking payments with the terminal, there’s a few steps you’ll need to complete to set it up.
Charge the terminal
Before you begin using your Smart Terminal, it's important to ensure it's fully charged.
Use the included barrel charger to connect the Smart Terminal to a wall outlet.
Allow approximately 4 hours for the terminal to reach a full charge.
For more convenient charging, consider purchasing the optional charging cradle for Smart Terminal, which keeps your device powered up and ready for transactions.
| A fully charged Helcim Smart Terminal can last up to 8 hours with typical printer usage. |
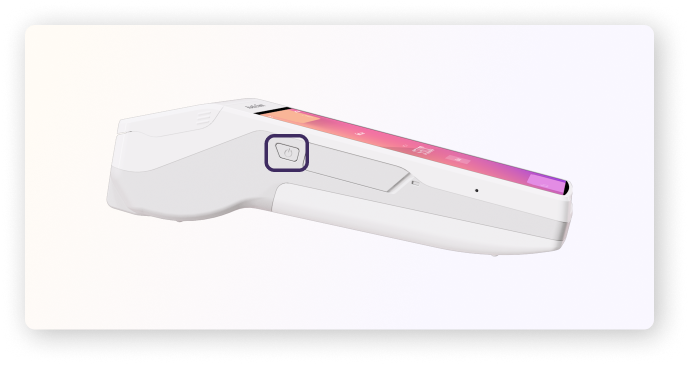
Power on your Helcim Smart Terminal
To turn on your Helcim Smart Terminal:
Press the power button located on the left-hand side of the device.
The terminal will display the "Get Started" screen.
Connect to a network and set your time zone
To ensure your Helcim Smart Terminal can connect to the internet for updates and process transactions, you'll need to connect it to a network and set the time zone:
Connecting to Wi-Fi or 4G/LTE:
When you turn on the Helcim Smart Terminal for the first time, you will be prompted to set up your network connection.
Select your preferred Wi-Fi network from the list and enter your network password, then press Connect.
If your Smart Terminal is equipped with a 4G/LTE SIM card, follow these steps to activate it.
Setting your time zone:
Scroll through the list and select your preferred time zone for the device.
| The time zone selected on the Smart Terminal only applies to the device itself and does not change the time zone settings of your Helcim account. |
Configure your POS software
Now that your Smart Terminal is connected to the internet, you can complete the initial setup:
Helcim app updates: The Smart Terminal will automatically search for and install the latest version of the Helcim app. This ensures you have access to the most up-to-date features and improvements. After the update is installed, the device will automatically reboot.
Logging into your Helcim account for the first time: After the device reboots, you'll see a welcome page.
Select "Continue" to log in to your Helcim account. You'll need your Helcim account email and password.
If you haven't yet signed up for a Helcim account, you can do so on our sign-up page on your computer or mobile device.
For faster login in the future, you can set up a PIN for each user on your team. Click here for instructions on setting up a PIN login.
Pairing your terminal with a desktop computer
If you run your business from a front desk or office, you might prefer building your cart and managing orders on a computer screen.
You can pair your Smart Terminal to the Helcim Workstation App (available on Windows and macOS). In this configuration, your computer acts as the controller for the transaction, while the Smart Terminal functions as the customer-facing card reader.
How it works
Instead of Bluetooth, this connection uses the cloud. As long as your computer and your Smart Terminal are both online, they can pair wirelessly.
| To learn exactly how to set this up, please view our guide: Connecting the Smart Terminal to your desktop computer. |
Configuring hardware settings
The Helcim Smart Terminal has several hardware-specific settings that you can customize:
There are two ways to access these settings:
When turning on or rebooting the device: On the welcome screen, select "Settings" under "Continue."
From within the Helcim POS App: Select the three lines in the bottom right corner, then select "Settings" and choose "Hardware Settings."
The following hardware settings are available:
Network: Change the Wi-Fi network your Smart Terminal is connected to.
Device Info: View device information, firmware version, and model number. You can also reinstall the Helcim app from here. Note that reinstalling the app will not affect any custom settings in your Helcim account.
Display: Adjust the screen brightness and configure sleep mode.
Time Zone: Change your device's time zone.
Support: View contact information for the Helcim support team.
Next steps
Now that you've set up your Helcim Smart Terminal, you're ready to start processing payments!
If you are using the device on its own, check out our guide on taking a payment with the terminal.
If you want to control the device from your desktop computer, check out this article first.
FAQ
What are some general troubleshooting tips for the Smart Terminal?
Before troubleshooting specific issues, please ensure the following:
The Helcim Smart Terminal has sufficient battery life.
The device has the latest version of the Helcim app.
The device's date and time are accurate.
Your Helcim account is active.
My Smart Terminal is not connecting to the internet. What should I do?
If you're experiencing connectivity issues:
Toggle the device's Wi-Fi or 4G/LTE connection off and on to check connectivity.
Restart your router and the Smart Terminal, then try connecting again.
Check your current Wi-Fi speed. If it's weak, you may need to switch to another network.
Reboot the Helcim Smart Terminal.
My Smart Terminal printer is not working. What should I do?
Ensure the printer latch is closed and the receipt paper is loaded correctly.
Check that your device has the latest version of the Helcim app.
Reboot the Helcim Smart Terminal.