Alright, let's talk shop! Keeping your products organized in your Helcim POS is key to a smooth and speedy checkout.
Whether you're adding new items, arranging your inventory, or tweaking product details, we've got you covered.
In this article
Adding existing products to the Helcim POS
Your existing products can be added to the POS in two ways: individually, or in bulk.
To add products individually, follow the steps in the ‘Creating new products in the POS’ section below
To add products in bulk, you can use the product import feature in your Helcim account. This is a great way to quickly add a large number of products.
For more information on adding products in bulk, please visit our article on importing and exporting products.
| If you haven't added any products yet, no sweat! You can still use the POS by entering the payment amount directly in the Numpad view. |
Creating new products in the Helcim POS
Need to add a product on the fly? You can do it right within the Helcim POS!
Select Items at the top of the screen
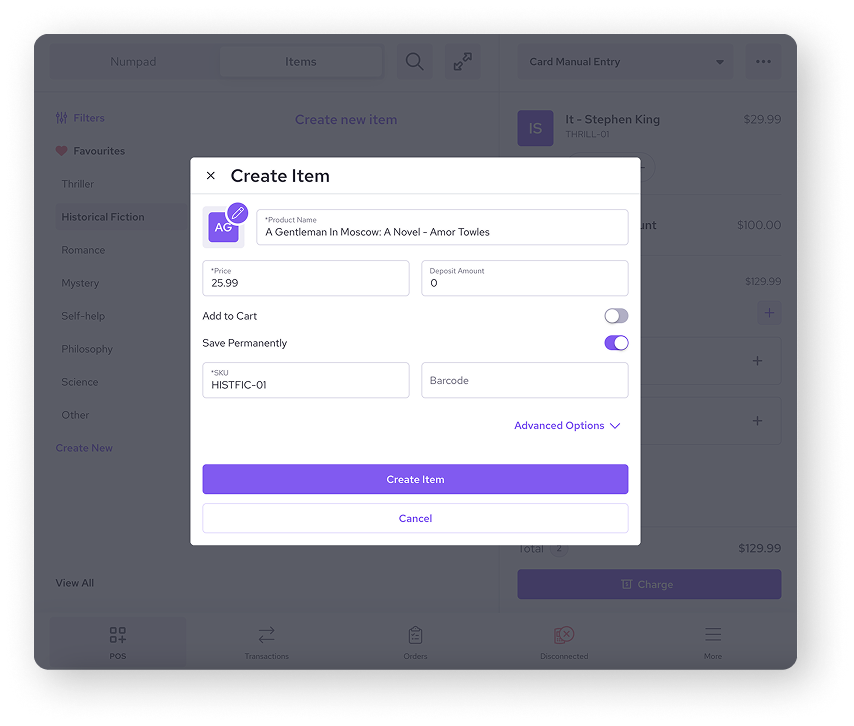
At the bottom of each product category, collection, or brand, select Create new item.
Here, you can add the thumbnail, product name, SKU number, and price.
You can also choose to add it to the cart, or to save it permanently to your product catalog.
Select Advanced Options to file the product into a specific category, collection, or brand, and to adjust the tax settings for it.
When you’re done, select Create Item.
Organizing and sorting products in the Helcim POS
Keep your product display neat and tidy by organizing and sorting your products.
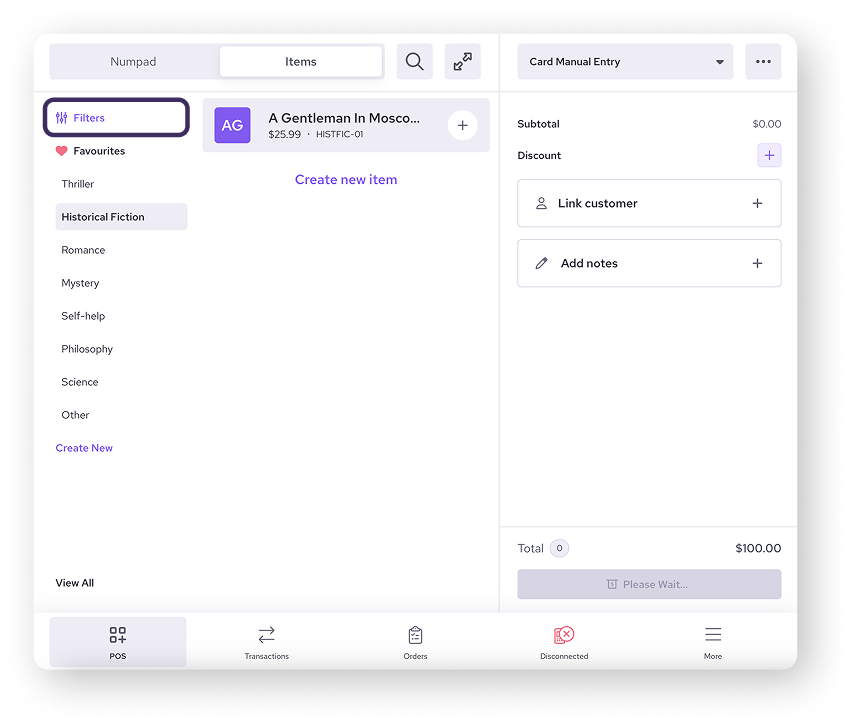
By default, your products are displayed by Categories.
You can adjust this by clicking on Filters, where a drop-down menu will give you different display and sorting options.
Products that aren't assigned to a category will be listed under Other.
| Need to find a product fast? Use the magnifying glass in the top menu bar to search for it. |
Create a new category
You can create new categories directly in the POS by:
Selecting Create New under the categories menu
Selecting a parent category (optional)
Entering a category name
Setting the availability of the category
Hitting Create
Adding products to the favorites list
Got some hot-ticket items you want to access quickly? Add them to your favorites list.
The favorites list in the POS is a super-handy way to quickly access popular items or promotional items that customers buy frequently.
Clicking on Favorites from the menu on the left-hand side of your screen will show the products currently on the list.
To add a new item to the list, select the item. In the pop-up, select the heart icon in the top right-hand corner.
You can remove products from the list by deselecting the heart icon.
.png)
Next steps
Now that you’ve added products to your Helcim POS, you can add them to the cart more easily when processing sales for customers.
| For a walk-through of how to take a payment using the Helcim POS app, visit this article. |
Here are some other articles to learn how to further optimize your POS experience.
FAQ & Troubleshooting
Do the products I add through the Helcim POS app sync with my Helcim web dashboard?
Yes! Any items added directly through the Helcim POS app will show up in your Products list in the web dashboard.
If you don’t see it, try refreshing the page and looking again.
The shopping cart is in the way in the desktop app. How can I collapse it?
You can collapse the cart view in the desktop app by:
Click on the double arrows to collapse the cart.
Your cart will collapse to the side of your screen, giving you a larger product view.
You can keep adding items to the cart while it's collapsed.
To return to the full cart view, just click the arrows again.
You can toggle back and forth between these views as needed.
Help! I don’t see a product from my catalog in the Items view.
There’s a chance you may not have made your product available for retail yet.
In your Helcim POS app, select More.
Select Products & Services.
Select Products, and then the specific product that isn’t showing.
Select Overview.
Scroll down to Availability, and toggle Available Retail on.