Ready to start accepting ACH bank payments? It's a straightforward process to get things set up in your Helcim account. This article will walk you through how to turn on ACH payments, adjust the settings to fit how you use your favorite Helcim tools, and point you to how to get your customer's bank information securely added.
Let's get your ACH payment processing up and running!
In this article
Turning ACH payments on (or off)
By default, ACH payments are enabled for you when you sign up for your Helcim account. However, you can use the steps below to toggle them on or off when needed.
Log in to your Helcim account.
Open the All Tools menu, and then Settings.
Select Payments from the left-side menu
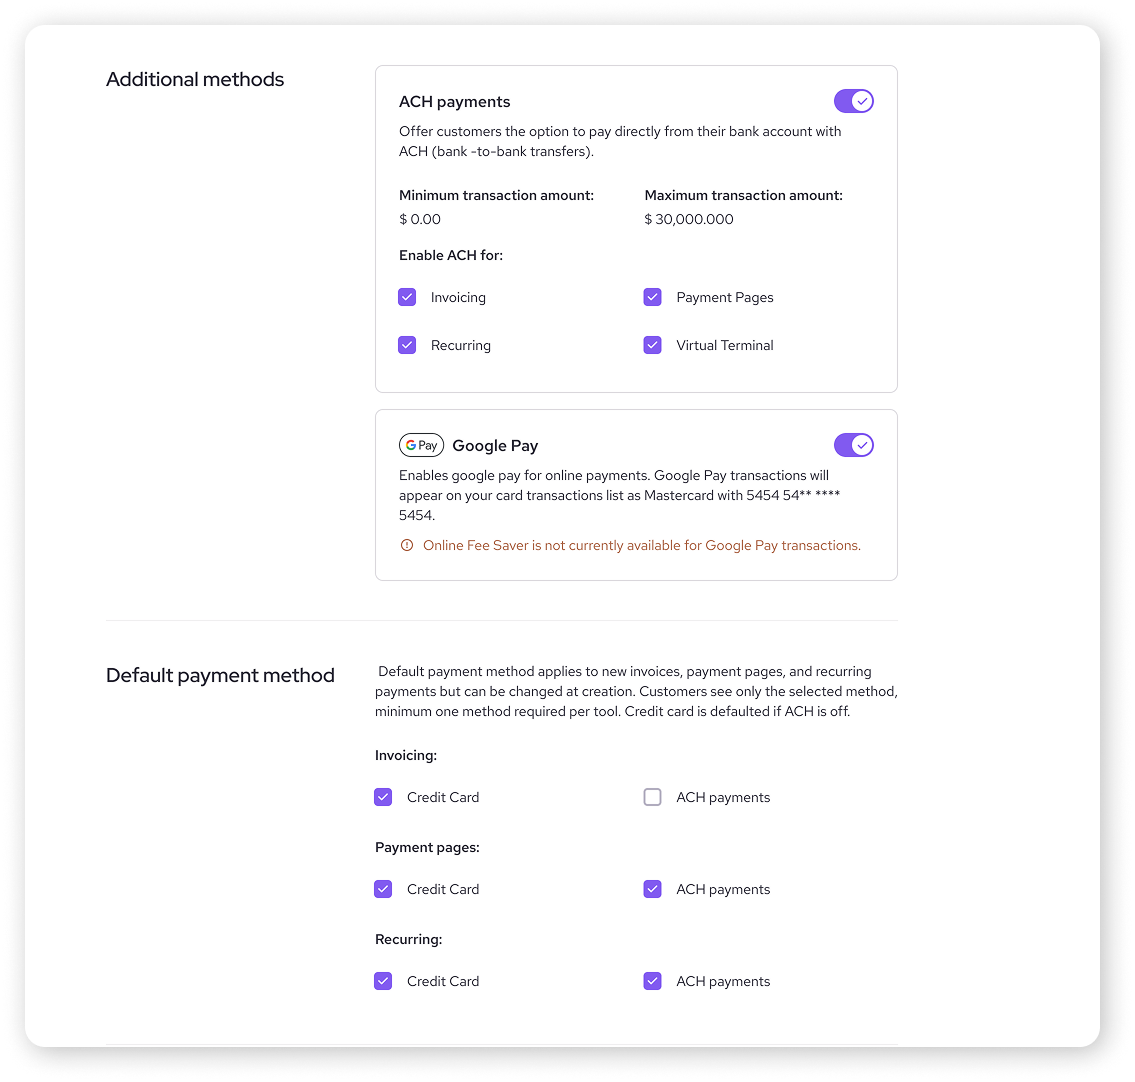
Under Additional methods, you'll see a toggle labeled ACH Payments.
To turn ACH payments on, switch this toggle to the active position.
To turn ACH payments off, switch this toggle off.
.png)
Choosing ACH options for your Helcim tools
Once ACH is enabled, you can decide how it's offered for each of your Helcim payment tools.
Here, you can selectively enable or disable ACH for the following tools:
For some of the tools, you can also use checkboxes to select Credit Card or ACH Payment as the default payment method(s).
| If you have Helcim Fee Saver enabled, you’ll be limited from changing the default payment method for Invoicing and Payment Pages. |
| If you turn the main ACH Payments toggle off, this will disable ACH across all tools, regardless of individual tool settings. You'll need to re-enable it here first before individual tool settings for ACH become active again. |
ACH payments with Helcim Fee Saver
If you have Helcim Fee Saver enabled on your account, the payment method for online payments (like those made through Helcim Invoicing and Payment Pages) will automatically be set to Credit Card or ACH Bank Payment. This gives your customer a choice between the payment methods, and is a requirement when charging convenience fees with Fee Saver.
Adding your customer's bank information
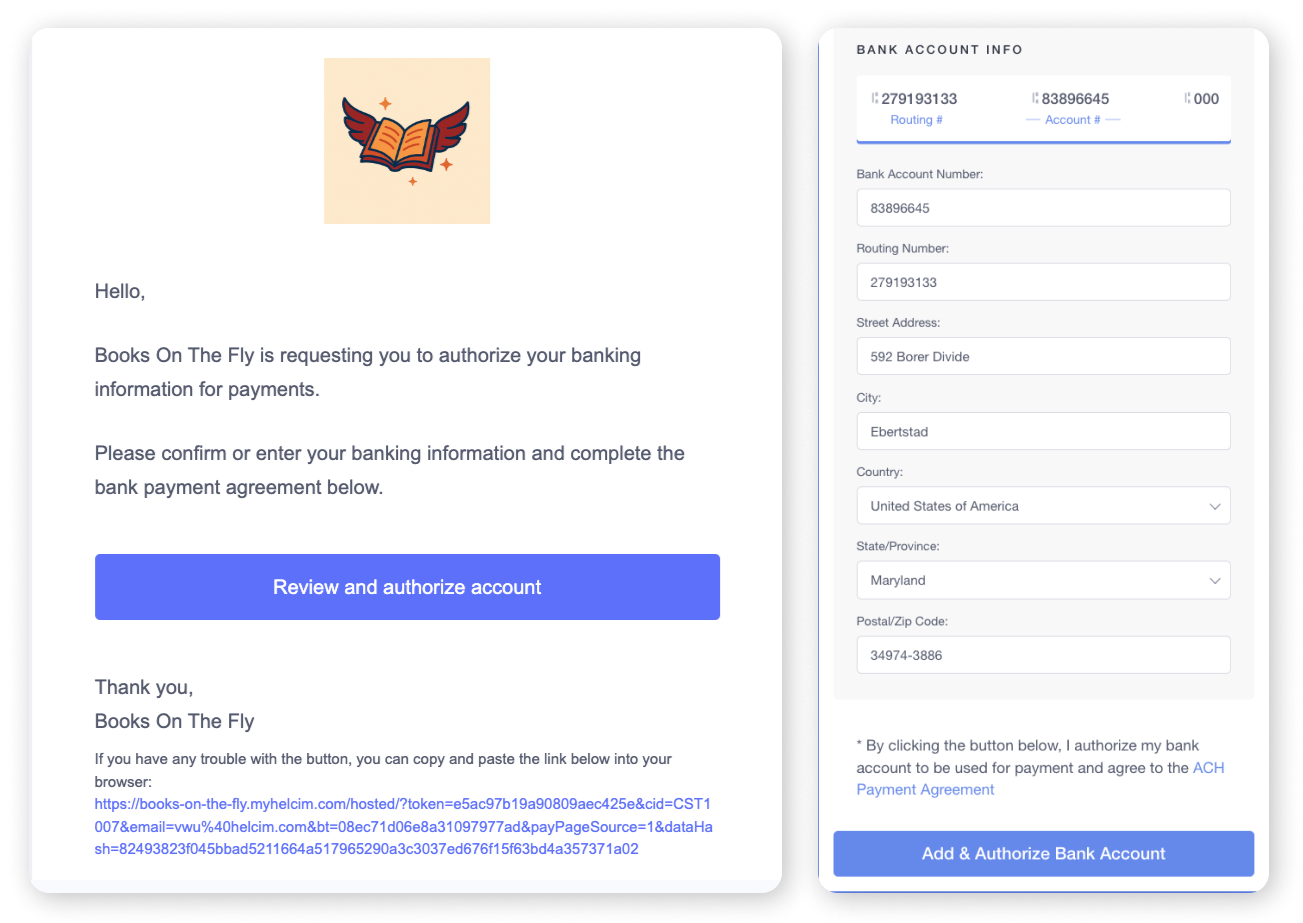
To take ACH payments, you'll need your customer's bank account details and their authorization to debit the account.
For detailed steps on how to securely add a customer's bank account information to their profile, either by entering it yourself (if you have it and their permission) or by sending them a secure request, please see our article: manage customer bank accounts (for ACH/PAD).
Using ACH with your Helcim payment tools
Once ACH is enabled and you have your customer's authorized bank details, here’s a quick overview of how you can use it with various Helcim tools. Remember that the specific payment options available will depend on your settings for each tool.
Online Invoicing | When creating an invoice, you can select ACH (or "Credit Card or ACH Bank Payment") as an accepted payment method. Your customer can then securely enter or confirm their bank details when they pay the invoice online. |
Recurring Invoicing | For recurring invoices, you can set ACH as the payment method. If you have verified bank information on file for the customer, the process is seamless. If not, an authorization request will be sent to the customer first. |
Recurring Payments | When setting up subscription plans, you can include ACH as an accepted payment type. Customers with authorized bank details on file will be billed automatically. |
Virtual Terminal | You can process an ACH payment directly through our Virtual Terminal. For existing customers with bank details on file, you can charge them directly. For new customers, you'll typically send an authorization request first. |
Hosted Payment Pages | Configure your payment pages to accept bank account payments. Customers visiting your page can then choose to pay with ACH by entering their banking information. |
Payment Requests | When sending a payment request, you can allow customers to pay with ACH. They'll receive the request and can submit their bank details and authorization to complete the payment. |
Next steps
Now that you've enabled ACH payments and understand how to offer them through your Helcim tools:
Review your ACH Payment Settings to ensure they match your business preferences for each tool.
Familiarize yourself with the process of adding a bank account to a customer profile, if you haven't already.
| Ready to learn about when your ACH funds will arrive? Read ACH settlement times and batch settings. |
FAQs
If I disable ACH payments, what happens to existing recurring ACH setups?
Disabling ACH payments account-wide will stop new ACH transactions, including those scheduled for recurring payments. You would likely need to arrange an alternative payment method with your customers or re-enable ACH.
Can I change my ACH settings for individual tools at any time?
Yes, you can do this in two places.
You can adjust the default payment method (Credit Card, ACH, or both) for individual tools in the ACH Payment Settings page,
Or you can adjust which payment method you want to accept in the specific tool (such as on an invoice).
Just remember that the main Enable ACH Payments toggle needs to be on for ACH to be an available payment option for individual tools.
| If you set the default payment method for invoicing as ACH only, the customer will see an error if you offer credit card as a payment option on an individual invoice. |
What does my customer see when they need to authorize an ACH payment?
Your customer will receive an email with a link to a secure Helcim-hosted page. Here, they can enter or confirm their bank account details and formally agree to the terms of the pre-authorized debit.